Create a Scheduling Rule - Notifications Tab
Create a Scheduling Rule - Notifications Tab
This section contains a guide on the Notifications tab of the Schedule Pipeline dialogue.
In the Notification tab of the Schedule Pipeline dialogue you can set the options for notifications sent on scheduled pipeline runs.
Note
You can also set the default format of the report about scheduled pipeline execution in Settings section on the Scheduler Notifications tab.
These notifications settings will apply to all scheduling rules.
If you want to change these settings for a particular pipeline you need to uncheck Use default notification settingsin the Notifications tab of a particular scheduling rule.
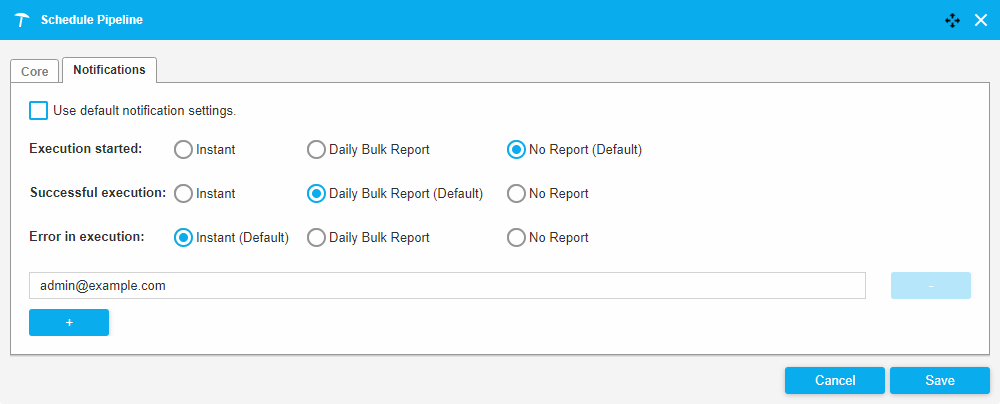 |
You can then specify the format of the notification for a successful execution and an error execution.
There are 3 types of notifications:
Instant (default for an error in the execution): you will be informed instantly after the pipeline is executed with a new email for every executed pipeline.
Daily bulk report (default for a successful execution): containing reports about executed pipelines in a given time period (day).
No report: you will not be informed at all.
The email field is mandatory. The email field is initially prefilled by the user email from the Settings section. The user can change this email or add more emails for notifications by clicking '+'.
You can remove unnecessary email information by the "-" button.
If the scheduled pipeline finishes with an error, the owner of the rule is notified as described in a Notification tab, and the pipeline will be run in the given period again.
Note
If the pipeline is scheduled after another pipeline, and that pipeline finishes with an error, the pipeline will not be run.
When the pipeline is scheduled after another pipeline, typically it depends on its output. In case of an error there is no output or it is faulty, so the scheduled pipeline should not be run.
After specifying all of the settings in the Schedule Pipeline dialogue, click Save to confirm your changes. Your new scheduling rule will be displayed in the Scheduler section.