User Administration

Abstract

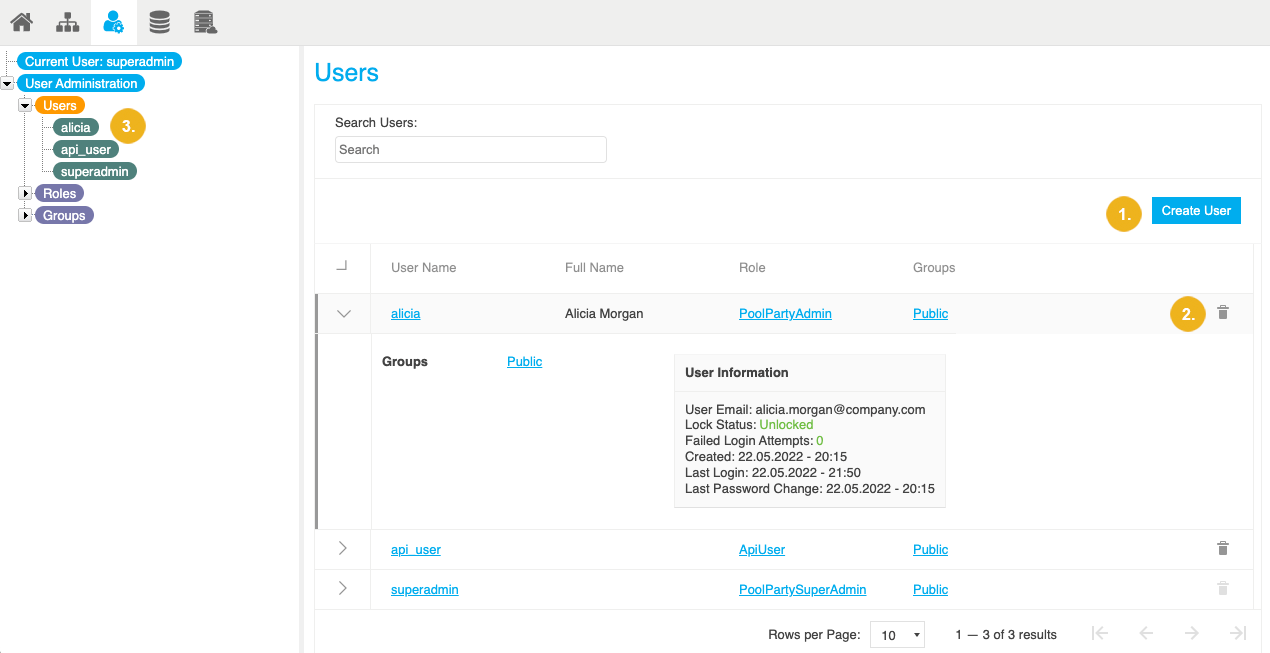
When you select the Users node in the PoolParty User Management, you can see a list of users together with their full names, roles and groups.

As a PoolParty SuperAdmin, you can administer other PoolParty users.

Clicking the Users node in the User Administration tree, in the Details View on the right you find a table listing all users defined on that PoolParty server.

The following information is displayed:

From here, you can do the following:

869---users-node.png

Create a New User

Abstract

As a PoolPartySuperAdmin, you can add new PoolParty users. Follow this step-by-step guide, which will lead you through the procedure.

Users in the PoolPartySuperAdmin role can add new PoolParty users. For more information on the PoolPartySuperAdmin role, see User Roles in PoolParty.

  1. Open the User Management using the icon in the toolbar.

  2. Select the Users node in the User Administration tree on the left.

  3. Select Create User.

    Create-user.png

    The Create User dialogue opens.

  4. Enter the Username (mandatory), Full Name (optional) and User Email (optional).

    Note

    The Username cannot be changed once the user has been created.

  5. Select the user's Default Role. For more information, see User Roles in PoolParty.

  6. Select the Groups that the user will be a member of. For more information, see User Groups in PoolParty.

  7. Optional: Go to the Advanced tab to define the user's custom URI. For more information, see Define a Custom User URI.

    Note

    You cannot edit the user's URI once you have created the user.

  8. Confirm with Save.

    Create-user-dialogue-box.png

    The User account created dialogue opens. You can find a password there, which you can display or copy to your clipboard. The new user needs this password to activate their account before they can use it. For more information, see Activate or Reactivate Your User Account.

    User-account-created.png

Tip

If you would like to learn more about this topic, please watch this PoolParty Academy Tutorial video:

2.13 User Management

When the video is not available, you can sign up to the PoolParty Academy

Define a Custom User URI

Abstract

Define a Custom User URI

This section contains a short guide on how to define a custom user URI.

In PoolParty each user's data is a resource with a unique URI the system automatically provides. You can change that URI according to your needs, as long as the format is compliant.

The default Base URI is defined via the poolparty.properties file. The User Identifier is pre-filled with the defined user name.

Where to find the Custom User URI

In the Create User dialogue, Advanced tab, you find and define the user's complete URI as a combination of the Base URI and User Identifier field, as shown below:

23899372.png

Note

You cannot edit the user's URI once you have created the user.

How to Edit Existing Users

Abstract

Users in the PoolPartySuperAdmin role can edit profiles of other PoolParty users. The user profile includes user details, language settings and more.

Users in the PoolPartySuperAdmin role can edit user profiles of other users. The user profile includes user details, language settings, authorization and display settings. For more information, see User Profile. The changes take effect next time the user logs in.

Note

All users with access to the PoolParty UI can view and update their own user profile. For more information, see Access to User Settings for PoolParty Users.

  1. Open the User Management using the icon in the toolbar.

  2. Expand the Users node in the User Administration tree on the left.

  3. Select the user whose profile you want to update.

    The user's Profile opens on the right.

  4. Update the user's Profile.

    For a detailed account of the individual settings and information, see User Profile.

    Note

    If the user is managed by a third-party identity provider (IDP), their full name, email, role and groups might get overwritten by the information coming from the IDP.

  5. Click Update profile.

    801-How-to-edit-existing-users.png

    The Update profile confirmation message opens.

  6. Confirm your edits with Update profile.

    The changes will take effect next time the user logs in.

User Profile

Abstract

The PoolParty user profile includes user details, authorization and more. See our documentation for a detailed account of the individual options.

The user profile includes user details, language settings, authorization and display settings.

All users with access to the PoolParty UI can view and update their own profile. For more information, see Access to User Settings for PoolParty Users.

Users in the PoolPartySuperAdmin role can also view and update profiles of other users. For more information, see How to Edit Existing Users.How to Edit Existing Users

. User
  • Username: user name is unique throughout the system, it cannot be changed once the user is created.

  • Full Name: user's full name.

  • User Email: user's email address.

  • Created: date and time when the user was created.

  • Last Password Change: date and time when the user's password was changed for the last time.

. Authorization
  • Role: the user's role. As a PoolPartySuperAdmin, you can change the user role. For more information, see User Roles in PoolParty.User Roles in PoolParty

  • Groups: the groups that the user is assigned to. For more information, see User Groups in PoolParty.

. Language Settings
  • User Interface Language: the language of the user interface.

  • Autocomplete language: the language that will be used or selected by default in the fields with autocomplete function. If the language set here is not available in the respective project, PoolParty uses the project's default language.

  • Display languages: languages that are checked by default in the Details view of the project's thesaurus. Select the languages that are edited regularly, as the user will not have to check each language checkbox individually. If the languages set here are not available in the respective project, PoolParty uses the default language of the project.

. Display Settings
  • SKOS View: the view set for the SKOS tab in the Details View of a concept. For more information, refer to Concept Details. Possible options: Basic and Advanced.

  • Time Zone: the time zone that is selected by default in the date/time custom scheme attributes the user assigns to concepts.

Reset Another User's Password

Abstract

PoolPartySuperAdmins can reset other users' passwords. Follow this step-by-step guide to lead you through the process.

PoolPartySuperAdmins can reset other users' passwords. For more information on the PoolPartySuperAdmin role, see User Roles in PoolParty.

Note

You cannot reset passwords of users managed by a third-party identity provider (IDP) in PoolParty.

  1. Open the User Management using the icon in the toolbar.

  2. Expand the Users node in the User Administration tree on the left.

  3. Select the user whose password you want to reset from the Hierarchy Tree.

  4. Select Reset Password.

    799-Resert-password-1.png

    The Password reset successfully dialogue opens. You can find a new password there, which you can display or copy to your clipboard. The user needs this password to activate their account before they can use it. For more information, see Activate or Reactivate Your User Account.

    Password-reset-successfull.png

Delete a PoolParty User

Abstract

Users in the PoolPartySuperAdmin role can delete accounts of other users. Follow this step-by-step guide to learn how to delete a PoolParty user.

Users in the PoolPartySuperAdmin role can permanently delete other users' accounts. For more information on the PoolPartySuperAdmin role, see User Roles in PoolParty.

Procedure. Delete a PoolParty User from their Details View
  1. Open the User Management using the icon in the toolbar.

  2. Expand the Users node in the User Administration tree on the left.

  3. Select the user whose account you want to delete.

  4. Select Delete this Account.

    800-Delete-a-user.png

    The Delete User confirmation message opens.

  5. Confirm with Delete.

    800-Delete-a-user-2.png

    Caution

    If you select Delete, the user gets permanently deleted. You cannot undo this action.

Procedure. Delete a PoolParty User from the Users List
  1. Open the User Management using the icon in the toolbar.

  2. Select the Users node in the User Administration tree on the left.

  3. Select Delete User next to the user whose account you want to delete.

    800-Delete-a-user-from-the-list.png

    The Delete User confirmation message opens.

  4. Confirm with Delete.

    800-Delete-a-user-from-the-list-2.png

    Caution

    If you select Delete, the user gets permanently deleted. You cannot undo this action.