Scheduler Section
This section contains a guide on how to use the Scheduler section in UnifiedViews.
Note
Terms special to UnifiedViews and their meaning are explained in our UnifiedViews Glossary.
The Scheduler section of the main menu is used to create and view scheduling rules of pipelines.
A scheduling rule is a description of when the pipeline should be executed.
There are two types of scheduling rules:
A fixed interval rule consists of an initial run time (date and time of the first run) and interval information (number and units of a repetition period).
A dependency rule consists of a list of other pipelines, which will be run before the given pipeline.
The Scheduler section contains a list of scheduling rules. Every scheduling rule has an owner. The rule is visible only to its owner and the users with the Administrator role.
The Scheduler section is represented as a table that contains the following columns:
Column | Icon | Option | Description | ||
|---|---|---|---|---|---|
Actions |
| Disable | depending on the actual status of the rule in theStatuscolumn. If the rule is in the Enabled status the Disable icon is shown in the Commands column. If the rule is in the Disabled status the Enable icon is shown in the Actions column. These icons are used to switch the status of the rule. | ||
Enable | is displayed for executions that have been started in common mode. | ||||
| Edit | icon is used to view the details of the rule and editing them. | |||
Delete | is displayed for executions which are in all states except RUNNING and CANCELLING. | ||||
Status |
| Enabled/Disabled | status of the rule. An enabled rule is stored in the system and the pipeline is executed according to this rule. A disabled rule is presented in the system, but it is inactive, so the pipeline is not executed according to this rule. | ||
Pipeline | the name of a scheduling pipeline. | ||||
Rule | short description of a scheduling rule. | ||||
Last | date and time of the last pipeline execution by this rule. It is empty if the pipeline has not been executed by this rule yet. | ||||
Next | date and time of the next execution which are calculated by the system automatically based on the frequency settings of the rule. It is empty if the rule is not of an interval type. | ||||
Last Run Time | the time that the last execution took. |
Above the table, there are following buttons:
Create New Scheduling Rule: for creating a new scheduling rule in the system (read more).
Reset Filers: for clearing filters of the table.
 |
Create and Edit Scheduling Rules
Create and Edit Scheduling Rules
This section contains a guide on how to create and edit scheduling rules in UnifiedViews.
The following section describes how to work with the Schedule Pipeline dialogue that is used for creating and editing a scheduling rule for a pipeline.
This section includes the following topics:
Creating a Scheduling Rule — This section contains a guide on how to create a scheduling rule.
Create a Scheduling Rule - Core Tab — This section contains a guide on the Core tab inside the Schedule Pipeline dialogue.
Create a Scheduling Rule - Notifications Tab — This section contains a guide on the Notifications tab of the Schedule Pipeline dialogue.
Editing Scheduling Rule — This section contains a short guide on how to edit a scheduling rule.
Creating a Scheduling Rule
Creating a Scheduling Rule
This section contains a guide on how to create a scheduling rule.
There are two ways to create a scheduling rule in UnifiedViews:
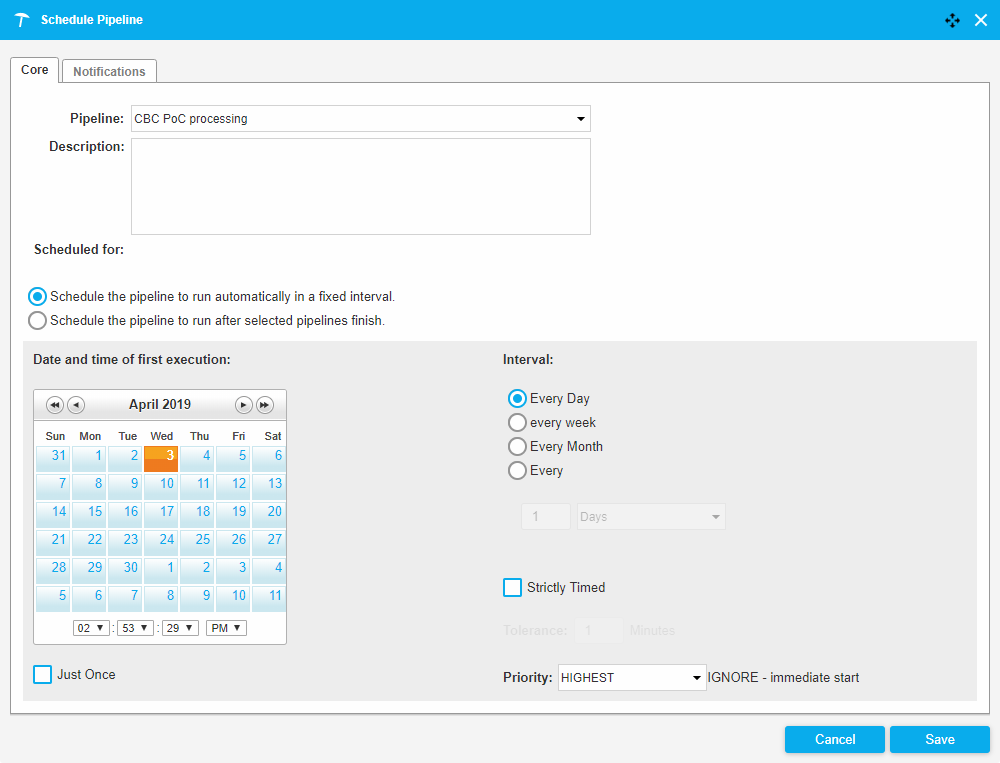
The Schedule Pipeline dialogue is displayed. It contains these options:
Pipeline: drop down (mandatory).
Description (optional): to enter a description for this scheduling rule.
Scheduled for: user name of the user that created the rule.
Schedule the pipeline to run automatically in a fixed interval option.
Schedule the pipeline to run after selected pipelines finish option.
Date and time of the first execution: set to the current date and time.
Interval: execute in a certain interval (default: Every Day).
You can change these options (except Scheduled for) according to your needs.
 |
The Schedule Pipeline dialogue consists of two tabs:
Core tab: contains components for the description of when the pipeline should be executed
Notifications tab: lets you specify on which kinds of when the pipeline is successfully finished/finished with errors.
Create a Scheduling Rule - Core Tab
This section contains a guide on the Core tab inside the Schedule Pipeline dialogue.
On the Core tab you have to select the pipeline for scheduling, in the Pipeline drop down. This drop down is mandatory.
If the field is empty, on the right side of the field an exclamation mark with the notification 'Pipeline must be filled.' is displayed.
Note
In this state you will get an error message in attempting to save the rule without having selected the pipeline for scheduling.
The drop down Pipeline contains a list of pipelines you can access.
As a default user with the role User you can see and schedule only pipelines created by you. You are not allowed to see and schedule the pipelines created by other users.
A user with the role Administrator can see and schedule all pipelines in the system created by all users.
Select the type of scheduling rule.
There are two types of scheduling rule:
Fixed interval rule: consists of initial run time (date and time of first run) and interval information (number and units of repetition period).
Dependency rule: contains a list of other pipelines, after which execution of the given pipeline should be run.
In the dialogue it is represented as an optional group with two options:
Schedule the pipeline to run automatically in a fixed interval: set the time of the first run and the interval for repetition. The interval can be daily, weekly, monthly, or a custom interval in whole units of minutes/hours/days/months.
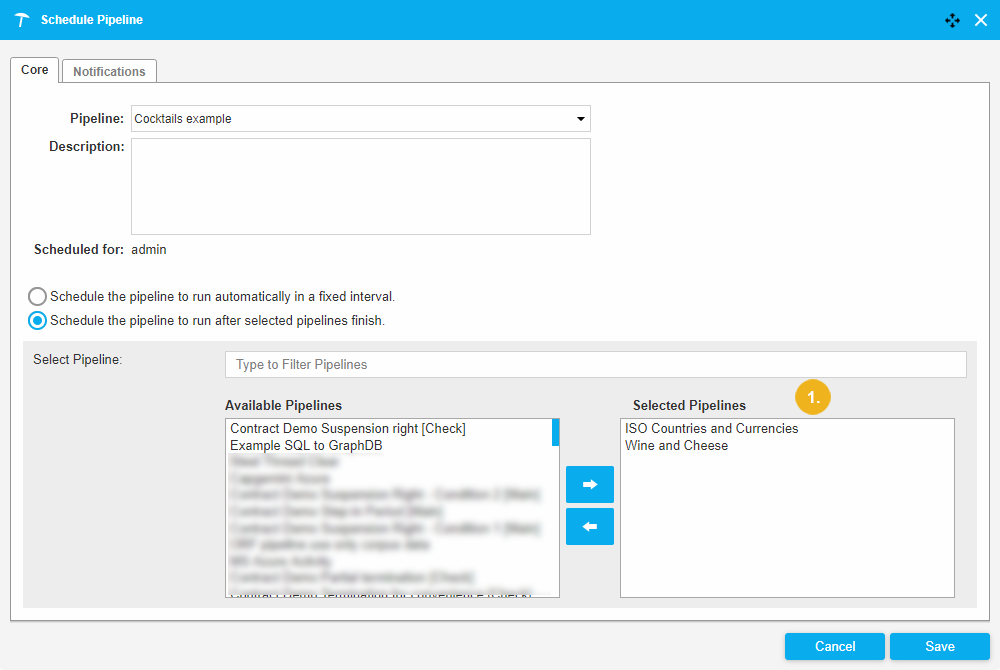
Schedule the pipeline to run after selected pipelines finish: when selected, a list of available pipelines will be displayed. You can select one or several pipelines, which should be run after the current Pipeline has been executed. The pipeline will run only, after at least onepipeline from the Selected Pipelines list finishes.
If you have selected Schedule the pipeline to run after selected pipelines finish, the Available Pipelines and the Selected Pipelines columns become visible.
The Available Pipelines column contains a list of pipelines you can access.
You can filter the list of Available Pipelines by starting to type a pipeline name. This is convenient if the list of available pipelines is long:

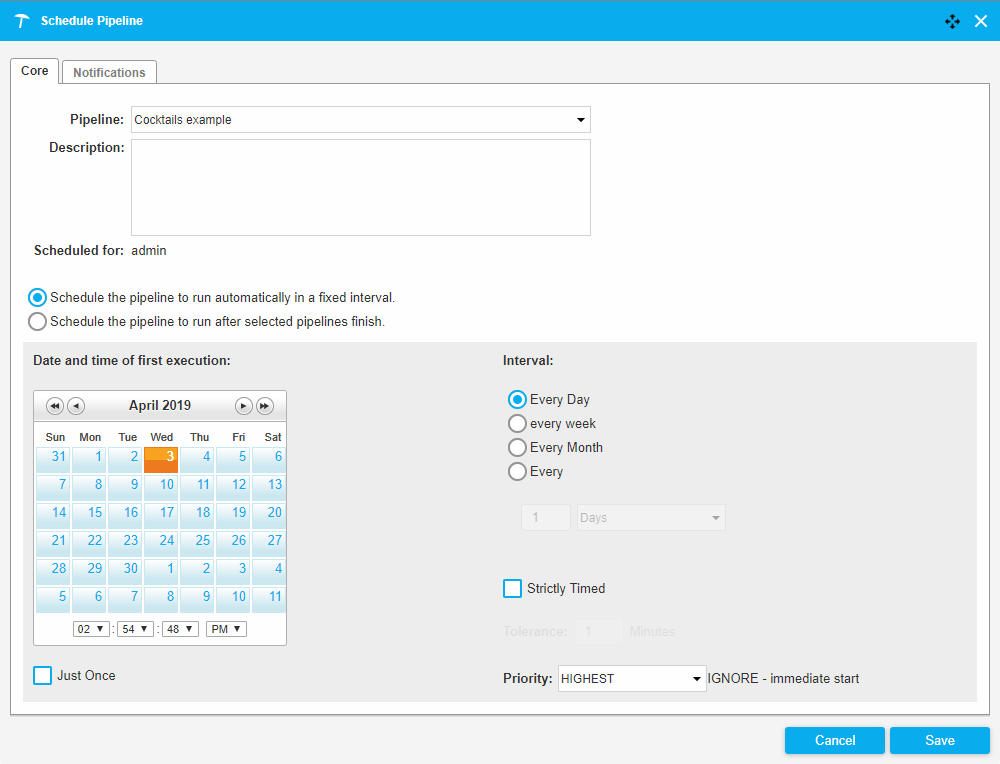
The Strictly Timedoptionis used to control the pipeline execution started in case of an offline backend.
If Strictly Timed is not selected, the pipeline execution will start as soon as possible after the scheduling time of launch has been reached.
If Strictly Timed is selected, the system controls how much time has passed since the pipeline should start running. If this time interval is less than the strict time Tolerance, the pipeline execution will start, in the other case the pipeline execution will never start.
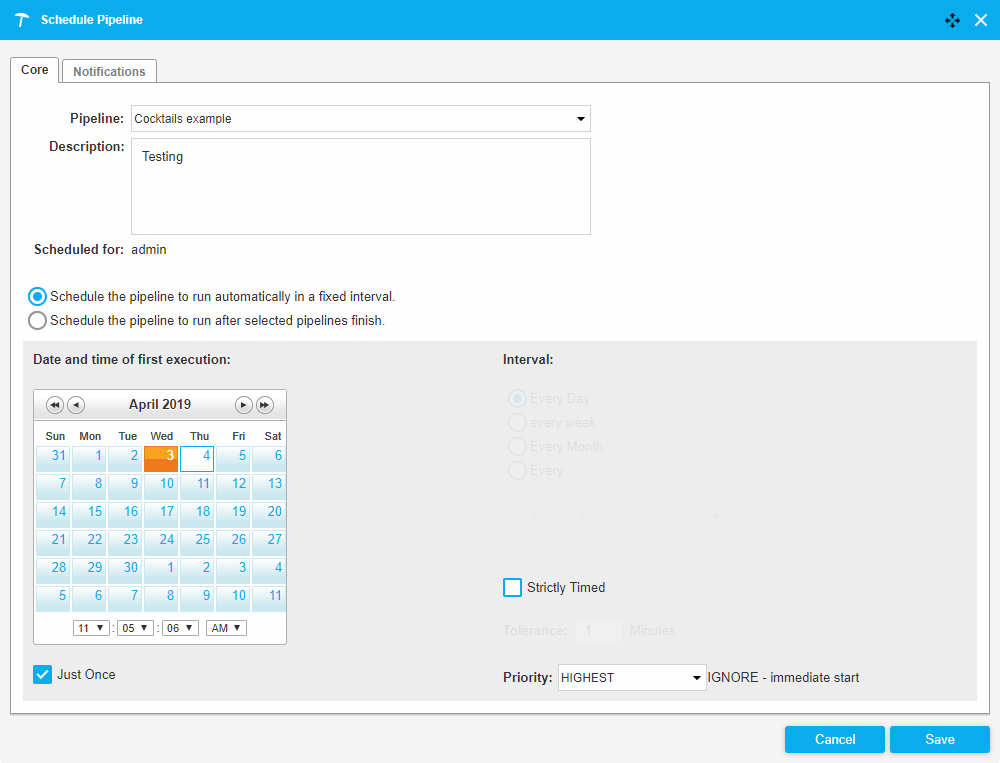
Schedule the pipeline to run automatically in a fixed interval: Date and time of the first 'Cocktails example' pipeline execution: 03.04.2019, 02:54:48 pm. The pipeline will be executed just once.
Note
The Intervalcomponent is disabled ifJust oncecheckbox is selected.
Schedule the pipeline to run after selected pipelines finish: the 'Cocktails example' pipeline will be executed after the execution of the ISO Countries and Currencies and Wine and Cheese pipelines.
Create a Scheduling Rule - Notifications Tab
Create a Scheduling Rule - Notifications Tab
This section contains a guide on the Notifications tab of the Schedule Pipeline dialogue.
In the Notification tab of the Schedule Pipeline dialogue you can set the options for notifications sent on scheduled pipeline runs.
Note
You can also set the default format of the report about scheduled pipeline execution in Settings section on the Scheduler Notifications tab.
These notifications settings will apply to all scheduling rules.
If you want to change these settings for a particular pipeline you need to uncheck Use default notification settingsin the Notifications tab of a particular scheduling rule.
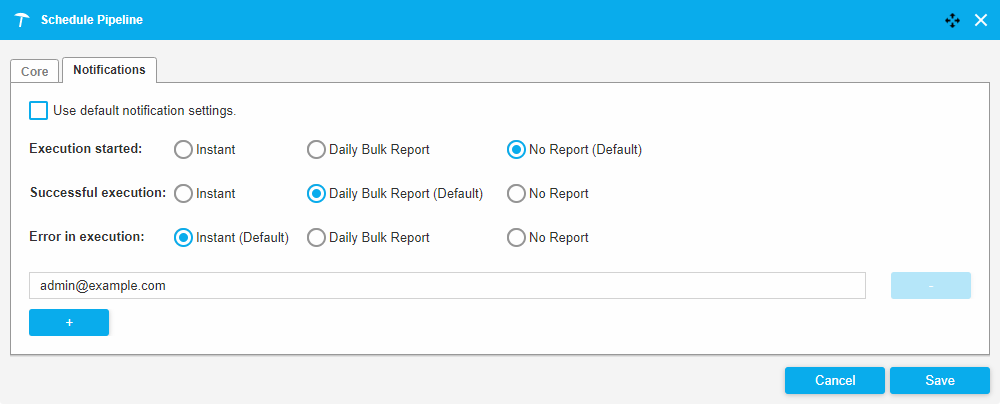 |
You can then specify the format of the notification for a successful execution and an error execution.
There are 3 types of notifications:
Instant (default for an error in the execution): you will be informed instantly after the pipeline is executed with a new email for every executed pipeline.
Daily bulk report (default for a successful execution): containing reports about executed pipelines in a given time period (day).
No report: you will not be informed at all.
The email field is mandatory. The email field is initially prefilled by the user email from the Settings section. The user can change this email or add more emails for notifications by clicking '+'.
You can remove unnecessary email information by the "-" button.
If the scheduled pipeline finishes with an error, the owner of the rule is notified as described in a Notification tab, and the pipeline will be run in the given period again.
Note
If the pipeline is scheduled after another pipeline, and that pipeline finishes with an error, the pipeline will not be run.
When the pipeline is scheduled after another pipeline, typically it depends on its output. In case of an error there is no output or it is faulty, so the scheduled pipeline should not be run.
After specifying all of the settings in the Schedule Pipeline dialogue, click Save to confirm your changes. Your new scheduling rule will be displayed in the Scheduler section.
Editing Scheduling Rule
Editing Scheduling Rule
This section contains a short guide on how to edit a scheduling rule.
To edit a scheduling rule which already exists in the system click the Edit icon on a particular rule in the Scheduler section.
 |
After that the Schedule Pipeline dialogue will be displayed. The dialogue contains preconfigured options according to the scheduling rule you edit:
 |


