GraphEditor Configuration
GraphEditor Configuration
In this section you find all details on the configuration options, namely the Metadata tab and the Configuration tab.
In the Metadata tab, similar to Metadata tabs and pages elsewhere in the PoolParty interface, you find general information about the graph editor, such as the creator's user name, time and date of creation, etc.
The following topics will guide you through the available configuration options:
GraphEditor - Metadata Tab
GraphEditor - Metadata Tab
In the GraphEditor Metadata tab, find all information pertaining to the respective graph editor. In this section you find a short overview of what you will see there.
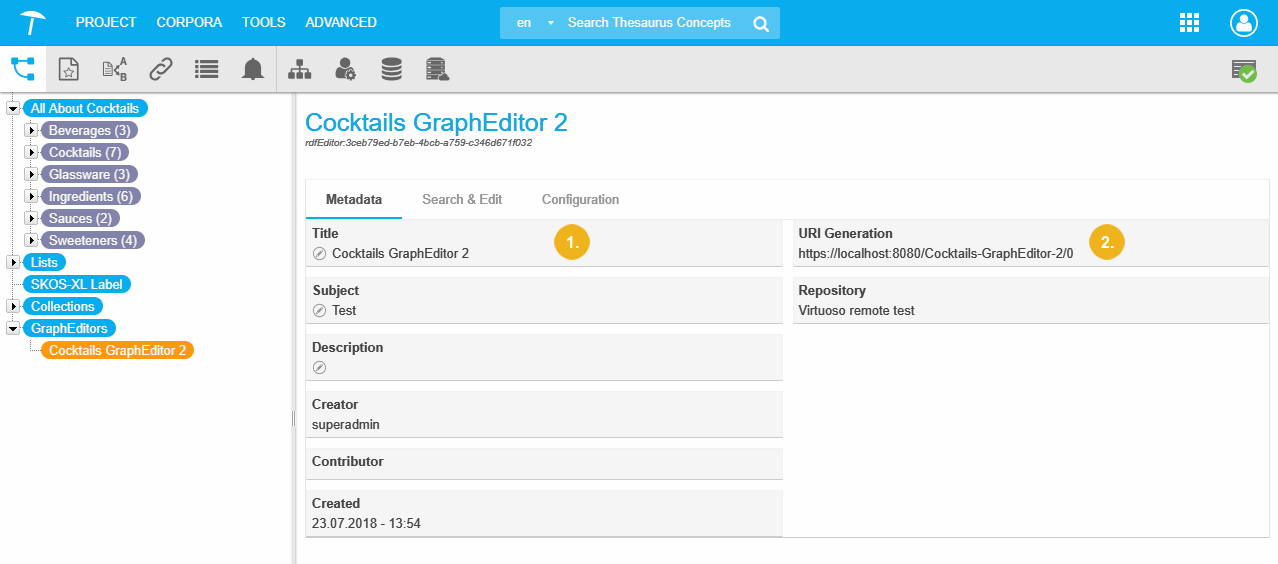
The Metadata tab opens by default when you access your graph editor. It provides the background information on fields such as creation date, remote repository, PoolParty version. You find details about the fields in the following paragraph.
 |
Note
Fields with an asterisk can be edited. Use the respective Edit icon to edit or change them.
Two sections are available, the user and content information (1) and technical background information (2).
Title*: shows the name or title for the graph editor.
Subject*: a field that displays a subject this graph editor is dedicated to, if you provide one.
Description*: a descriptive text to further explain the focus or purpose of this editor.
Creator: the user who created this graph editor, will be filled by PoolParty per default.
Contributor: a field you can define yourself initially when the GraphEditor Assistant is executed. Cannot be edited and does not define permissions.
Created: here the original the graph editor's creation date and time are displayed, also filled per default by PoolParty.
URI Generation: you find here the Base URI you defined during graph editor creation.
Repository: the remote graph database's name of this graph editor is visible here.
GraphEditor - Configuration Tab
GraphEditor - Configuration Tab
This section contains a guide on the Configuration tab in a PoolParty graph editor and its child tabs and the available options and settings there.
After you have accessed an existing graph editor, you can activate the Configuration tab.
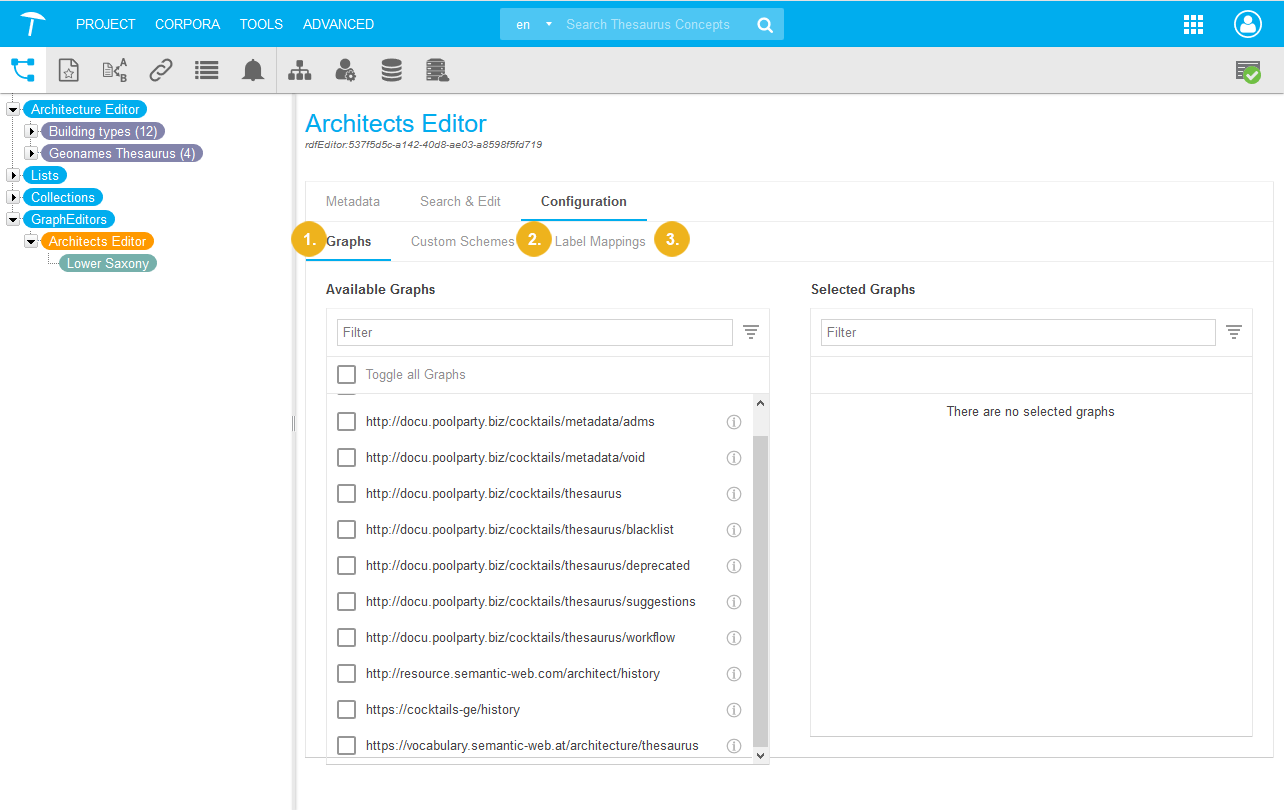
It contains three separate child tabs, namely:
Graphs: check and configure graphs you want to use for the graph editor. Set them to 'lookup' only or make them 'editable'.
Custom Schemes: check the custom schemes you have activated as regards their statistical data. Manage custom schemes by using a separate dialogue to add to or remove custom schemes from your editor.
Label Mappings: you can map labels to RDF resources here. After that, in the graph editor's Search & Edit tab these labels and their respective resources will be displayed, in the table there, in the order you define here.
The following tabs provide more information:
 |
GraphEditor - Graphs Tab
GraphEditor - Graphs Tab
This section contains a short guide on the Graphs tab in a graph editor in PoolParty and the available options.
Once you have created a graph editor, you can configure it further using the tabs inside the Configuration tab (1). The Graphs tab lets you decide which graphs you want to look at, or which ones you also want to edit.
In addition you can use it to check on graphs you selected even in very long lists of available graphs by a quick filter at the side of each column (3,4).
When you open the tab for the first time, you see the Available Graphs and the Selected Graphs column displayed.
You can use the Filter field at the top of each to filter for individual graphs by starting to type their name.
The quick filters for Available Graphs consist of All, Used and Unused (3). Default is All.
The quick filters for Selected Graphs consist of All, Lookup and Editable (4). Default is All.
Note
As soon as you activate one of the additional options here, the filter icon will turn green.
In order to select graphs and make them editable or keep them as lookup graphs, follow the steps below.
In the Available Graphs column, use the check boxes to select graphs.
You can use the Filter field and filter for graphs by starting to type.
When you activate a graph's check box, it will move into the Selected Graphs column. It will be a Look-up Graph by default.
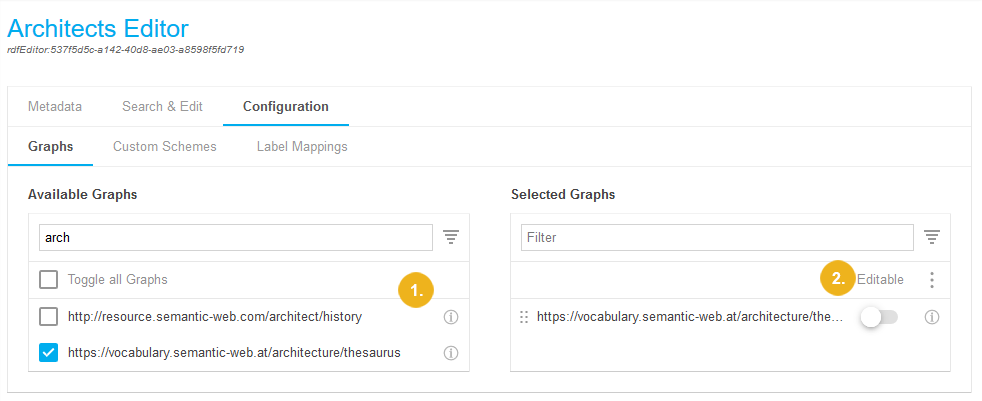 |
By default, graphs you selected in the Available Graphs column stay look-up graphs. The slider Editable stays greyed out.
By clicking the slider beside each graph's name the slider will turn green and the graph becomes an editable graph.
Additionally, a batch mode is available:
using the three dots menu, you can use the sub-menu from there to set all selected graphs to editable or to set all to look-up.
Select the respective menu item.
 |
Note
You can edit the graph URI's name right here. Find out details about that in this topic: GraphEditor - Edit or Create Graph Names and Move Graphs in the List
GraphEditor - Edit or Create Graph Names and Move Graphs in the List
GraphEditor - Edit or Create Graph Names and Move Graphs in the List
This section contains a short guide on how to edit a graph name and move it in the list.
In the list of Selected Graphs you have several options.
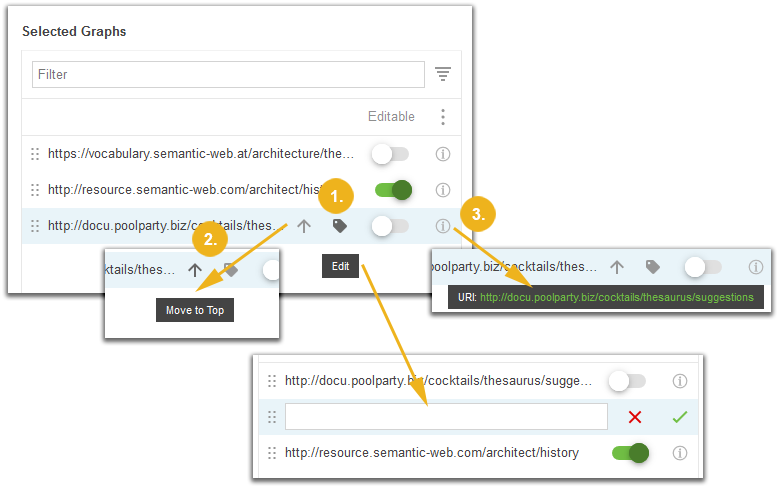
You can edit their name right here.
Hover your mouse over the end of the entry and click the Edit icon. The URI turns into an editable field. Enter a name of your choice.
Using the green Check Mark icon or the red Cancel icon will confirm or discard your changes.
You can use a small Arrow icon beside their name to move one to the top of the list.
Hover your mouse over the end of the entry and click the Arrow icon. The graph will be moved to the top of the list.
Note
Moving a graph to the top of the list will make it the default graph for importing graphs from RDF data.
A small Information icon will display the whole URI of the graph, if it is hidden from view, because of its length or screen resolution constraints.
Hover your mouse over the Information icon at the end of a graph's entry to display the small popup containing the URI.
 |
GraphEditor - Custom Schemes Tab
GraphEditor - Custom Schemes Tab
This section contains a short guide on how to manage custom schemes of an existing PoolParty graph editor.
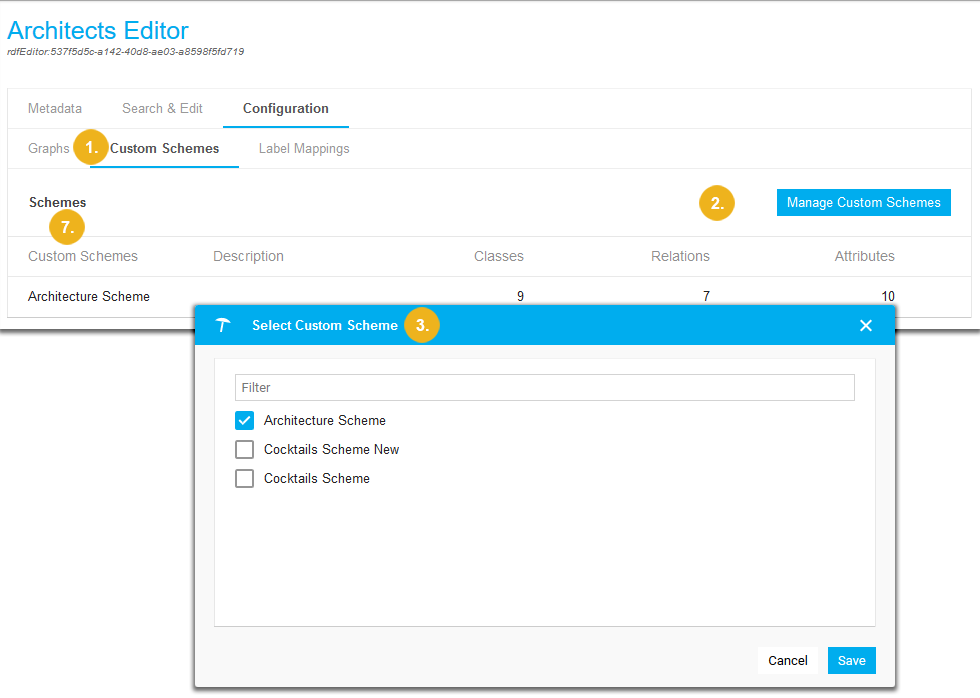
Inside the Configuration tab you find the Custom Schemes tab (1). It lets you add additional custom schemes or deactivate previously selected ones.
The table inside it displays all selected custom schemes and their description (optional), as well as the number of classes, relations and attributes (7).
Follow these steps to manage your custom schemes:
Activate the Custom Schemes tab.
Click Manage Custom Schemes.
The Select Custom Scheme dialogue opens.
Start typing in the Filter field to filter for custom schemes.
Using the check boxes, select or deactivate the custom schemes of your choice.
Click Save to confirm your changes.
 |
GraphEditor - Label Mappings Tab
GraphEditor - Label Mappings Tab
This section contains a short guide on the options in the Label Mappings tab of the graph editor.
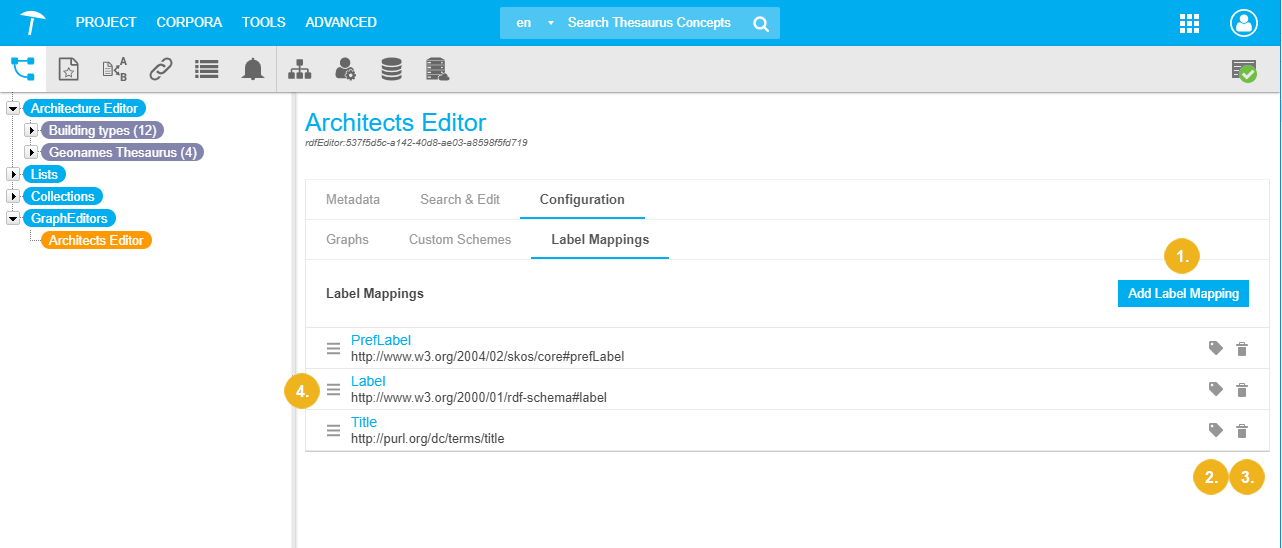
A graph editor you created in PoolParty will have a couple of label mappings already present by default.
These mappings determine, which properties are visible in your graph editor's table, in the GraphEditor - Search & Edit Tab tab and where, in the order of the table columns.
In this example you see the URI for the RDF specification of 'preferred label' mapped to the actual label in your editor. The labels you use here for each URI are entirely up to your choice.
This document describes the options available in the Label Mappings tab.
You find information on how to edit existing mappings here: GraphEditor - How to Edit a Label Mapping.
In the Label Mappings tab you have the following options:
Add a new mapping:GraphEditor - How to Add a Label Mapping.
Edit the label of an existing mapping: GraphEditor - How to Edit a Label Mapping.
Delete the whole mapping: GraphEditor - How to Delete a Label Mapping.
Reorder the existing mappings: GraphEditor - How to Reorder Existing Label Mappings.
 |
GraphEditor - How to Add a Label Mapping
GraphEditor - How to Add a Label Mapping
This section contains a short guide on how to add a label mapping in the graph editor in PoolParty.
In order to add a label mapping to an existing graph editor, follow these steps:
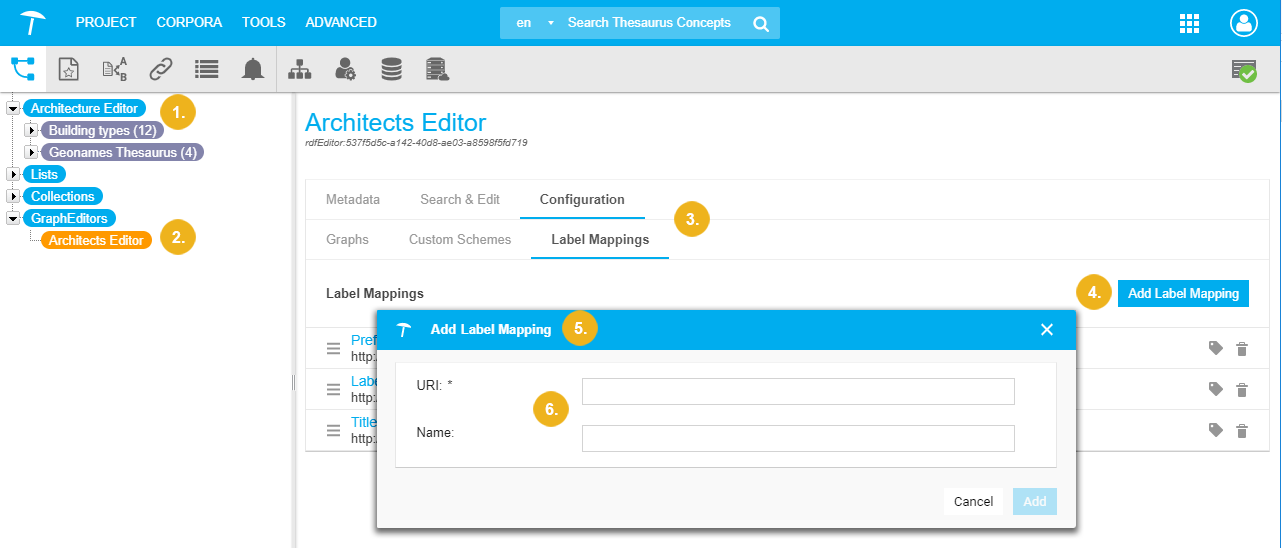
Open your PoolParty project.
Open the Configuration tab, then click the Label Mappings tab.
On the right in the Details View, click Add Label Mapping.
The Add Label Mapping dialogue opens.
In the URI field enter the resource's URI (mandatory entry).
In the Name field enter a name of your choice (optional).
Click Add to confirm your changes.
 |
GraphEditor - How to Edit a Label Mapping
GraphEditor - How to Edit a Label Mapping
This section contains a short guide on how to edit an existing label mapping in the graph editor.
You can edit a label mapping once it has been created by changing its name.
In order to edit an existing label mapping in your graph editor, follow these steps:
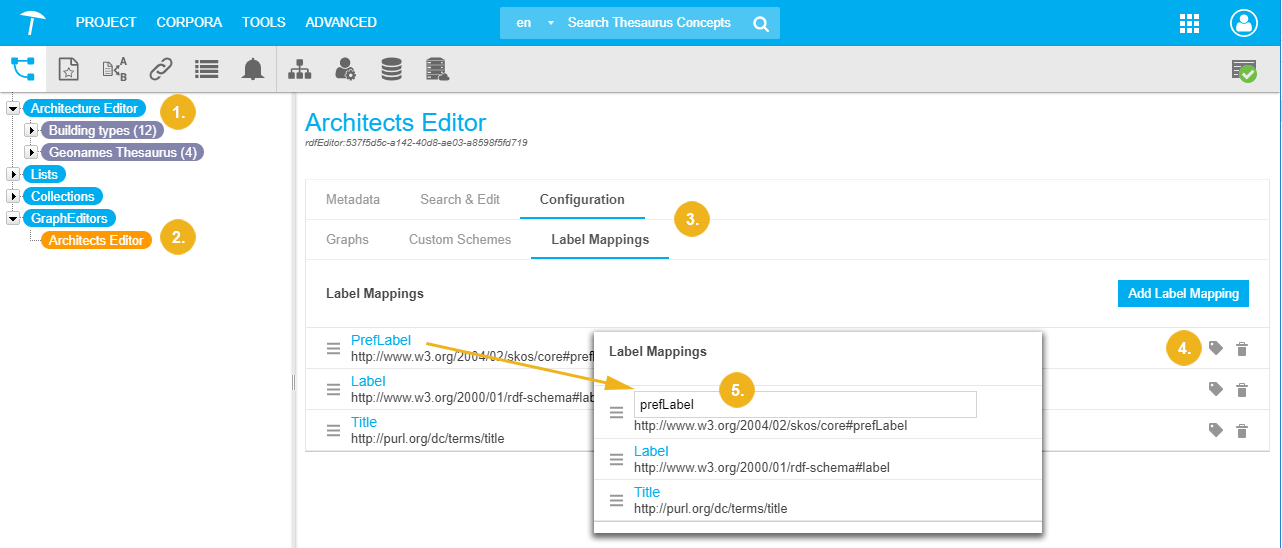
Open your PoolParty project.
Open the Configuration tab, then click the Label Mappings tab.
Find the label mapping you want to edit. At the end of its row, click the Edit icon.
The name of the label will become editable.
Enter a new name for it.
Click below the field in the label mapping's row to confirm your changes.
 |
GraphEditor - How to Reorder Existing Label Mappings
GraphEditor - How to Reorder Existing Label Mappings
This section contains a short guide on how to reorder existing label mappings in the PoolParty graph editor.
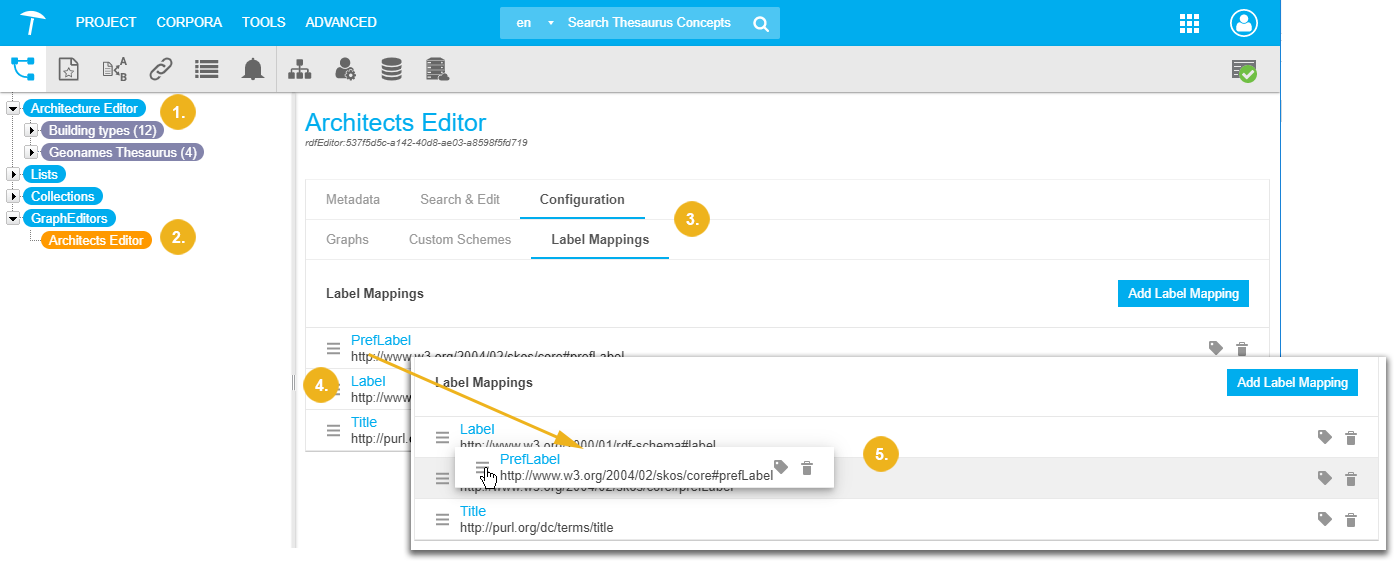
In a list of existing labels you can reorder them to change the order of their display in your graph editor's Search & Edit table.
PoolParty will parse your data based on these mappings. The first label in this list that exists for a resource, when there are more than one, will then be used to display the name for that resource.
The first label mapping will also be the left-most column in your table's display.
In order to reorder the label mappings in your Label Mappings tab, follow these steps.
Open your PoolParty project.
Open the Configuration tab, then click the Label Mappings tab.
In the list of label mappings, find the one you want to move up or down.
On the left, use the handle by clicking, then drag the entry using your mouse cursor, and by releasing it, move it to the new position in the list.
 |
GraphEditor - How to Delete a Label Mapping
GraphEditor - How to Delete a Label Mapping
This section contains a short guide on how to how to delete an existing a label mapping in the graph editor.
In order to delete a label mapping from the list, follow these steps:
Open your PoolParty project.
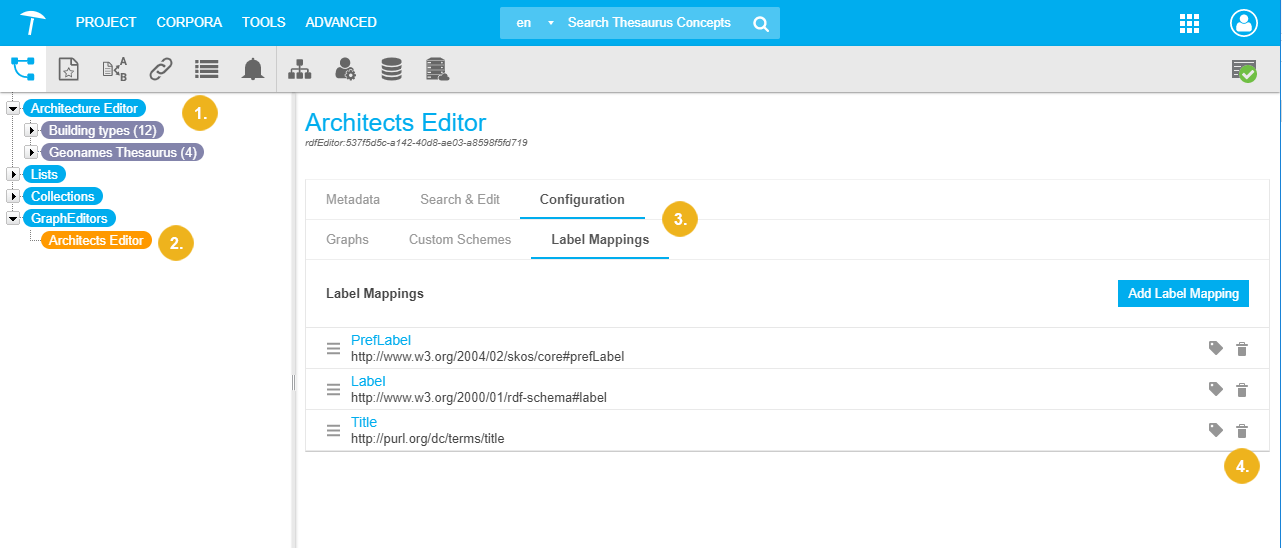
Open the Configuration tab, then click the Label Mappings tab.
At the end of the row of the label mapping you want to delete, click the Delete icon.
PoolParty will display a dialogue to ask, if you really want to delete the label.
Click Confirm in the message dialogue to save your changes.
 |