Installation Guide (Microsoft Windows)
Make sure that your Windows server satisfies the prerequisites defined in the PoolParty System Requirements.
Keycloak
PoolParty comes with Keycloak as an authentication and authorization service. A relational database is recommended to run Keycloak. Keycloak comes with H2 as an embedded database.
Tip
PoolParty 9.3.1 installation includes Keycloak version 22.0.5.
Note
In accordance with the Keycloak documentation, we recommend using a proper database service instead of the default database Keycloak comes with. For more information on how to migrate to a proper database service, refer to the Keycloak documentation.
Prerequisites
The following prerequisites must be satisfied to be able to install PoolParty on a Windows system:
a valid PoolParty license
a 64-bit Windows Server 2016 or 2019 system
OpenJDK 17 installed,
If you have no OpenJDK installed, then install OpenJDK 17 and correctly configure JAVA_HOME. To validate that your installation is successful, enter on the command line
echo %JAVA_HOME%to display the Java version (in our caseC:\jdk17), then enterjava -versionwhich then returns all the JDK version details.
the PoolParty installer (
poolparty.zip) which can be downloaded from our download area .you should set up ES_JAVA_HOME variable the same way as you set up JAVA_HOME.
Installation Procedure
STEP 1: Install PoolParty including Elasticsearch Index & Recommender
Create the
drive:\poolpartyhomefolder e.g.C:\opt\poolparty. The installation path may not contain any spaces.Unzip the installer in the
drive:\poolpartyhomefolder.Open the Command Prompt with administrator privileges.
Change directory to
drive:\poolpartyhome.Go to the
binfolder.On the Command Prompt execute
init_poolparty.ps1file from thebinfolder. We have installed PoolParty toC:\opt\poolpartyand we have run theinit_poolparty.ps1file from there.
STEP 2: Define the baseURI
Define the baseURI after invoking the init_poolparty.ps1 file.
Note
We recommend choosing a baseURI pattern according to the defined URI Pattern Strategy Planning. Changing such pattern later might imply changes to the already created data.
Define the baseURI. The default is
http://localhost. Either enter a custom baseURI or pressEnterfor the default one.Define the baseURI for the PoolParty projects. The default is
http://localhost. Enter the baseURI you want to use or pressEnterto use the default baseURI.Define the baseURI for users. Enter the baseURI you want to use or select
Enterto use the default baseURI .Wait for the installation process to finish.
STEP 3: Provide the PoolParty License
Provide the PoolParty license key during login to PoolParty, or place the license file in the drive:\poolpartyhome\config\licenses folder.
STEP 4: Start Services
After completing Step 2 and Step 3 start Notepad.
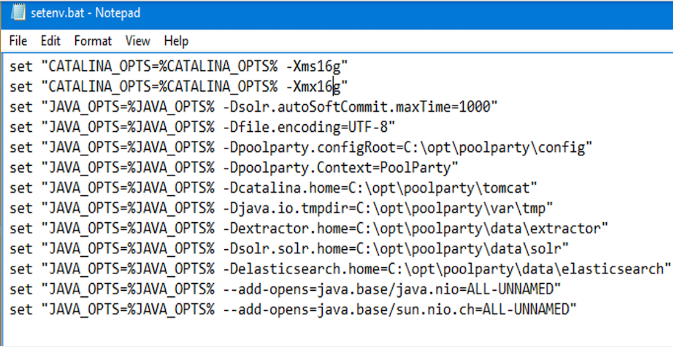
In the Notepad open the file
poolpartyhome\tomcat\bin\setenv.bat.Update the memory settings to reflect your RAM configuration
Now open Command Prompt and run:
shutdown /r /t 0; or manually reboot your Windows system.Depending on the speed of your Windows system PoolParty should be up within 5 to 8 minutes after the reboot.
Example of RAM configuration:
 |
Tip
You can additionally check that all required services are running. To do so, open the management console services.mcs. There navigate to the PoolParty services. If the start of these services is not set to Automatic, change those settings accordingly on the management console.
 |
Note
Solr is fully supported. PoolParty currently supports Elasticsearch 8.12.
For more information, refer to: