UnifiedViews Installation Guide (Linux)
UnifiedViews Installation Guide (Linux)
This section provides detailed instructions on how to install UnifiedViews on Linux.
Introduction
Make sure that you have followed the prerequisites defined in the UnifiedViews System Requirements.
Note
An OpenJDK 11 or a 64 bit build of a Sun/Oracle Java 11 SE Development Kit is required to run UnifiedViews.
Prerequisites
These installation instructions assume that a UnifiedViews standard installation will be made using the following options:
You have defined a user (e.g. 'poolparty') on the server assigned to a respective group (e.g. 'poolparty') that should be used to run the Tomcat server. That user has to be able to execute the sudo command. Refer to the respective Linux distribution's documentation for particulars of commands and permission settings.
The target system is running on a 64 bit Linux server.
UnifiedViews' Tomcat will be running as localhost using port 80.
UnifiedViews installer (PoolParty.run) has been downloaded from our download area.
Installation Procedure
UnifiedViews can be installed in one of two ways: either as a standalone application or bundled with PoolParty.
A. Installing UnifiedViews together with PoolParty
Note
This will install UnifiedViews using the same Tomcat setup that is used for PoolParty, which is not the recommended way of doing it on a productive system.
We recommend using a standalone installation for such cases.
To choose this option, just follow the Installation Guide (Linux).
Once you have reached the part about confirming the Base URL for users, you will be asked whether or not you would like to also install UnifiedViews:
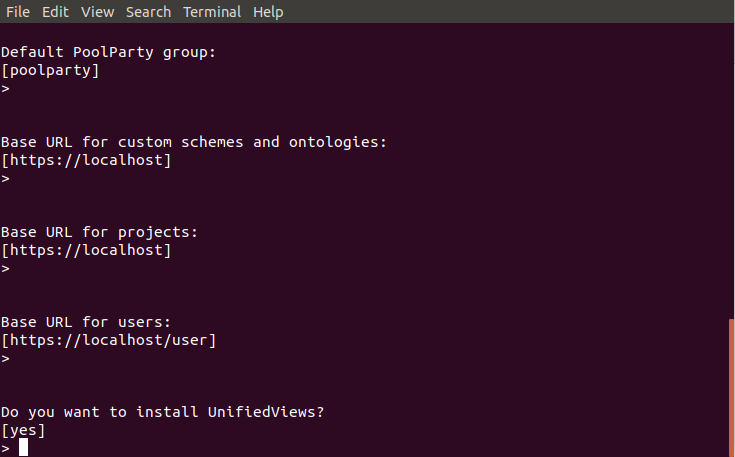 |
B. Installing UnifiedViews as a Standalone Application
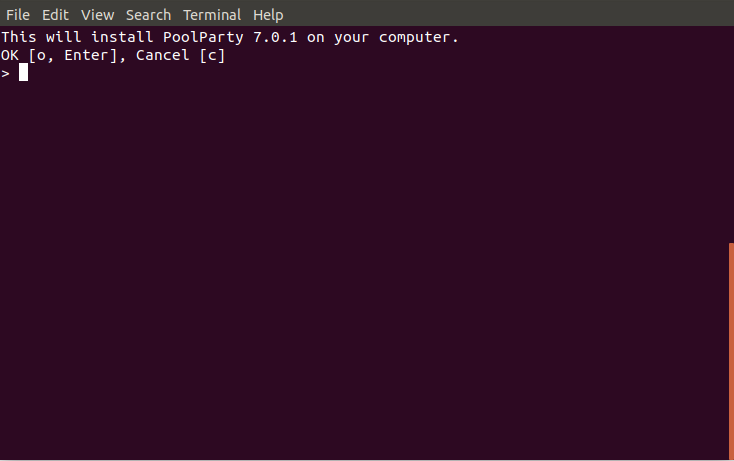
STEP 1: Run the Installer PoolParty.run from a Terminal Window
This will open a dialogue in the terminal. By hitting Enter you start the process.
 |
STEP 2: Start Installation Mode
In the next step choose to do a new installation by entering 3 and hitting Enter.
STEP 3: Check and Adjust the UnifiedViews Application Directory
In this step you can define the path for your PoolParty Directory Structure Linux (default: /opt/unifiedviews).
Enter the path you want to use or hit Enter to use the default one.
STEP 4: Define User and Group
In this step define the user that will be used Controlling PoolParty (Linux) (default: poolparty).
Enter the user you want to use or hit Enter to use the default user.
In addition you can define the group that will be used running it (default: poolparty).
Enter the name of the user group you want to use or hit Enter to use the default group. The group you enter here will be created, if it doesn't exist.
STEP 5: Finalize the Installation
You will be presented with an overview of the settings you made. You can then finalize the installation process by hitting Enter.
You will be presented with the credentials of the The Tomcat Web Application Manager, right before the confirmation that the installation was successful:
STEP 6: Start UnifiedViews
Open a console and change to root:
sudo -i
It is important to first start the frontend and then start the backend as follows:
/opt/unifiedviews/bin/unifiedviews-frontend start
/opt/unifiedviews/bin/unifiedviews start
If you need to specifically change memory allocation settings related to how UnifiedViews runs, this can be done in the unifiedviews.conf file. Similar to what you find in the instructions for The poolparty.conf File (Linux)
Post Installation Tasks
Open a browser and access your UnifiedViews installation using a URL like this:
http://<your-server>/unifiedviews/
You can log in with the user 'admin' and password 'unifiedviews'.
Note
We strongly recommend to change the password for the 'admin' user after the installation.