Setup SAML Authentication for PoolParty 8.1 Or Older
Setup SAML Authentication for PoolParty
PoolParty supports Single Sign On (SSO) based on SAML 2.0. All SSO providers which support SAML and also are known to work with Spring Security should be supported by PoolParty.
Note
SAML is a protocol and its implementation differs from an identity provider. Accordingly, the configuration to integrate with PoolParty can be different. We rely on the fulfillment of the protocol, and consider PoolParty compatible with an identity provider as long as it claims to implement SAML. We cannot do the testing for every identity provider. But we always support customers with setting up the configuration and until now we could always establish a working SAML integration. Known identity providers which can be integrated with PoolParty include but are not limited to Okta, OneLogin, Ping, Azure AD, AD FS, Duo, Google SSO.
A complete integration requires configuration at both identity provider (IDP) and service provider (SP, or PoolParty in the current context) sides. The process is elaborated in the following chapters.
Configuration of identity provider (IDP)
The following instruction will use Google SSO for reference. There are many IDPs supporting SAML, but due to space limitations we will not be able to cover each of them in detail. Please refer to the help documentation of the corresponding product. However, the process is in principle identical. Meanwhile, the instruction assumes the access URL to PoolParty is https://saml.poolparty.biz. This value will be used hereinafter and please replace it with the actual value accordingly.
Preparation
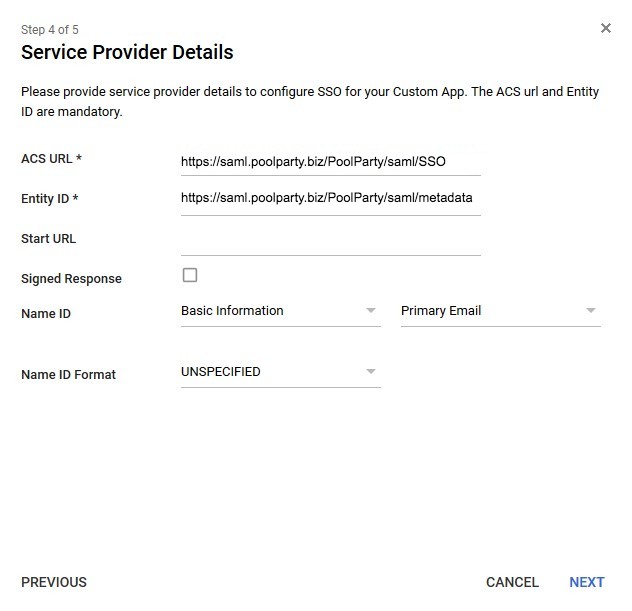
Only two parameters are compulsory to the input of the setup: ACS URL and Entity ID. They specify the service endpoint of the service provider where SAML messages are handled and the unique identifier of the entity which provides SAML-based services, respectively. By convention they have the form of the host of the service provider followed by "/PoolParty/saml/SSO" (path to service endpoint) and "/PoolParty/saml/metadata" (path to service profile), respectively. Therefore, for the current example, we have
ACS URL: https://saml.poolparty.biz/PoolParty/saml/SSO
Entity ID: https://saml.poolparty.biz/PoolParty/saml/metadata
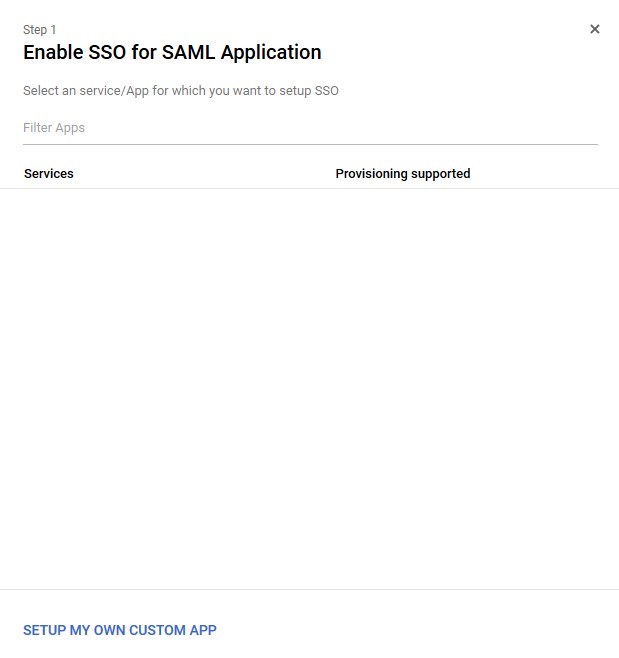
STEP 1: Navigate to SAML configuration panel
Log in to the Admin Console of Google Workspace with administrator privileges, then navigate to Apps, SAML, and Add a service. Choose "Setup my own custom app".
 |
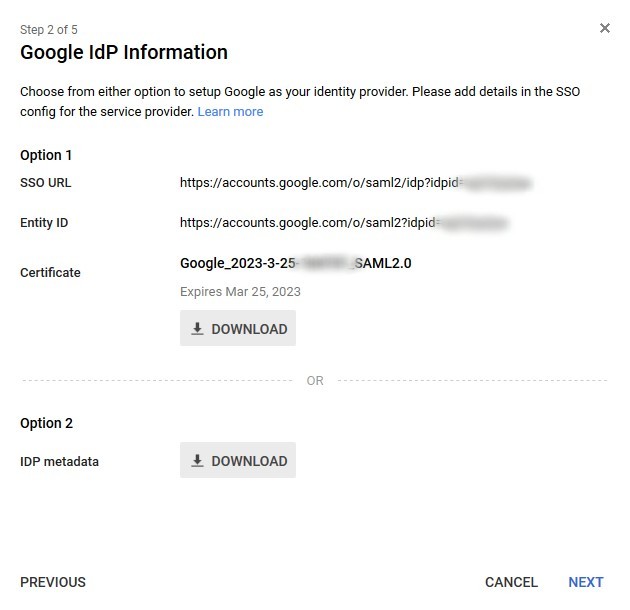
STEP 2: Collect IDP information
Google creates IDP metadata and certificate. Both need to be exported for further usage.
 |
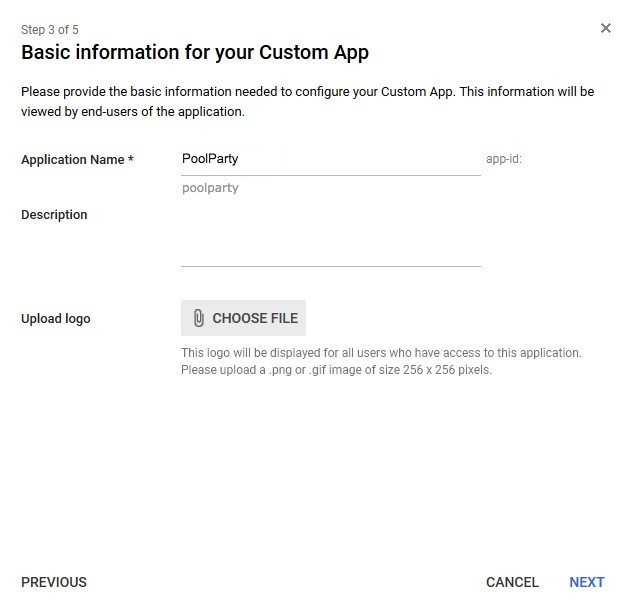
STEP 3: Provide information about service provider
Choose a name and an optional logo, which will be used for display in application gallery in Google Workspace.
 |
STEP 4: Provide configuration of the service provider
The aforementioned ACS URL and Entity ID values need to be provided here.
Optionally, the administrator can decide which attribute of the user profile should be used as username for the authentication of the service provider. PoolParty expects the Name IDs passed in by SAML requests correspond to the username of the users in PoolParty. In current example, email address is used as Name ID. In such case users are expected to created with email address as username in PoolParty.
 |
STEP 5: Other configuration
Currently PoolParty does not make use of other information of user profiles. Therefore such step is not necessary.
 |
Then the configuration at the IDP side is completed. More information about this process can be found at https://support.google.com/a/answer/6087519.
Configuration of service provider / PoolParty
Note
Note that the following instructions apply to on-premise installations. For cloud service please create a ticket at PoolParty support desk and our support engineers will take over this process.
This chapter explains the SAML configuration at the service provider side. It requires operational changes to PoolParty installation, therefore access rights to the infrastructure and write permissions to the file system are necessary.
Hereinafter PoolParty installation path is assumed to be "/opt/poolparty" in a Linux system. Please adapt paths accordingly when PoolParty is installed in a different path or operating system.
STEP 1: Stop PoolParty if it is running
STEP 2: Upload IDP configuration to PoolParty
Create directory /opt/poolparty/config/saml and upload the IDP metadata file and the certificate exported during the IDP configuration process with file names "metadata.xml" and "cert.pem" respectively.
STEP 3: Configure PoolParty KeyStore
To make use of the certificate for SAML related services, PoolParty needs it to read it from a Java KeyStore.
Run the following commands to create a keystore and import the certificate:
keytool -genkeypair -keysize 1024 -alias saml -storepass jksPassword -keystore /opt/poolparty/config/saml/saml.jks
What is your first and last name?
  [Unknown]: <press ENTER>
What is the name of your organizational unit?
  [Unknown]: <press ENTER>
What is the name of your organization?
  [Unknown]: <press ENTER>
What is the name of your City or Locality?
  [Unknown]: <press ENTER>
What is the name of your State or Province?
  [Unknown]: <press ENTER>
What is the two-letter country code for this unit?
  [Unknown]: <press ENTER>
Is CN=Unknown, OU=Unknown, O=Unknown, L=Unknown, ST=Unknown, C=Unknown correct?
  [no]:  <enter 'yes' and press ENTER>


keytool -importcert -alias saml-crt -file /opt/poolparty/config/saml/cert.pem -keystore /opt/poolparty/config/saml/saml.jks -keypass jksPassword
Enter keystore password: <enter password and press ENTER>
Trust this certificate? [no]:  <enter 'yes' and press ENTER>
Certificate was added to keystore
STEP 4: Update PoolParty auth configuration file
Auth configuration file is located at /opt/poolparty/config/auth.xml. Replace it with the attached SAML configuration template auth.zip (download). Please remember to backup this file before replacement for future needs.
The following lines in the configuration file need to be adapted to the corresponding values:
Line 33: specify IDP metadata file location /opt/poolparty/config/saml/metadata.xml
Line 50: specify PoolParty login page https://saml.poolparty.biz/PoolParty as "entityBaseURL"
Line 54: specify alias of the signing key, which is "saml" as used in the previous step
Line 63: specify path to Java KeyStore file, which is /opt/poolparty/config/saml/saml.jks as used in the previous step
Line 64: specify password to the KeyStore, which is jksPassword as used in the previous step
Line 67: specify alias of the default key as "key", which is "saml", and password to the private key as "value", which can be left empty when the key is not created with a password
Line 70: specify alias of the default key, which is "saml" as used in the previous step
Line 141: specify domain name of the server, which is saml.poolparty.biz in the current example
Line 142: specify the port number of the server, default to 443. This port should be the port exposed to end users, which could be after proxying, but not the internal port with respect to the server.
STEP 5: Enable SAML in PoolParty configuration
Add the following lines at the end of PoolParty property file /opt/poolparty/config/poolparty.properties:
# SAML integration

entrypoint=samlEntryPoint
metadataGeneratorFilter=metadataGeneratorFilter
samlFilter=samlFilter
Optional:
By default one can still bypass SAML login process and fall back to PoolParty local login by navigating to https://saml.poolparty.biz/PoolParty/!/auth/login. To disable this login page and force users to use SAML, add the following parameters to the configuration file as well. Additionally, a redirect URL can be specified for parameter "login.ppt.redirect" which will redirect a user to the corresponding URL when he logs out from PoolParty.
logout.ppt.url=/PoolParty/
login.ppt.redirect=https://accounts.google.com/login
STEP 6: Start the PoolParty server
If the configuration is successful, the user will be redirected to IDP login page when navigating to PoolParty login entrypoint (e.g. https://saml.poolparty.biz/PoolParty ).
Logging configuration for debugging
In the case that the configuration does not work as expected, one will need to investigate the logs to find out what fails during the authentication and SAML handling processes. By default PoolParty does not capture SAML related logs. To enable it, The PoolParty log4j.properties File needs to be configured.
The following content should be appended to the log configuration:
logger.SAML.name = org.springframework.security.saml
logger.SAML.level = DEBUG
The following two lines need to be adapted:
# add "SAML" at line 98
loggers = SAML, RDF4J, PPGS, PPT, PPX, TUCKEY, SPRING, SPRINGSECURITY, PPSECURITY, PUNKT

# change log level of root logger from "WARN" to "DEBUG" at line 154
rootLogger.level = DEBUG
PoolParty has to be restarted to reload the log configuration. Then SAML related logs such as authentication request and response will be printed to log file catalina.out.
When the debugging process is complete, please remember to revert the changes.
Frequently reported issues
Here is a list of commonly seen reasons that SAML integration does not work. They can be identified from the relevant details in the logs.
1. Time on the server is not synchronized with NTP servers
Timestamps in SAML requests and responses are used to ensure the integrity and validity of the authentication process. When the time of the service provider deviates too much from the identity provider, the identity provider will refuse proceeding. This tolerance is usually 1 minute. To solve this problem, the time of PoolParty server needs to be configured to synchronize with NTP servers automatically.
2. Length of authentication state or validity time is not aligned between the IDP and the SP
Per default PoolParty allows users to maintain sign-on status for up to 1 day (86400 seconds) since their initial authentication. Some IDPs allow users to stay authenticated for longer periods. For example, ADFS allow users to stay logged in for 90 days. In such case, when a user access to PoolParty via SSO after one day, his authenticated state will be approved by the IDP, but not PoolParty, leading to refused login attempt. To avoid such situation, the length of the authenticated status needs to be aligned between the IDP and the SP. For PoolParty this setting can be changed using the "maxAuthentcationAge" property in auth.xml file.
<beans:bean id="webSSOprofileConsumer" class="org.springframework.security.saml.websso.WebSSOProfileConsumerImpl">
       <beans:property name="maxAssertionTime" value="86400"></beans:property>
       <beans:property name="maxAuthenticationAge" value="86400"></beans:property>
</beans:bean>
3. SAML request is signed with certificate from the SP but the certificate is not provided to the IDP
By default PoolParty will add "SigAlg" and "Signature" parameter in SAML requests. The IDP will then verify the request with the certificate from PoolParty on condition that metadata or certificate from PoolParty is registered in the IDP. Otherwise the authentication will abort. If there is any problem related to certificates or verification, a workaround is skip the signing of requests, which will however downgrade security constraints:
# add <property name="requestSigned" value="false"/> to "MetadataGenerator" bean definition in auth.xml

<bean class="org.springframework.security.saml.metadata.MetadataGenerator">
    <property name="entityBaseURL" value="https://$DOMAIN/PoolParty"></property>
    <property name="extendedMetadata">
        <bean class="org.springframework.security.saml.metadata.ExtendedMetadata">
            <property name="idpDiscoveryEnabled" value="false"/>
            <property name="signingKey" value="saml"/>
            <property name="requestSigned" value="false"/>
        </bean>
    </property>
</bean>
4. Logout from PoolParty does not log a user out from the IDP
When logging out from PoolParty using the logout button at the upper right corner of PoolParty GUI, it can happen that the window reloads and the user is again logged in to PoolParty. This is because the user is still logged in from the perspective of the IDP, so the user's access to login screen after the "logout" is again authenticated, as if the user can never log out from PoolParty. This phenomenon is bound to the implementation and configuration of the IDP. PoolParty does inform the IDP about the logout activity properly. It is up to the IDP to decide if the user will be logged out globally. This is the default behavior of some IDPs, but other IDPs will ignore it and further configuration is necessary at the IDP side.