Installation Guide (Microsoft Windows)
Installation Guide (Microsoft Windows).
This section provides detailed instructions on how to install PoolParty on Windows.
Introduction
Make sure that you have followed the prerequisites defined in the PoolParty System Requirements.
Prerequisites
To install PoolParty on Microsoft Windows, you need to:
Install OpenJDK or a 64-bit build of a Sun/Oracle Java 11 SE Development Kit.
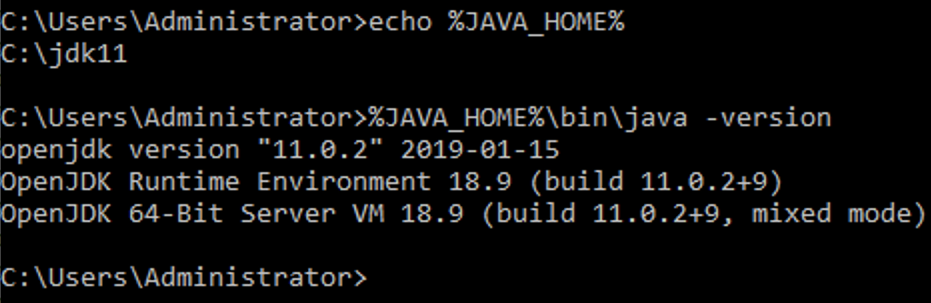
Configure JAVA_HOME. It is mandatory. For a successful installation, you should be able to see the results of echo %JAVA_HOME% and java -version.
Download the poolparty.zip.
Have a valid PoolParty licence.
Note
Password Change Policy (mandatory):
New users and legacy users have to change passwords on their first login. After logging in a user cannot execute any functions, until the password is changed.
Installation Procedure
To install PoolParty:
Step 1: Start the PoolParty Installation
To start the installation:
Create the
drive:\poolpartyhomefolder e.g.C:\Users\Public\poolparty.The installation path should not contain any spaces.
Unzip the installer in the
drive:\poolpartyhomefolder.Open the Command Prompt with Administrator privileges.
Change the directory to
drive:\poolpartyhome.Go to the
binfolder.Run as the Administrator the
init_poolparty.batfile from thebinfolder in the Command Prompt.For example, we have installed PoolParty in
C:\Users\Public\poolpartyfolder and we have run theinit_poolparty.batfile from here.
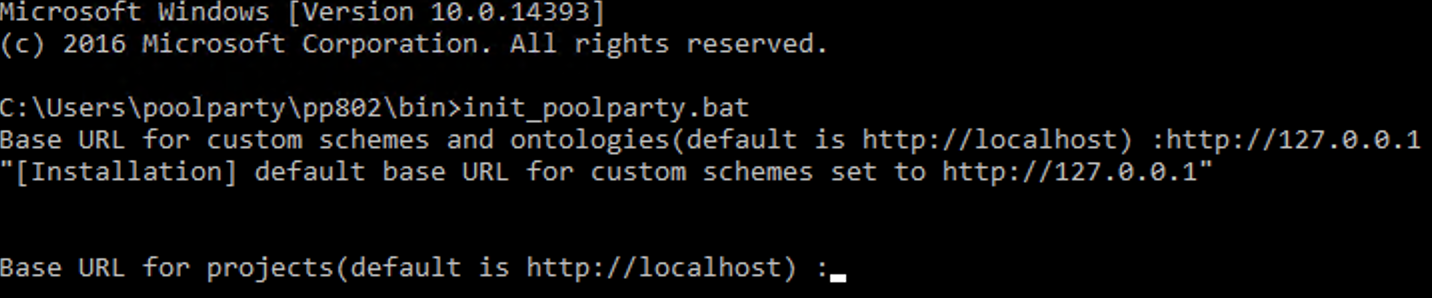
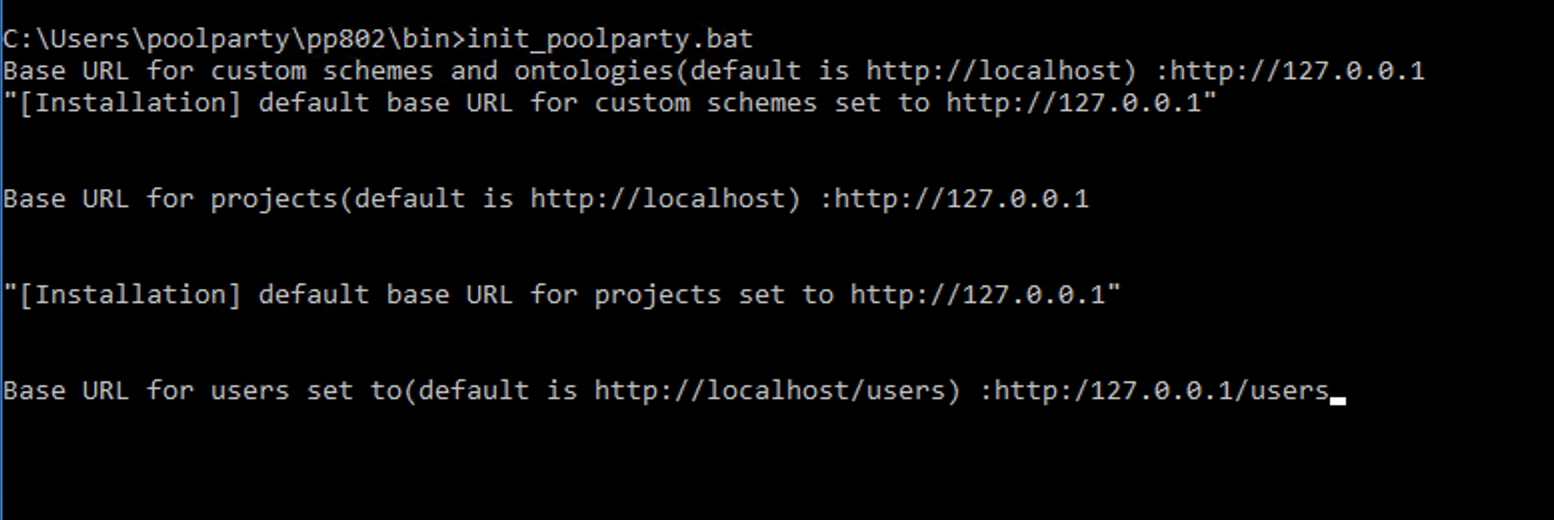
Step 2: Define the Base URLs
To define the Base URLs after invoking the init_poolparty.bat file:
Define the Base URL for custom schemes and ontologies. The default is http://localhost. Either enter the Base URL you chose or hit Enter for the default Base URL.

Note
We recommend to choose a Base URL pattern according to the planned URI Pattern Strategy Planning. Changing the Base URL pattern might imply changes in the existing data.
Define the Base URL for projects. The default is http://localhost.
Enter the Base URL you want to use or hit Enter to use the default Base URL.
Define the Base URL for users.
Enter the Base URL you want to use or hit Enter to use the default Base URL.
Step 3: Enable Verbose mode in the init_poolparty.bat file
To Enable Verbose mode in the init_poolparty.bat file, edit the init_poolparty.bat file and set echo to on. The Verbose mode is set to off by default. The ... script sets placeholders for the PoolParty configuration and enables Tomcat 9 and Solr services.|
STEP 4: Configure Solr and Apache Services
To start Solr7 PoolParty 8 and Apache Tomcat 9.0 tomcat9:
Open Services.
Find the Solr7 PoolParty 8 service.

Ensure that the service Startup type is set to Automatic, and start it.
Navigate to Apache Tomcat 9.0 tomcat9 service.

If you plan to run PoolParty on port 80, start it.
STEP 5: Provide the PoolParty license
Provide the PoolParty licence key during login to PoolParty or place it in drive:\poolpartyhome\config\licenses folder.
pp8_installation.log
For more information on the installation, see the installation log in the drive:\poolpartyhome\bin\pp8_installation.log that contains the following:
PoolParty installation Start ::
Replace placeholders in the poolparty.cfg ::
Update poolparty.properties ::
Setup Windows Services ::
Configure tomcat Windows service ::
PP8 PW init. Start ::
[NOTE] superadmin GENERATEDPASSWORD (change after first login)
[NOTE] solrGENERATEDPASSWORD (change after first login)
PP8 PW init. End ::
PoolParty installation End ::
For more information, see: