Creating a New DPU in UnifiedViews
Creating a New DPU in UnifiedViews
This section contains a guide on how to create a DPU in UnifiedViews.
If you are not familiar with basic concepts of UnifiedViews (DPU, data unit, etc.), you find thebasic concepts of UnifiedViews in a separate section with respect to DPU development.
For general installation notes, refer to the installation guide.
Quick Start Using the DPU Archetype Template
Note
Before you start, make sure that the development environment is prepared as we described it in Development Environment Setup.
UnifiedViews provides a Maven Archetype that generates a skeleton for a new DPU for you.
You can access it in two ways:
From within your IDE, using the wizard. Click New Project→Maven→ Create from archetype
Use the interactive command line.
You have first to make sure that the SWC repository is configured correctly.
The Maven Archetype is either available at the remote UnifiedViews repository under the following coordinates:
groupId:
eu.unifiedviewsartifactId:
uv-dpu-template-baseversion: matching the latest release of PoolParty, or your targeted release
Alternatively, you may also checkout and install the UnifiedViews - Plugin-devEnv repository, master branch on your computer to have all needed artifacts in your local repository.
Using the Command Line
If you are using IntelliJ as IDE, you can use IntelliJ's built-in terminal.
$ mvn archetype:generate -DarchetypeGroupId=eu.unifiedviews -DarchetypeArtifactId=uv-dpu-template-base -DarchetypeVersion=8.0.0 -Ddpu_name=my-dpu -Ddpu_type=Extractor -Ppoolparty-profile
Replace the values for dpu_name and dpu_type. For more information, go to basic concepts of UnifiedViews for supported DPU types, default is 'Transformer'.
The output should be similar to the following:
[INFO] Generating project in Interactive mode
...
Define value for property 'groupId': eu.unifiedviews.plugins
Define value for property 'artifactId': my-dpu-project
[INFO] Using property: version = 1.0.0-SNAPSHOT
Define value for property 'package' eu.unifiedviews.plugins: :
[INFO] Using property: author = SWC
[INFO] Using property: dpu_name = my-dpu
[INFO] Using property: dpu_type = Extractor
[INFO] Using property: unifiedviews_api_version = 8.0.0
Confirm properties configuration:
groupId: eu.unifiedviews.plugins
artifactId: my-dpu-project
version: 1.0.0-SNAPSHOT
package: eu.unifiedviews.plugins
author: SWC
dpu_name: my-dpu
dpu_type: Extractor
unifiedviews_api_version: 8.0.0
 Y: :
[INFO] ----------------------------------------------------------------------------
[INFO] Using following parameters for creating project from Archetype: uv-dpu-template-base:8.0.0
[INFO] ----------------------------------------------------------------------------
[INFO] Parameter: groupId, Value: eu.unifiedviews.plugins
[INFO] Parameter: artifactId, Value: my-dpu-project
[INFO] Parameter: version, Value: 1.0.0-SNAPSHOT
[INFO] Parameter: package, Value: eu.unifiedviews.plugins
[INFO] Parameter: packageInPathFormat, Value: eu/unifiedviews/plugins
[INFO] Parameter: dpu_name, Value: my-dpu
[INFO] Parameter: unifiedviews_api_version, Value: 8.0.0
[INFO] Parameter: dpu_type, Value: Extractor
[INFO] Parameter: author, Value: SWC
[INFO] Project created from Archetype in dir: /home/user/Develop/my-dpu-project
[INFO] ------------------------------------------------------------------------
[INFO] BUILD SUCCESS
[INFO] ------------------------------------------------------------------------
Note
You will be asked for missing artifactId or groupId, but not for dpu_name and dpu_type, make sure to specify them on the command line.
Creating a New DPU Using IntelliJ
This section contains a short guide on how to create a DPU using the IntelliJ IDE.
Open IntelliJ, create new project, select Maven.
Check Create from archetype.
Select the archetype with the ID as above. Click Next.
If such an archetype does not exist, just add it manually
Group ID: eu.unifiedviews,
Artifact ID: uv-dpu-template-base
Version: 8.0.0
New project details. Fill in basic info about your DPU artifact which should be created for you:
GroupId.
Maven group ID for the prepared DPU artifact. In general, all your developed DPUs should use the same Maven Group ID.
For generic plugins use: eu.unifiedviews.plugins
For PP SWC plugins use: eu.unifiedviews.plugins.swc.poolparty
ArtifactId
Version (optional):
By default, the version of the DPU will be 1.0-SNAPSHOT. You may keep it as it is.
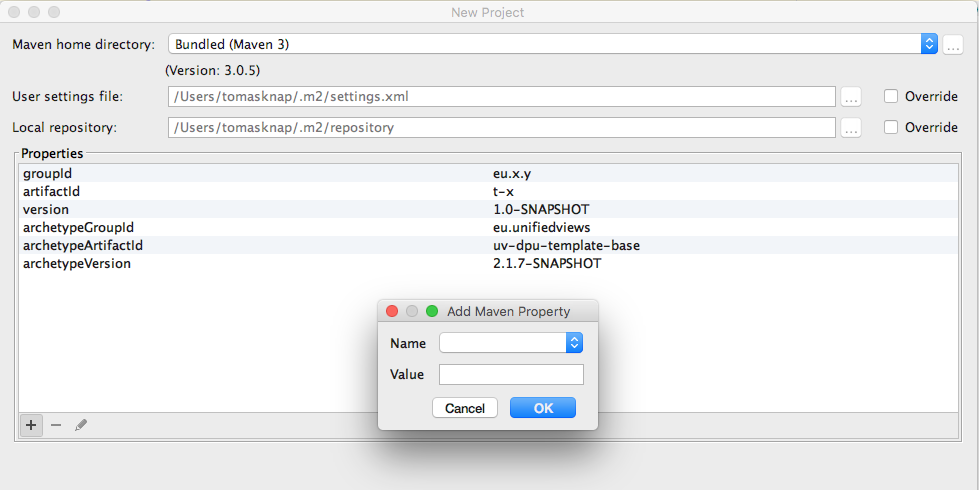
Click next, add more properties of the DPU. To add a property, click '+ (see the screenshot below). The dialogue for adding a Maven property appears.
Manually define the following properties:
dpu_typeEvery DPU is of certain DPU type.
Please specify one of the following values :
Extractor
Transformer (default)
Loader
Quality
dpu_namePlease specify the name of the DPU. This value is used as name of base DPU classes. Use only names which may be used as Java class names.
Suggested pattern CamelCase with big initial letter, e.g., MyDpu.
authorName of the DPU author. This value is inserted into comments for all generated classes.
Example: 'Tomas Knap'
Click Next, Fill project name, adjust project location to your needs:
Project name:
{first character from DPU type}-{dpuName in camelCase style}For example
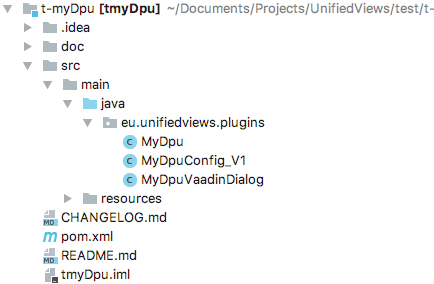
t-myDpufor the DPU above (notuv-t-myDpu)
Project location: Usually within the folder with plugins/SWC plugins.
Click Finish.
Note
If the process ends with an error ('Cannot find the given archetype'), please ensure that the Maven repository at the location https://mvn.semantic-web.at/nexus/content/repositories/releases/ is used by Maven.
You may set up such remote repositories in Preferences, search for Maven, Repositories and add such remote repository. In case of difficulties, first checkout and install UnifiedViews - Plugin-devEnv repository, master branch
After the project has been generated, you may still need to change these settings:
Mark the 'src' folder as containing source code files.
Instruct Maven to automatically import projects.
For further explanation of the generated files, please refer to: Explaining the Core DPU Files Generated by the DPU Template
You can also build the DPU (as it is) and try to import it to UnifiedViews' UI, see: Creating a New DPU Using IntelliJ
Creating a New DPU Using the Netbeans IDE
Creating a New DPU Using the Netbeans IDE
This section contains a short guide on how to use the Netbeans IDE for DPU development.
In order to set up the Netbeans IDE, follow these steps:
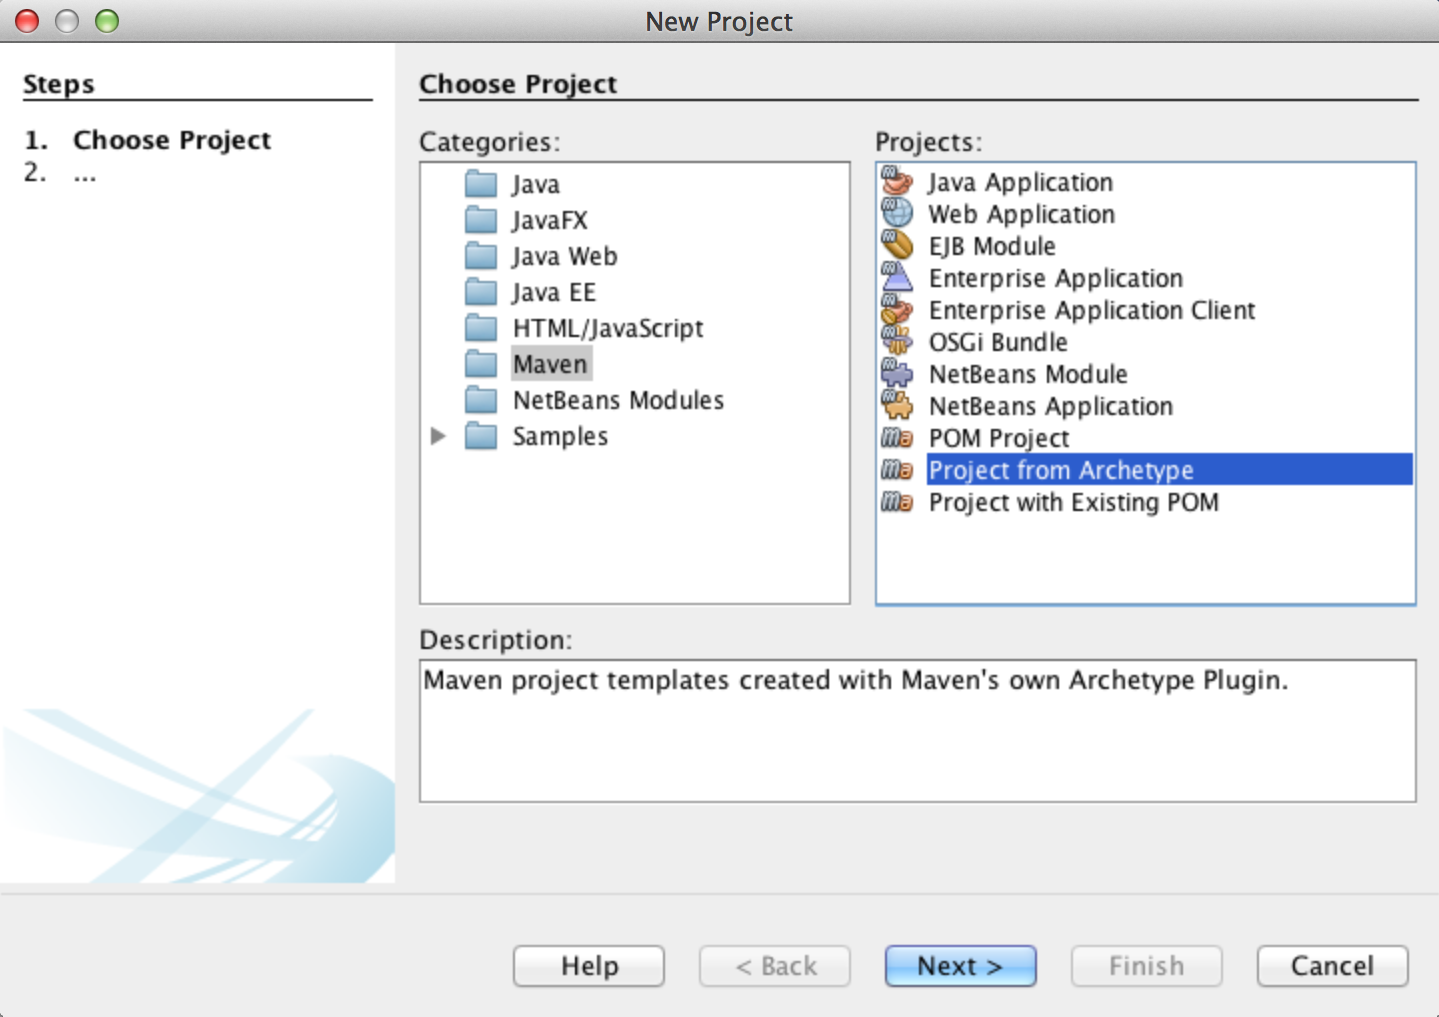
Open the Netbeans IDE, Create new project, select Maven, Project from archetype.
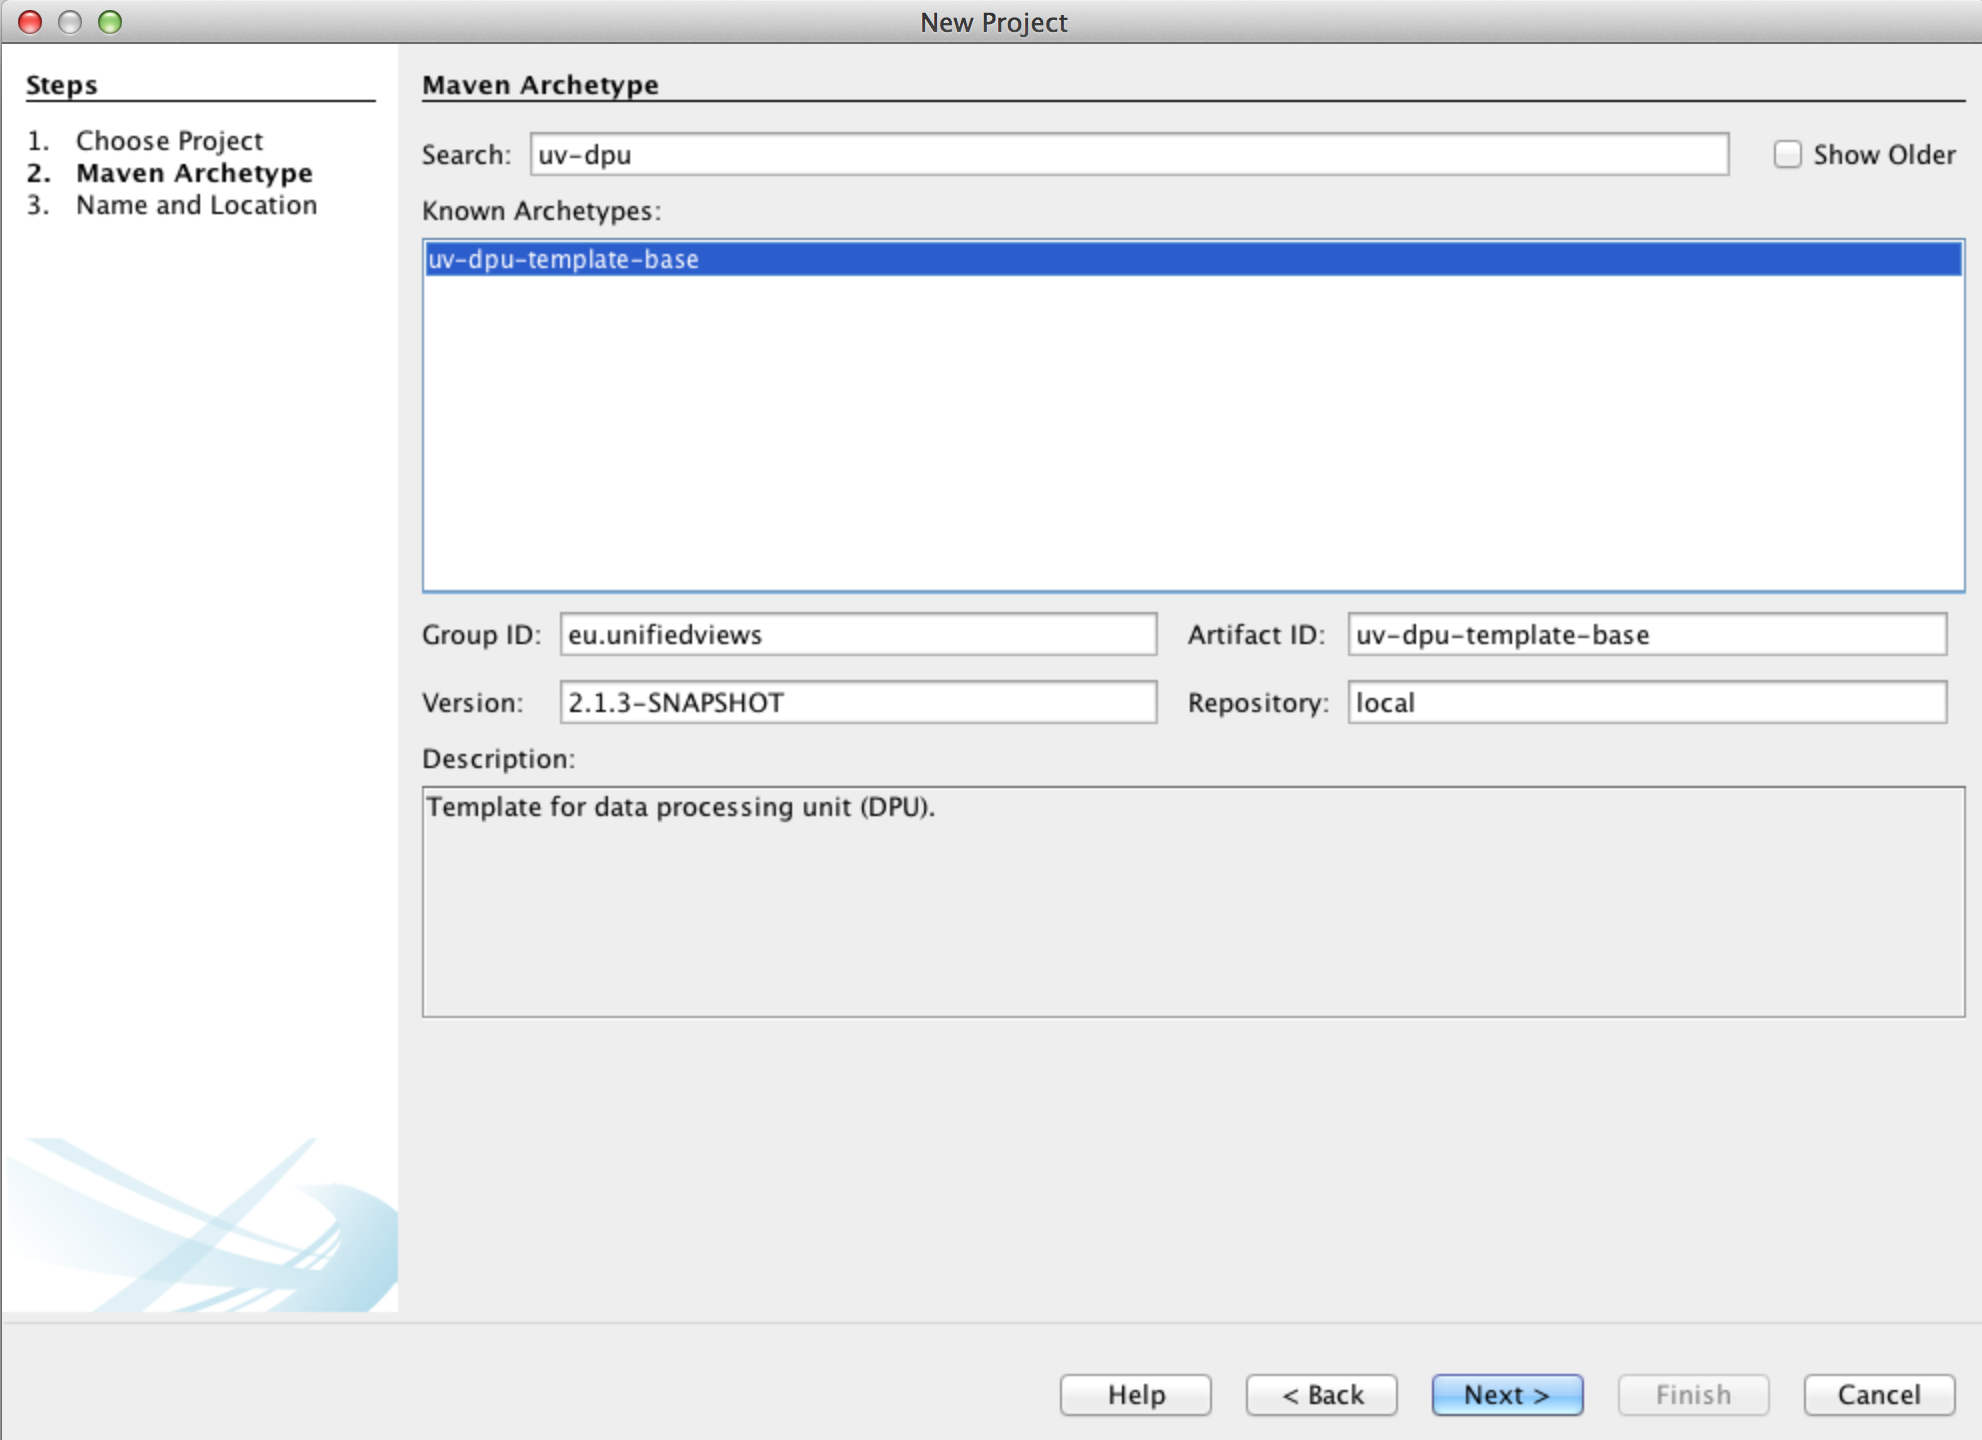
Find the archetype named uv-dpu-template-base. Check that the version is the required version of UnifiedViews API. (Every release of UnifiedViews Core has also information about the used UnifiedViews API). Click Next.
Fill in basic information:
Project Name: this value is used as name of the project directory. Project name is also used as a Maven artifact ID, which is the unique Maven identifier of the DPU created.
Project Location: choose an arbitrary location of the project on your filesystem.
Artifact Id: automatically prefilled based on project name.
Group Id: Maven group ID for the prepared DPU. In general, all your developed DPUs should use the same Maven Group ID.
Suggested pattern: For company with homepage 'mycompany.eu', use 'eu.mycompany.uv.dpu'.
Version: You may keep as it is. So the initial version of the DPU will be 1.0-SNAPSHOT
Package: Java package in which the DPU classes will reside.
Suggested form of package name: {group id}.{type in lowercase}.{dpuName lowercase}
Additional Creation Properties:
dpu_type: Every DPU is of a certain DPU type. Please specify one of the following values:
Extractor
Transformer
Loader
Quality
unifiedviews_api_version: This is the version of the API, the DPU is built against. Do not change unless you know what are you doing.
author: Name of the DPU author. This value is inserted into comments for all generated classes.
dpu_name: Please specify the name of the DPU. This value is used as name of base DPU classes
Suggested pattern CamelCase with big initial letter, example, 'MyDpu'. Use only names which may be used as Java class names.
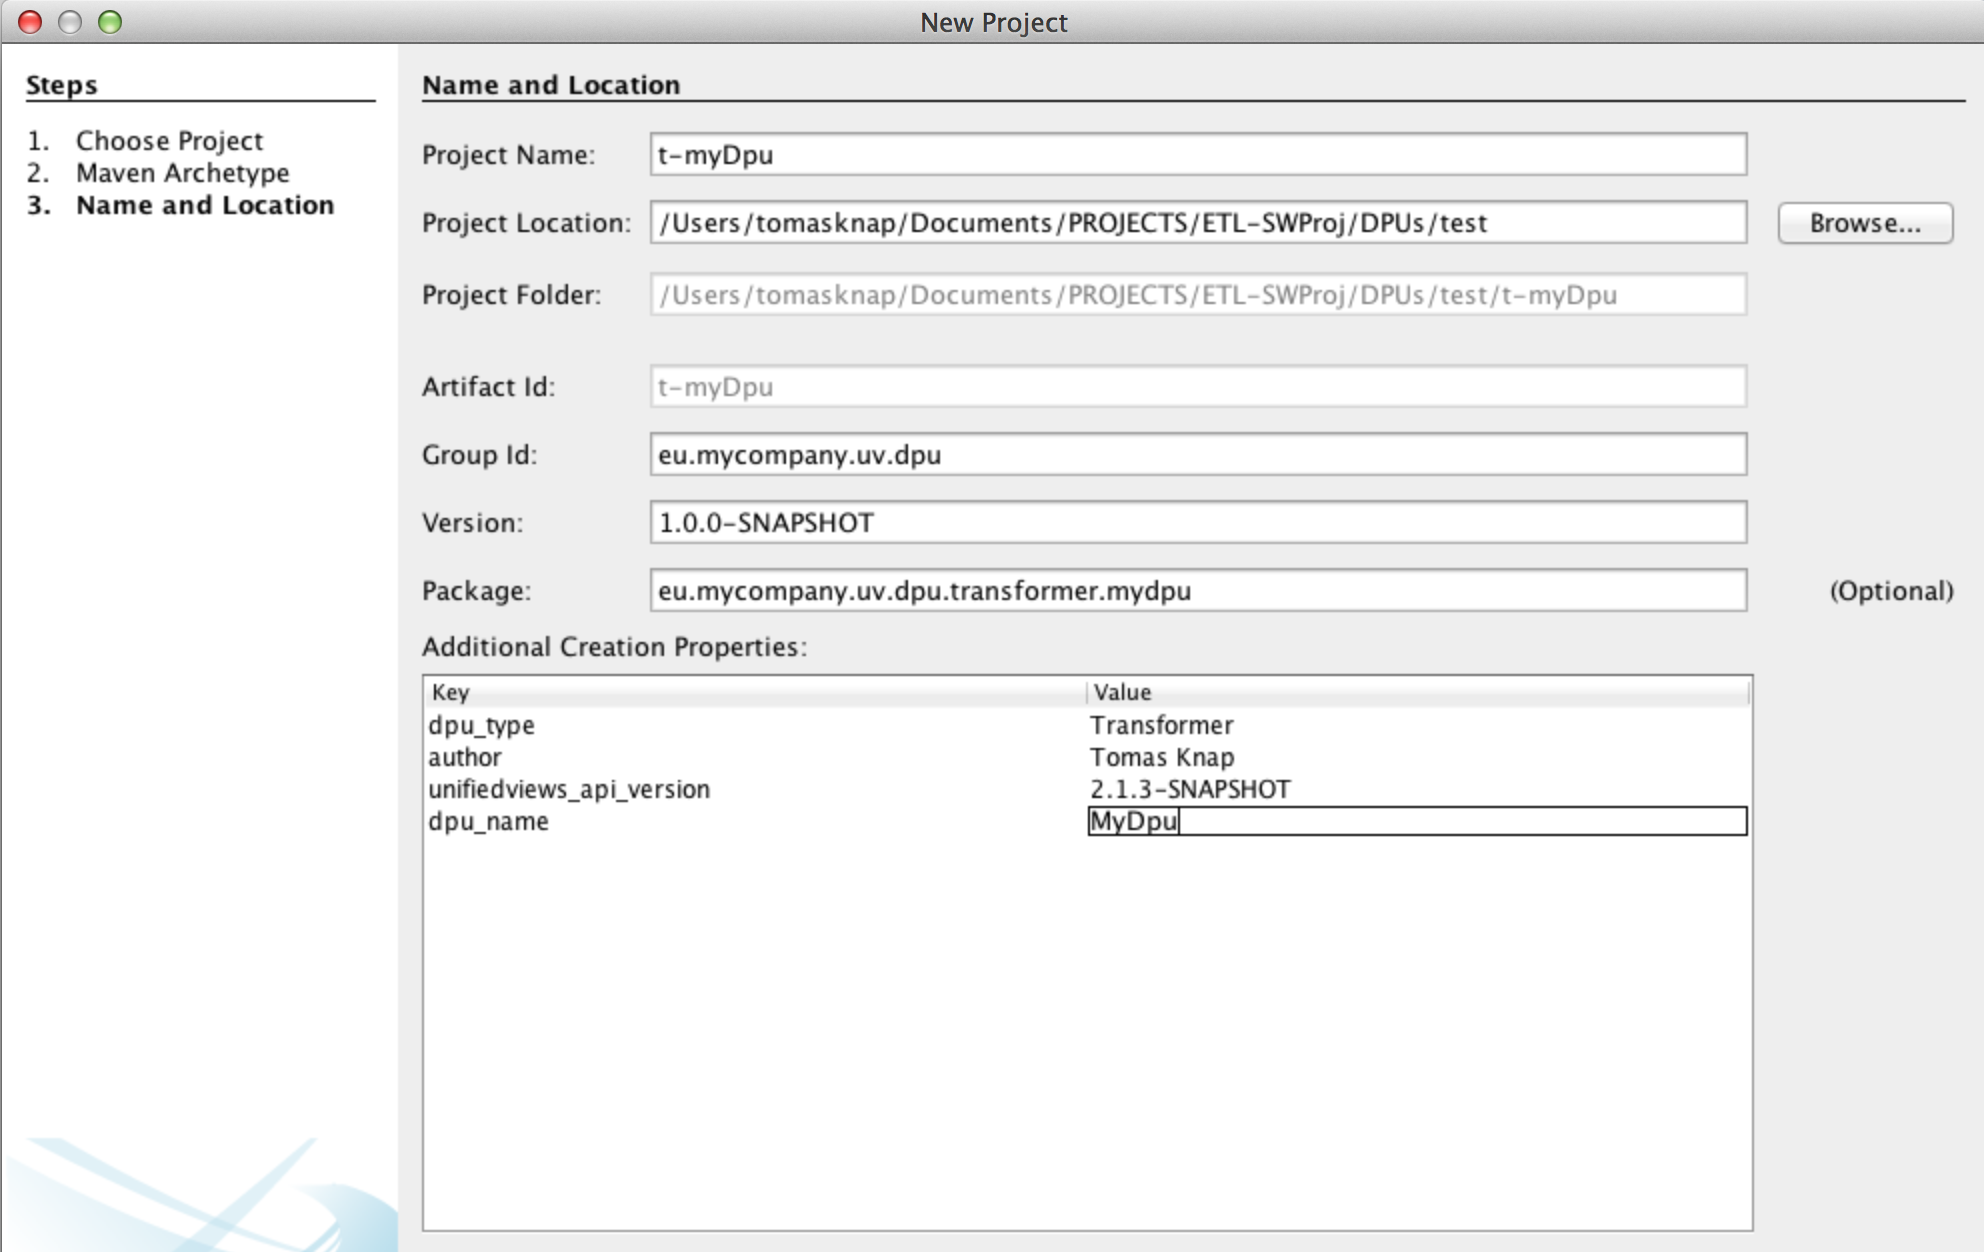
Check the prepared values. Click Finish. As a result, new project is prepared, with Core classes being already generated.
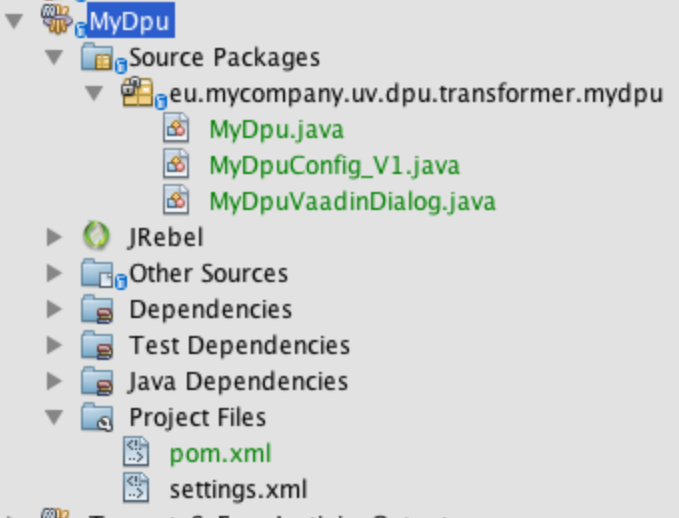
For further explanation of the generated files, please see: Explaining the Core DPU Files Generated by the DPU Template
You can also build the DPU (as it is) and try to import it to UnifiedViews UI, see: Creating a New DPU Using the Netbeans IDE
Explaining the Core DPU Files Generated by the DPU Template
Explaining the Core DPU Files Generated by the DPU Template
This section contains a short guide on files that are being created by the DPU archetype.
The previous section explained how the skeleton for a new DPU may be prepared.
This section describes the files generated by the DPU template. Let’s start with a short list to deliver the general idea, afterward more important files will be explained in detail.
Note
The discussion below assumes that you used the same value when setting up the creation of DPU from DPU template.
DPU source code files:
MyDpu.java - M ain DPU class. It contains the method 'innerExecute()' where all the business logic of the DPU goes and which is called when the DPU is executed.
MyDpuVaadinDialog - Vaadin configuration dialog. Every DPU can provide a Vaadin configuration dialog. The dialog is presented to pipeline designers in the frontend part of UnifiedViews, so that they can configure the DPU via a graphical interface.
MyDpuConfig_V1 - DPU's Configuration. The configuration class must have private fields with public getters/setters for each field. This class is used on the one hand by the main DPU class of the DPU (to configure the DPU as it is executed). On the other hand it used by Vaadin configuration dialog to configure the dialog or to store the configuration from the dialog.
DPU documentation files:
README.md
CHANGELOG.md
doc/About.md: English version of the user documentation
doc/About_{languageTag}.md (optional): here {languageTag} can be 'sk' for Slovak localization, for example.
DPU resource files for localization, localized messages, localized DPU's name:
src/main/resources/resources.properties: this file contains text that is presented to the user as a message or as a part of a configuration dialog. In our case the file contains two messages.
Note
It is highly recommended to put all the strings inside this file and not directly into code as it makes DPU localization much easier.
src/main/resources/resources_{languageTag}.properties, here, too, {languageTag} can be 'sk' for Slovak localization, for example.
Source code file, class: MyDpu.java, further referred to simply as 'MyDpu' class.
The generated MyDpu class looks as follows (imports are skipped):
@DPU.AsTransformer
public class MyDpu extends AbstractDpu<MyDpuConfig_V1> {
    private static final Logger LOG = LoggerFactory.getLogger(MyDpu.class);

    @ExtensionInitializer.Init
    public FaultTolerance faultTolerance;
        public MyDpu() {
                super(MyDpuVaadinDialog.class, ConfigHistory.noHistory(MyDpuConfig_V1.class));
        }

    @Override
    protected void innerExecute() throws DPUException {
        ContextUtils.sendShortInfo(ctx, "MyDpu.message");
    }
}
Line 1 contains an annotation, which defines the DPU type, in our case it is a transformer. Other options are
DPU.AsExtractor,DPU.AsLoader,DPU.asQuality, which corresponds with the available DPU types.Line 2 shows that every DPU prepared should extend
AbstractDpuclass, base class for DPUs. The parameter of the AbstractDpu class is the configuration class, in this caseMyDpuConfig_V1. The usage of configuration class as a template parameter ensures compatibility with the configuration dialog.Line 3 defines the Logger object which should be used when the DPU developer wants to log certain information about the DPU's execution. Only reasonable size messages and reasonable amount of messages should be logged as all the logs are stored in the database.
Lines 10 - 12 contain the draft of the main execution method, which is called when the DPU is executed. This is the place where the DPU developer should put the business logic of the DPU.
AbstractDpu class, this DPU class inherits from, provides two important variables.
They can be used inside of the main execution method innerExecute():
config - points to DPU configuration - the instance of the MyDpuConfig_V1 class
ctx - holds instance of the execution context.
The innerExecute method can throw a DPUException.
This exception should be used in case the DPU developer would like to express failure of the DPU due to error in the DPU execution or due to cancellation of the DPU's execution. Some helpers and other classes also throw this exception. In general this exception is considered to be a non-recovery failure, which means, the DPU should fail.
In Line 14, the
ContextUtilsclass is used to send an event. Events are another way of communication with the user, they present a high level overview of the DPU's execution. When compared with using Logger from Line 3, events should be send only in significant cases, so the rule of thumb is that every DPU should send just a couple of these events. For example, information about a number of input entries processed. Also another difference is if an ERROR level event is sent, then the DPU is considered to have failed. It finishes with ERROR.In this case, in Line 11, an information message is send.
ContextUtils also provides other methods for message sending and a method for creation of DPUException.
Every string passed (besides args) to ContextUtils goes through the localization process. The second parameter of sendShortInfo() method in Line 11 actually points to the file with resources. Translations of the message, so the method sendShortInfo()automatically supports localization. For this reason, developers are encouraged to use ContextUtils for message sending and creation of DPUException.
Note
As a DPU developer you yourself must check for requests for cancellation of execution. This check should be implemented e.g. after/before every new entry (file, graph) is being processed by the DPU.
This can be done by using the following code fragment:
if (ctx.canceled()) {
    log.info("DPU execution was cancelled.");
    break;
}Source code file, class: MyDpuVaadinDialog.java, further referred to simply as 'MyDpuVaadinDialog' class.
The generated MyDpuVaadinDialog class looks as follows, imports are skipped:
public class MyDpuVaadinDialog extends AbstractDialog<MyDpuConfig_V1> {

    public MyDpuVaadinDialog() {
        super(MyDpu.class);
    }

        @Override
    public void setConfiguration(MyDpuConfig_V1 c) throws DPUConfigException {
    }

        @Override
    public MyDpuConfig_V1 getConfiguration() throws DPUConfigException {
        final MyDpuConfig_V1 c = new MyDpuConfig_V1();
        return c;
    }

        @Override
    public void buildDialogLayout() {
        final VerticalLayout mainLayout = new VerticalLayout();
        mainLayout.setWidth("100%");
        mainLayout.setHeight("-1px");
        mainLayout.setMargin(true);

                mainLayout.addComponent(new Label(ctx.tr("MyDpu.dialog.label")));

                setCompositionRoot(mainLayout);
    }
}
Line 1 shows that the Vaadin configuration dialog class of the DPU always extends AbstractDialog class. We use the base dialog abstract class with our configuration as a template parameter. The template parameter ensures compatibility of configuration between Main DPU class and Vaadin configuration dialog class.
Lines 3 - 5 represent constructor for the Vaadin configuration class. In the constructor we need to pass the main DPU class to the AbstractDialog class. Thanks to this, AbstractDialog can scan the DPU class for configuration history and extensions.
In Lines 7- 9 the configuration dialog class is given a configuration object to load. So the DPU developer has to specify in this method how the values from the configuration object should be loaded to the Vaadin components. This method is called when the configuration dialog needs to be prepared for the pipeline designer.
In Lines 11 - 15, the DPU developer should specify how the values taken from the Vaadin components should be serialized to the configuration object. This is the last place where any validation of the configuration can be done. This method is called when the pipeline designer saves the configuration dialog. In case of invalid configuration DPUConfigException should be thrown by the DPU developer.
Lines 17 - 27 create Vaadin dialog layout. As specified in Line 20, the width of the dialog is set to '100%', so it takes the whole space in the horizontal level.
Line 21 specifies height to be ' -1px', which means that the layout takes only as much vertical space as needed.
In Line 24 the ctx.tr returns the value assigned to the given string
MyDpu.dialog.labelin resources.properties, thus, it returns the proper localized version of the label. If no value is presented in resource.properties, the stringMyDpu.dialog.labelis returned. It is highly recommended to externalize messages to resources.properties – out of the code.Additionally, Line 24 creates a Label with the text. The Label is a simple read-only Vaadin component for displaying text. Finally, mainLayout. addComponent() method in Line 24 adds the given component, the Label, to the layout. If we would not call this method, the Label would not be presented in the layout/dialog.
Line 26 sets the above defined layout
mainLayoutas the root layout of the dialog.
For more information about Vaadin component’s and layouts, please refer to the Vaadin homepage, where you can find the excellent Book of Vaadin.
Source code file, class: eu.mycompany.uv.dpu.transformer.mydpu.MyDpuConfig_V1.java, further referred to simply as 'MyDpuConfig_V' class.
The generated MyDpuConfig_V1 class looks as follows (imports are skipped):
public class MyDpuConfig_V1 {
    public MyDpuConfig_V1() {
    }
}
Note
As can be seen in Lines 1 - 4, this a normal Java class, which has non-parametric constructor. The configuration class must have private fields with public getters/setters for each configuration field. This class is used on one side by the main DPU class of the DPU (to configure the DPU as it is executed) and on the other side by the Vaadin configuration dialog to configure the dialog or to store the configuration from the dialog.
The DPU template generates the following three files:
README.md: this file is the main file, which points to CHANGELOG.md file and user documentation files (doc/About.md). Further it includes technical documentation if needed.
CHANGELOG.md: this file holds the version history.
doc/About.md: this file contains the user documentation, which is also displayed to DPU users in UnifiedViews. Such user documentation may also be localized.
Note
UnifiedViews frontend shows the user documentation involved in doc/About.md - in the proper version based on the localization.
The generated file looks as follows; the file follows Markdown syntax:
MyDpu
----------

### Documentation

* see [Plugin Documentation](./doc/About.md)

### Technical notes

* May be used instead of DPU X, it also replaces DPY Y.

### Version history

* see [Changelog](./CHANGELOG.md)
In Line 6, README file contains links to the user documentation (About.md, see below). Line 14 contains links to Changelog file (see below). Further, if you would like to specify certain technical notes, you may specify them on Line 10.
The generated file looks as follows; the file follows Markdown syntax:
MyDpu
----------

v1.0.0-SNAPSHOT
---
* Initial version of the DPU
Lines 4-6 contains the description of the initial version.
Note
Whenever you change the version in the future, you should also specify the new version and features included in such version here.
Basically for each new version you have to add the following fragment to the start:
v1.1
---
* Description of the bugfix/feature 1
* Description of the bugfix/feature 2
The content of the About.md file contains the user documentation. As the DPU is built, it is converted to About.html file, which is then displayed in the UnifiedViews frontend in the DPU detail as user documentation.
The file generated by the template looks as follows; the file follows the Markdown syntax:
### Description

Description of the DPU intended for the user of the DPU.

### Configuration parameters

| Name | Description |
|:----|:----|
|**Param** | Param which ...|

### Inputs and outputs

|Name |Type | DataUnit | Description | Mandatory |
|:--------|:------:|:------:|:-------------|:---------------------:|
|input |i |FilesDataUnit |Input files |x|
|output |o |RdfDataUnit |Produced RDF data |x|
Line 3 contains description of the DPU, which is then depicted to user. This should be quite short, but should explain to nontechnical users what the DPU does.
Lines 5-10 contain description of parameters which are available in Vaadin configuration dialog.
Lines 11-16 contains description of input/output data units which the DPU uses. Every data unit contains its name (as in Main DPU class), type (i = it is input data unit, o = it is output data unit), dataUnit (FilesDataUnit for files data unit, RdfDataUnit for rdf data unit), description and flag, whether it is mandatory or not (if it is mandatory, pipeline designer has to use such input/output data unit).
A sample file converted to HTML looks as follows:
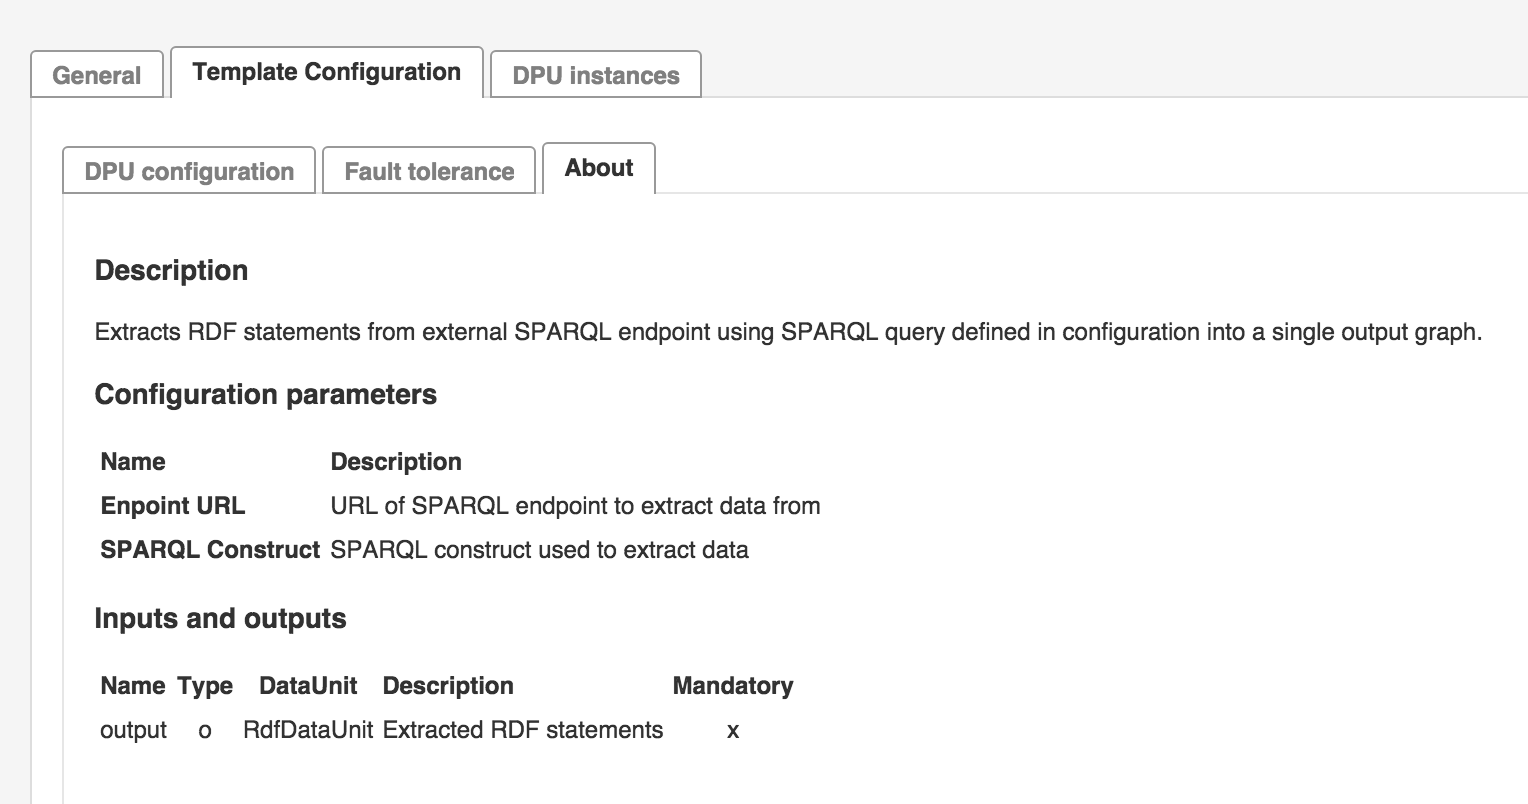 |
If you want to support also user documentation in a language other than English, you can create more such user documentation files and store them as doc/About_{languageTag}.md, where {languageTag} is for example 'sk' for Slovak localization.
UnifiedViews automatically ensures that the proper user documentation is loaded based on the localization of the whole application.
The file generated by the template looks as follows, it contains key=value pairs:
# Contains localization of used string in dialog and events. To avoid property collision all values
# must be prefixed by '{dpu name}.' for DPU execution and '{dpu name}.dialog' for configuration dialog!
# Additional prefix in form of dpu name is optional.

# DPU execution.
MyDpu.message = DPU is running ...

# DPU's dialog.
MyDpu.dialog.label = DPU's configuration
The generated file contains key-value pairs holding localized versions of strings used by the DPU .
You have to prefix message identifiers (keys) with ‘{dpu name}.’ or ‘{dpu name}.dialog’ based on their usage during DPU execution or in dialog respectively.
The generated file should contain English strings.
If you want to support also localizations in other languages than English, you may create more of such resource files and store them as resource
_{languageTag}.properties,where {languageTag} is for example 'sk' for Slovak localization. UnifiedViews automatically ensures that the proper messages are used in the DPUs based on the localization of the whole application.
Create Pure JavaScript Dialogues
Create Pure JavaScript Dialogues
This section contains a short guide on how to develop JavaScript dialogues based on the Vaadin Framework.
Basic idea is described in https://vaadin.com/blog/vaadin-7-loves-javascript-components.
Step 1: Define server part of your JavaScript component (see SparqlEditorComponent for more details).
package eu.unifiedviews.plugins.transformer.sparql.construct.editor;

@JavaScript({"vaadin://js/sparqleditor/sparqleditor.js", "vaadin://js/sparqleditor/jquery-v1.11.1.min.js", "vaadin://js/sparqleditor/yasqe.bundled.min.js"})
public class SparqlEditorComponent extends AbstractJavaScriptComponent {

        ...
        @Override
        protected SparqlEditorState getState() {
        return (SparqlEditorState) super.getState();
        }

}
@JavaScript annotation
extends AbstractJavaScriptComponent
override getState() method (see below)
Step 2: Prepare class holding the state object being exchanged between JS part of the component and server part.
In the example below, it just exchanges one string variable.
public class SparqlEditorState extends JavaScriptComponentState {
    public String query = "";
}
Note
Unfortunately, a component's state cannot be modified on the client side, to be updated on the server side. (https://vaadin.com/blog/vaadin-7-loves-javascript-components)
Any possible getters and setters in a state can not be used on the JavaScript side. The values are accessed directly as properties. This is true even if you explicitly have written the accessors in your state class.
There is a way how to define new callbacks for JavaScript in Java (to e.g. report status change back to the server): addFunction on the SparqlEditorComponent
Step 3: Prepare JS part - which has to define the controller, which is bind to the server part component based on its full name (including package).
So in the example above the following would be done:
eu_unifiedviews_plugins_transformer_sparql_construct_editor_SparqlEditorComponent = function() {

    // Create the component
    var mycomponent = new mylibrary.MyComponent(this.getElement());

    // Handle changes from the server-side - whenewher the query is changed, this function is called
    this.onStateChange = function() {
        //access the state object and get the value for query via this.getState().query;
    };

}
The function name must reflect the name and package of the server part.
sparqlEditorComponent = new SparqlEditorComponent();
sparqlEditorComponent.setStyleName("SparqlEditor");
sparqlEditorComponent.setSizeFull();
sparqlEditorComponent.setImmediate(true);


// Process a value input by the user from the client-side
sparqlEditorComponent.addValueChangeListener(
        new SparqlEditorComponent.CustomValueChangeListener() {
            @Override
            public void valueChange() {
                ...
            }
});(Server part - value change listeners)
public interface CustomValueChangeListener extends Serializable {
    void valueChange();
}

List<CustomValueChangeListener> listeners = new ArrayList<CustomValueChangeListener>();

public void addValueChangeListener(CustomValueChangeListener listener) {
    listeners.add(listener);
}
https://vaadin.com/blog/vaadin-7-loves-javascript-components
https://dzone.com/articles/integrating-html-and-0
https://vaadin.com/docs/v8/framework/gwt/gwt-javascript/#gwt.javascript.example
JS to JAVA: https://vaadin.com/forum/thread/4690491
https://vaadin.com/api/com/vaadin/ui/AbstractJavaScriptComponent.html
Localization for DPU Components
Localization for DPU Components
This section contains a short guide on how to enable localization for DPU components. The file resources.properties in this location src/main/resources/resources.properties takes care of the localization for any DPU component present.Labels in dialogues, options, messages, and exceptions will be extended with the text contained in it. This file contains text that is presented to the user as a message or as a part of a configuration dialogue. In our case the file contains two messages.
Note
It’s highly recommended to put all the strings inside this file and not directly into code as it makes DPU localization much easier.
In order to properly support localization, each string that should be localized shall go through the localization function presented under user context ctx.tr. There might be some exceptions in helpers, for example ContextUtils call this function on every given part of messages.Text in DPUs should be denoted as a name of properties in the resource.properties file. See existing DPUs for examples. It’s highly recommended to prefix each string with DPU name.
DPU Dialogues - Styling of DPUs with PoolParty
DPU Dialogues - Styling of DPUs with PoolParty
@Override
public void buildDialogLayout() {

        final VerticalLayout mainLayout = new VerticalLayout();
        mainLayout.setWidth("100%");
        mainLayout.setMargin(true);
        mainLayout.setSpacing(true);

        mainLayout.addComponent(new Label(ctx.tr("MyDpu.dialog.label")));

        tfConfigSample = new TextField(ctx.tr("MyDpu.dialog.tfSample.caption"));
        tfConfigSample.setWidth("100%");
        tfConfigSample.setNullRepresentation("");
        tfConfigSample.setRequired(false);
        tfConfigSample.setImmediate(true);
        mainLayout.addComponent(tfConfigSample);

    setCompositionRoot(mainLayout);
}A value is required. When the configuration is saved, it displays a custom error. This does not provide inline validation.
@Override
public void buildDialogLayout() {
    final VerticalLayout mainLayout = new VerticalLayout();
    mainLayout.setWidth("100%");
    mainLayout.setMargin(true);
    mainLayout.setSpacing(true);

    mainLayout.addComponent(new Label(ctx.tr("MyDpu.dialog.label")));

    tfConfigSample = new TextField(ctx.tr("MyDpu.dialog.tfSample.caption"));
    tfConfigSample.setWidth("100%");
    tfConfigSample.setNullRepresentation("");
    tfConfigSample.setRequired(true);
        tfConfigSample.setImmediate(true);
    mainLayout.addComponent(tfConfigSample);

    setCompositionRoot(mainLayout);
}


 @Override
    public MyDpuConfig_V1 getConfiguration() throws DPUConfigException {
        final MyDpuConfig_V1 c = new MyDpuConfig_V1();

                if (!tfConfigSample.isValid()) {
            throw new DPUConfigException(ctx.tr("MyDpu.dialog.label.notValid"));
        }

        c.setConfigSample(tfConfigSample.getValue());
        return c;
    }
When the configuration is saved, it displays a custom error. Also it provides inline validation, as the user is editing the configuration
@Override
public void buildDialogLayout() {
    final VerticalLayout mainLayout = new VerticalLayout();
    mainLayout.setWidth("100%");
    mainLayout.setMargin(true);
    mainLayout.setSpacing(true);

    mainLayout.addComponent(new Label(ctx.tr("MyDpu.dialog.label")));

    tfConfigSample = new TextField(ctx.tr("MyDpu.dialog.tfSample.caption"));
    tfConfigSample.setWidth("100%");
    tfConfigSample.setNullRepresentation("");
    tfConfigSample.setRequired(true);
        tfConfigSample.setImmediate(true);
    tfConfigSample.addValidator(value -> {
        if (tfConfigSample.getValue().isEmpty() || tfConfigSample.getValue().length() < 3) {
            throw new Validator.InvalidValueException(ctx.tr("MyDpu.dialog.label.notValid"));
        }
    });
    mainLayout.addComponent(tfConfigSample);

    setCompositionRoot(mainLayout);
}


 @Override
    public MyDpuConfig_V1 getConfiguration() throws DPUConfigException {
        final MyDpuConfig_V1 c = new MyDpuConfig_V1();

        try {
                tfConfigSample.validate();
                } catch (Validator.InvalidValueException e) {
                throw new DPUConfigException(e.getMessage(), e);
                }

        c.setConfigSample(tfConfigSample.getValue());
        return c;
    }
ComboBox cbMode = new ComboBox(ctx.tr("BatchLinkingDbpedia.dialog.processingmode.caption"));
cbMode.addItem(BatchLinkingDbpediaConfig_V1.Mode.OPTIMISTIC);
cbMode.setItemCaption(BatchLinkingDbpediaConfig_V1.Mode.OPTIMISTIC, ctx.tr("BatchLinkingDbpedia.dialog.processingmode.optimistic"));
cbMode.addItem(BatchLinkingDbpediaConfig_V1.Mode.CONSERVATIVE);
cbMode.setItemCaption(BatchLinkingDbpediaConfig_V1.Mode.CONSERVATIVE, ctx.tr("BatchLinkingDbpedia.dialog.processingmode.conservative"));
cbMode.setInvalidAllowed(false);
cbMode.setNullSelectionAllowed(false);
cbMode.setImmediate(true);
mainLayout.addComponent(cbMode);


# Set value to config object
c.setLinkingMode((BatchLinkingDbpediaConfig_V1.Mode)cbMode.getValue());


# Get value from config object
cbMode.setValue(c.getLinkingMode());This concerns items, which are not simple strings.
See the code below, important is the 'cbTypeOfLinkProduced.setNewItemsAllowed(true);' option, plus 'newItemHandler' to process new entries (if they are not just simple strings)
ComboBox cbTypeOfLinkProduced  = new ComboBox(ctx.tr("BatchLinkingDbpedia.dialog.linkprooduced.caption"));
cbTypeOfLinkProduced.setInvalidAllowed(false);
cbTypeOfLinkProduced.setNullSelectionAllowed(false);
cbTypeOfLinkProduced.setNewItemsAllowed(true);
cbTypeOfLinkProduced.setTextInputAllowed(true);
cbTypeOfLinkProduced.setImmediate(true);
cbTypeOfLinkProduced.addValidator(value -> {
    if (!isValidIri(value)) {
        throw new Validator.InvalidValueException(ctx.tr("BatchLinkingDbpedia.dialog.linkprooduced.invalid"));
    }
});
// Custom handling for new items
cbTypeOfLinkProduced.setNewItemHandler(new AbstractSelect.NewItemHandler() {
    @Override
    public void addNewItem(String newItemCaption) {
        try {
                        IRI newLink = VF.createIRI(newItemCaption);
                        cbTypeOfLinkProduced.addItem(newLink);

                        // Remember to set the selection to the new item
                        cbTypeOfLinkProduced.select(newLink);
        } catch (Exception e) {
            throw new Validator.InvalidValueException(ctx.tr("BatchLinkingDbpedia.dialog.linkprooduced.invalid"));
        }
    }
});
mainLayout.addComponent(cbTypeOfLinkProduced);


# Saving the configuration to the config object - in "getConfiguration" method:
cbTypeOfLinkProduced.validate();
c.setLinkUri((IRI)cbTypeOfLinkProduced.getValue());


# Reading the configuration from the config object - in "setConfiguration" method:
comboBox.addItem(SAMEAS);
..
comboBox.addItem(c.getLinkUri());
comboBox.select(c.getLinkUri());When creating a new button, use the following additional styles:
button.addStyleName("Button Button--sm Button--primary");