Installation Guide (Linux)
Introduction
Make sure that you have followed the prerequisites defined in the PoolParty System Requirements.
Tip
PoolParty 9.1 installation includes Keycloak version 21.1.2.
Caution
It is recommended to run the installation as a root user to ensure smooth installation process.
Prerequisites
The following prerequisites must be satisfied to be able to install PoolParty on a Linux system:
a valid PoolParty license
minimum OpenJDK 11 installed, better OpenJDK 17
a 64-bit Linux CentOS/RHEL/Oracle Linux 7 or 8 server
you will need to download the PoolParty installer (
PoolParty.run) from our download area and turn it into an executable (chmod) file.properly set up
JAVA_HOMEdefine a user (for example
'poolparty') on the server assigned to a respective group (for example'poolparty') that should be used to run the Tomcat server
Caution
PoolParty 2022 R2 (9.1.0) now supports Java 17 runtime environment. Support for Java 11 will be discontinued after PoolParty 2023 R2.
Note
Apache Tomcat will be running as localhost using port 8081.
Keycloak will be running as localhost using port 8181.
The built-in Apache Solr server will be running as localhost using port 8983.
Installation Procedure
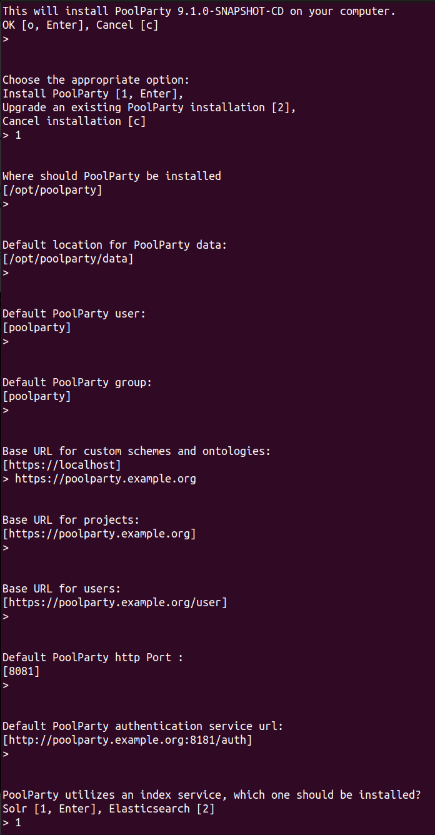
STEP 1: Open the terminal and run there the installer PoolParty.run. At first you will be prompted that PoolParty will be installed on your system. To confirm press either o or Enter. If you want to cancel the installation press c. The subsequent screenshot illustrates the complete installation routine.

STEP 2: Start a new installation by either entering 1 or pressing Enter.
STEP 3: Now you are prompted to specify the installation directory for both the PoolParty Application Directory (PPAppDir) and PoolParty Data Directory (PPDataDir).
You can define the path of your PoolParty directory structure on your Linux system . The default setting for PPAppDir is /opt/poolparty. If you want to use the default path, simply press Enter, otherwise enter the desired path and confirm with Enter. The default directory for PPDataDir is /opt/poolparty/data. To use the default path, simply press Enter, otherwise enter the desired directory path and confirm with Enter.
STEP 4: Define a User and Group
Now you need to specify the user owning the installation directory; the default setting is poolparty. You can of course enter the desired user or use the default user. To confirm the name of the user press Enter. Then you need to define the group that will be running the PoolParty application; again the default group name is poolparty; you can either confirm the default group name with Enter or enter the desired group name and press Enter.
STEP 5: Adjust the Base URIs.
In this step you can define the base URIs used in PoolParty per default to create projects, ontologies and custom schemes, or users.
Tip
We recommend adapting the baseURI to meaningful values according to the URI Pattern Strategy Planningto use such for creating data in PoolParty. Changing such later might imply changes to the already created data.
Note
Please keep in mind that all URLs are URIs.
Now you will have to specify the base URL for custom schemes and ontologies. The default value is http://localhost, but we recommend using a meaningful name such as https://poolparty.example.org). Confirm the specified URI by pressing Enter. Continue with specifying the base URLs for projects (default: http://localhost respectively the URL specified for custom schemes and ontologies - e.g. https://poolparty.example.org), users (default: http://localhost/users).
STEP 6: Miscellaneous Settings
Specify the Servlet PoolParty port; the default value for the http port is 8081.
Then enter the location of the PoolParty authentication service; the default is https://localhost:8181/auth.
Now you only need to specify the index service to be used by PoolParty - either Solr or Elasticsearch. The default setting is Solr.
You confirm these settings by pressing Enter.
Tip
Please keep in mind that the variables specified during the installation process will be stored in various configuration files, including the poolparty.properties file. These settings can be edited at a later point but we recommend that you use meaningful naming for your URIs to avoid any necessity for making changes at a later point.
Note
SOLR is fully supported. Elasticsearch was added to your PoolParty installation. Elasticsearch credentials are part of the final output. Elasticsearch is installed to /opt/poolparty/index, but Elasticsearch is not automatically set up in PoolParty. PoolParty currently supports Elasticsearch 7.17.
STEP 7: Finalize the Installation.
Now you are presented with an overview of all the settings you have just made. Press Enter to complete the installation. Next the credentials for the Tomcat Web Application Manager will be displayed along with some additional details on the installation process.
STEP 8: Move Your License Keys to the License Directory
Add your license keys to the license directory <PPAppDir>/config/licenses.
The default setting for the license directory is /opt/poolparty/config/licenses.
STEP 9: Start PoolParty
Open a console and change to the poolparty user using the following command if needed.
sudo su poolparty
Now start PoolParty (more details available at Controlling PoolParty)
<PPAppDir>/bin/poolparty start
Note
The PoolParty start script will also start and stop the packaged Solr server.
JAVA_HOME Configuration Files
Sometimes it may be necessary to specifically declare your JAVA_HOME parameter which is defined in the poolparty.conf file (refer to the poolparty.conf section for more details on how to set the JAVA_HOME parameter). You can also specify this parameter for Solr in the <PPAppDir>/data/solr/solrcore.properties file by inserting the same JAVA_HOME line as you did before in the poolparty.conf.
Note
PoolParty 2022 R2 (9.1.0) now supports Java 17 runtime environment. Support for Java 11 will be discontinued after PoolParty 2023 R2.
Post-Installation Tasks
Open a browser and access your PoolParty installation at http://localhost:8081/PoolParty. Consult the subsequent sections in the Administrator Guide which may be relevant for your post-installation tasks: