Pipelines Section
Pipelines Section
This section contains a short guide on how to work with the pipelines section in UnifiedViews.
The Pipelines section of the main menu is used to create, view and perform specific actions with pipelines, for more information, see: UnifiedViews Glossary.
Note
Terms special to UnifiedViews and their meaning are explained in our UnifiedViews Glossary.
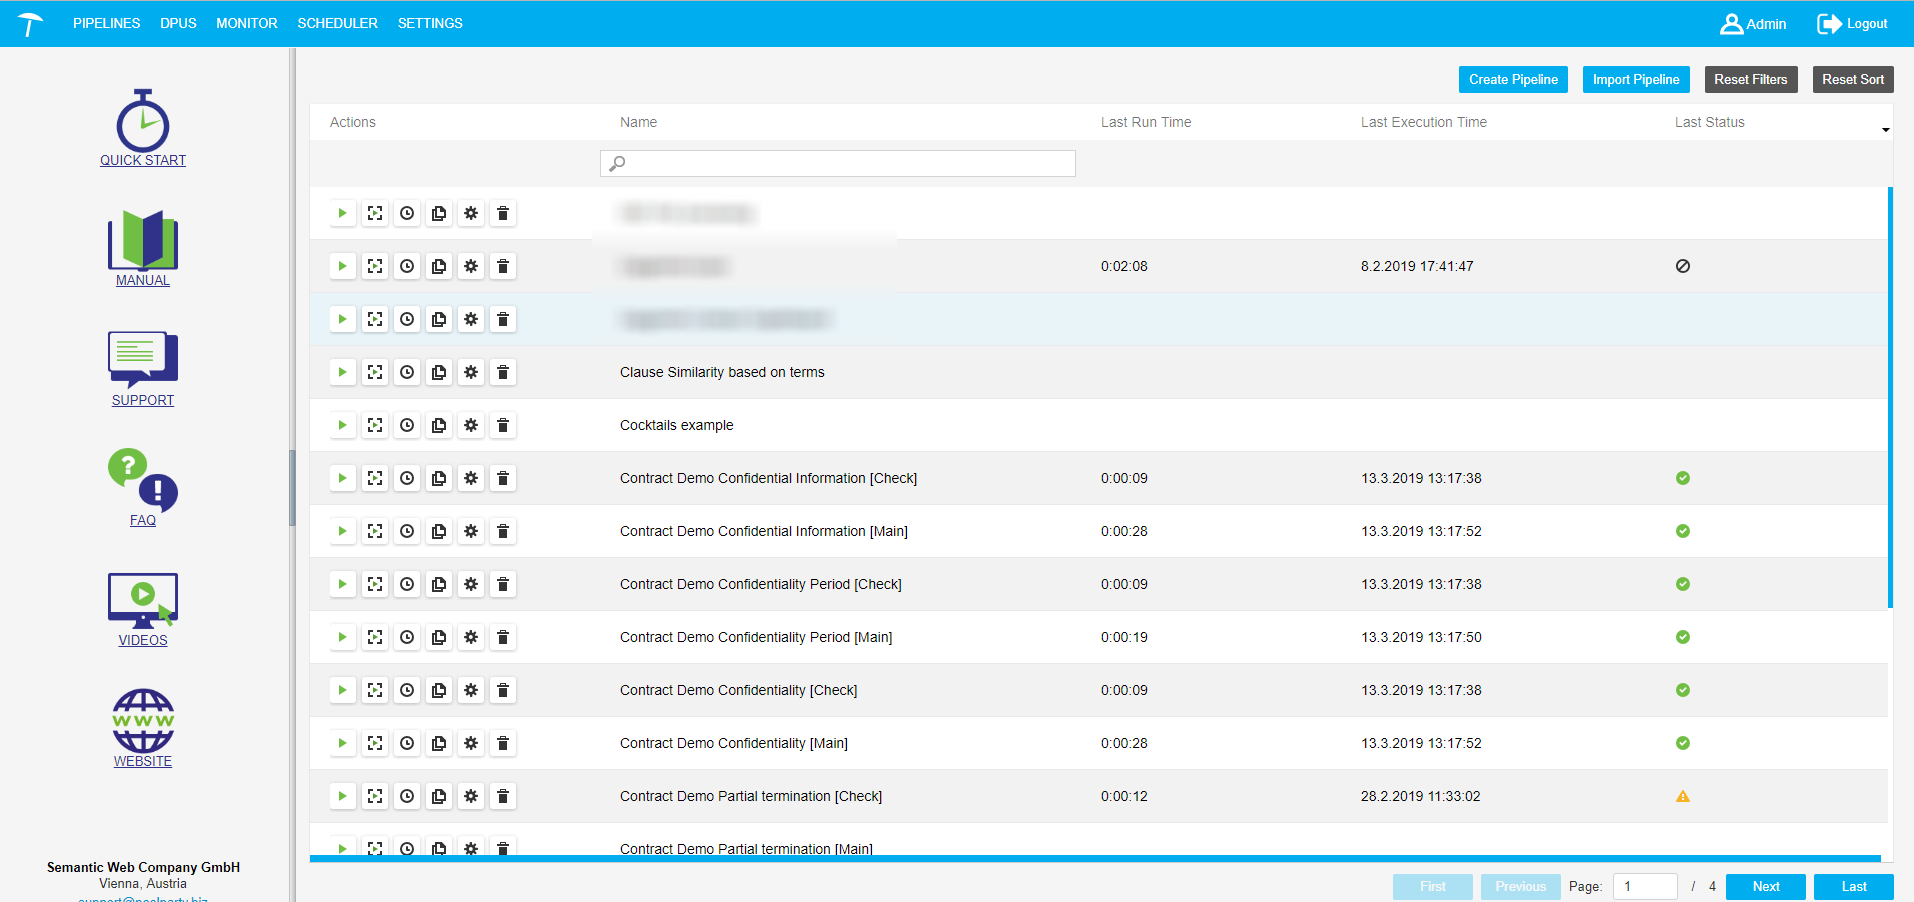
The Pipelines section is represented as a table that includes:
A list of accessible pipelines which can be sorted according to the pipeline name.
A user with the role User can see pipelines created by him in this list and pipelines being public (see Visibility option Create a UnifiedViews Pipeline ).
A user with the role Administrator can see all pipelines in the system created by all users. Pipelines that the user can see are called accessible pipelines.
Action buttons: are placed in each pipeline row and allow to perform specific actions on the specific pipeline. The actions being available:
Basic information about the pipeline, its name.
Basic information about pipeline execution. Last Run Time, Last Execution Time and Last Status represent the time and status of the last pipeline execution:
Last Run Time
Last Execution Time
Last Status
Pipelines can have the following states:
private: only the author or Administrator may use such pipeline),
public, read only: everybody can use such pipeline, but only the author or a user with the role Administrator can edit or delete such a pipeline.
public, read/write: everybody can use or edit such pipeline.
Privacy of a pipeline is set by the user when they Create a UnifiedViews Pipeline a pipeline. Information about the pipeline execution, UnifiedViews Glossary in the table correlates with the privacy settings. If a pipeline is private , its executions are also private and other users (except an Administrator) are not allowed to see them.
If a pipeline is public (read only or read/write), its executions are also public and visible for all users in the system.
In case of a private pipeline, this execution was initiated by the pipeline owner or an Administrator. In case of a public pipeline, the execution could be initiated by anybody.
Above the table, there are the following buttons:
Create Pipeline: for Create a UnifiedViews Pipeline in the system.
Import Pipeline: opens the dialogue to import a pipeline.
Reset Filers: for clearing filters of the table.
Reset Sort: to reset sorting you may have done using the column headers.
Create a UnifiedViews Pipeline
Create a UnifiedViews Pipeline
This section describes how to create a pipeline.
To create a pipeline in the system click Create Pipeline in the top right-hand corner of the Pipelines section (1).
 |
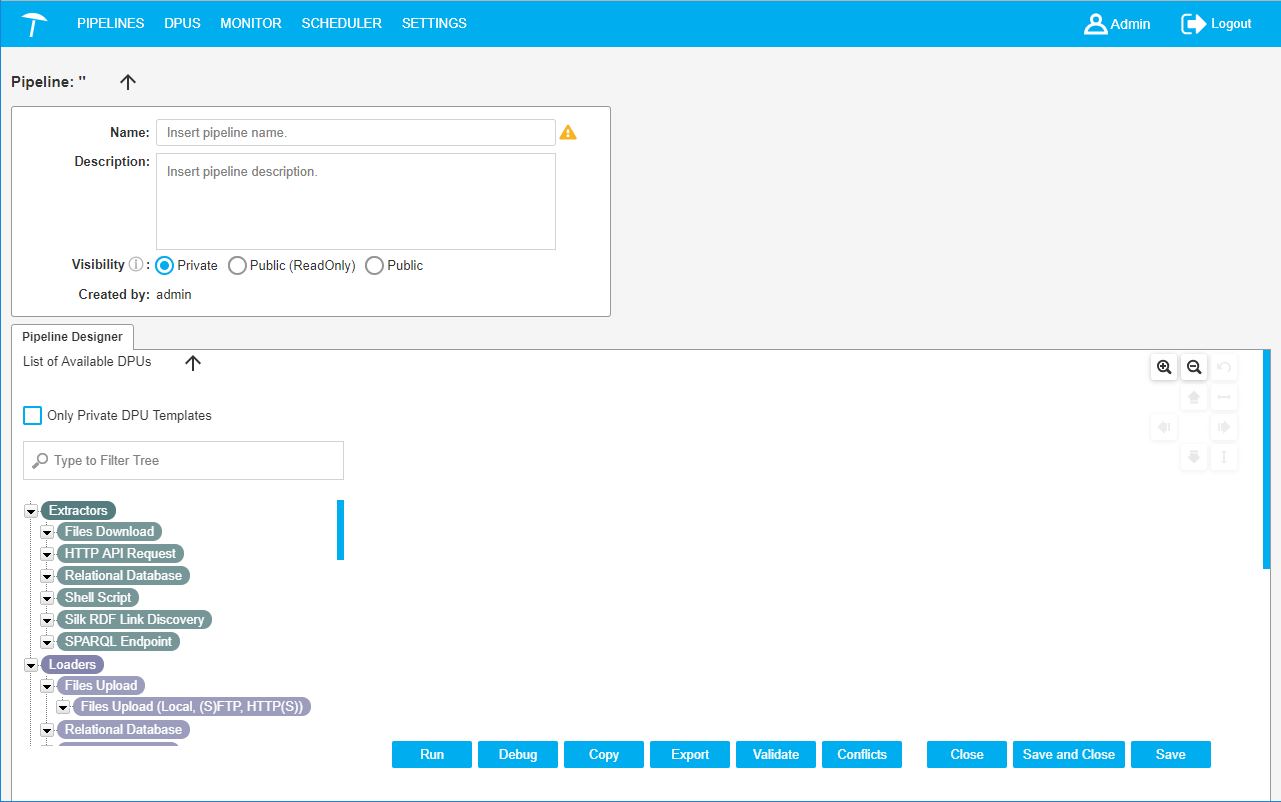
After that the page for the Pipeline Detail specification will be opened:
 |
The following topics in this section cover the steps necessary to create pipelines:
Placing DPU Instances on the Canvas
Placing DPU Instances on the Canvas
This section contains a short guide on how to create a pipeline in UnifiedViews by placing the individual DPUs on the canvas.
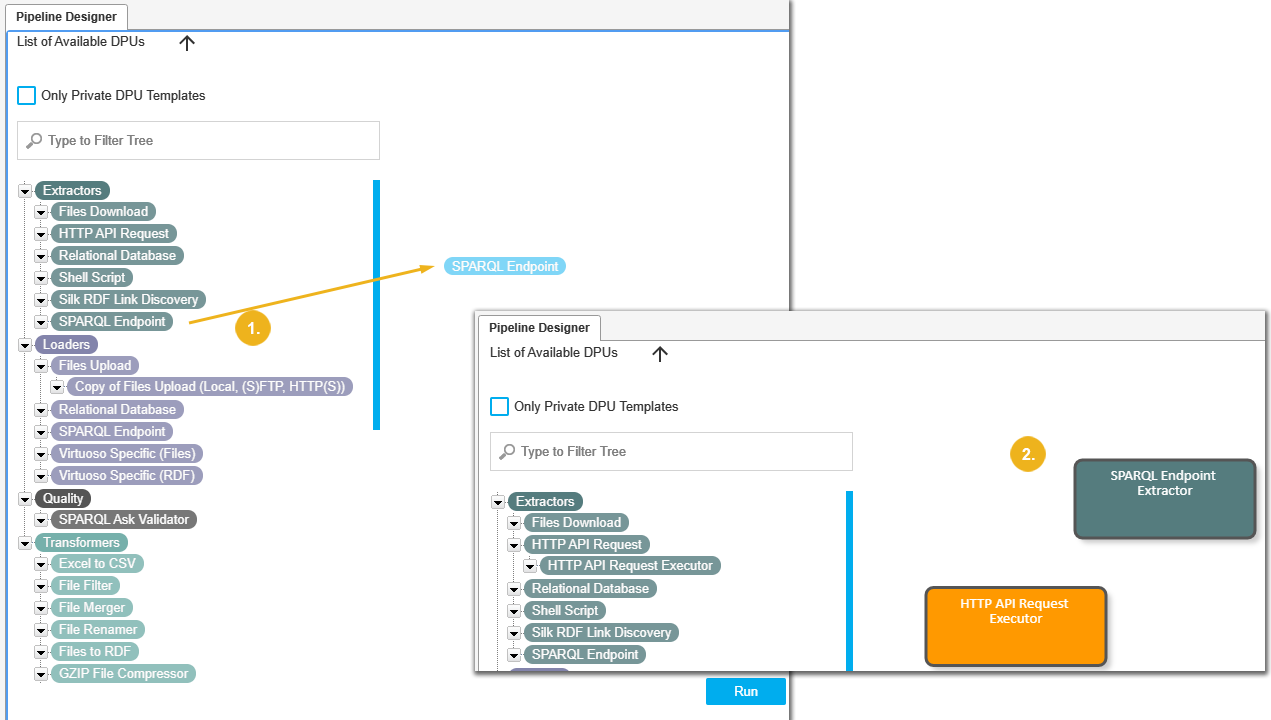
Select a DPU template from the DPU Templates tree and via drag and drop move it onto the pipeline canvas.
Add the rest of the DPUs you need for constructing the pipeline.
When you drop a DPU template onto the canvas, a DPU instance based on such a DPU template, is created.
DPU templates are logically separated into three groups: Extractors, Transformers, Loaders, which are differentiated by their color.
 |
Note
If there is no suitable DPU template in the tree, you can create your own.
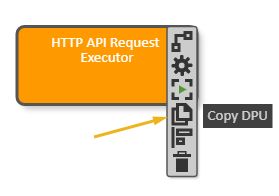
Hover your mouse over the DPU's edge, and click the Copy DPU icon.
You can hide the DPU Templates Tree panel if you need more space for editing the pipeline. To hide the panel, click the black arrow above the tree (1):
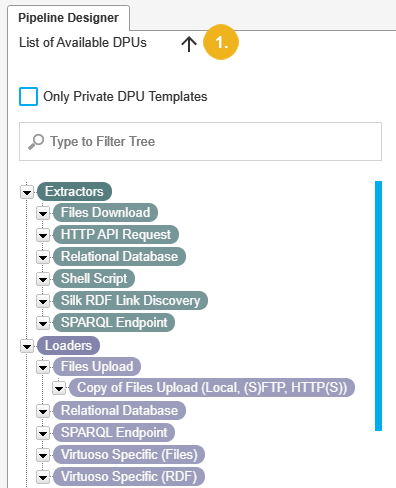
Entering Properties for a UnifiedViews Pipeline
Entering Properties for a UnifiedViews Pipeline
This section contains a short guide on how to enter properties for a UnifiedViews pipeline.
After you have created a pipeline, you can enter the properties for it as follows.
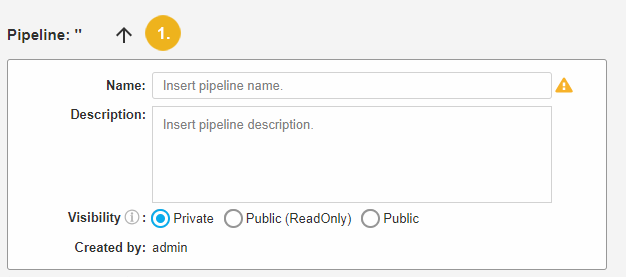
Enter the Name (mandatory), Description (optional) of a pipeline and set Visibility.
The name of the pipeline creator is filled in automatically.
Note
If the field Name is empty, on the right side of the field an exclamation mark with a notification 'Name must be filled!' is displayed. In this state the pipeline cannot be stored. You will recieve an error message in attempting to save the pipeline without a name.
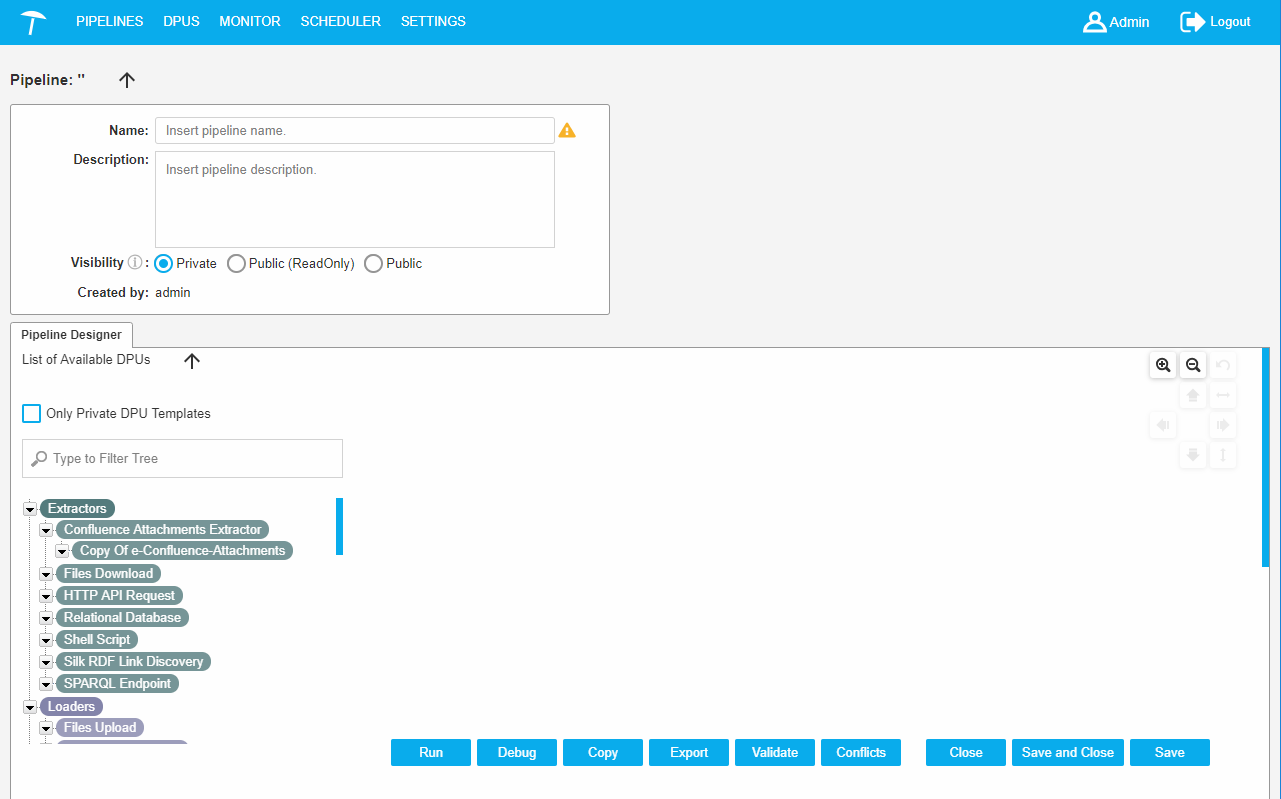 |
Visibility: response for the pipeline permission settings. The pipeline has one of three modes:
Private (default)
Public (ReadOnly)
Public
Permissions are described in the following table.
View/ View in PipelineList | Edit | Delete | Copy | Run | Schedule | On Execution Visible for | |
|---|---|---|---|---|---|---|---|
Private | ppl-owner admin | ppl-owner admin | ppl-owner admin | ppl-owner admin | ppl-owner admin | ppl-owner admin | ppl-owner admin |
Public (ReadOnly) | all | ppl-owner admin | ppl-owner admin | all | all | all | all |
Public | all | all | ppl-owner admin | all | all | all | all |
The Pipeline properties panel can be hidden if you need more space for editing the pipeline. To hide the panel you should click the black arrow (1) above the panel.
Setting Configurations of DPU Instances
Setting Configurations of DPU Instances
This section contains a short guide on how to configure DPU instances on the canvas.
You can configure DPU instances after you have placed one on the pipeline canvas.
Open the DPU's Detail dialogue by double clicking the DPU instance.
Alternatively, click the Show detail icon on the DPU's tool bar.
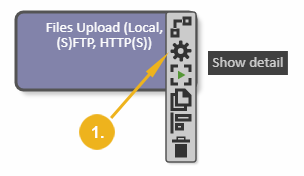
The DPU Detail dialogue has a different layout for different DPUs. Name and Description are always present, but the rest of the dialogue depends on the particular DPU template.
Configure this dialogue according to your requirements.
Enter settings in the DPU Detail dialogue and click Save.
You can also save a configuration as a new DPU template.
Click Save as New DPU template.
After that a new DPU template will be shown in the DPU Templates Tree on the third level.
Creating and Editing Data Flow Edges for DPUs in UnifiedViews
Creating and Editing Data Flow Edges for DPUs in UnifiedViews
This section contains a short guide on how to create edges between DPUs on the canvas in UnifiedViews.
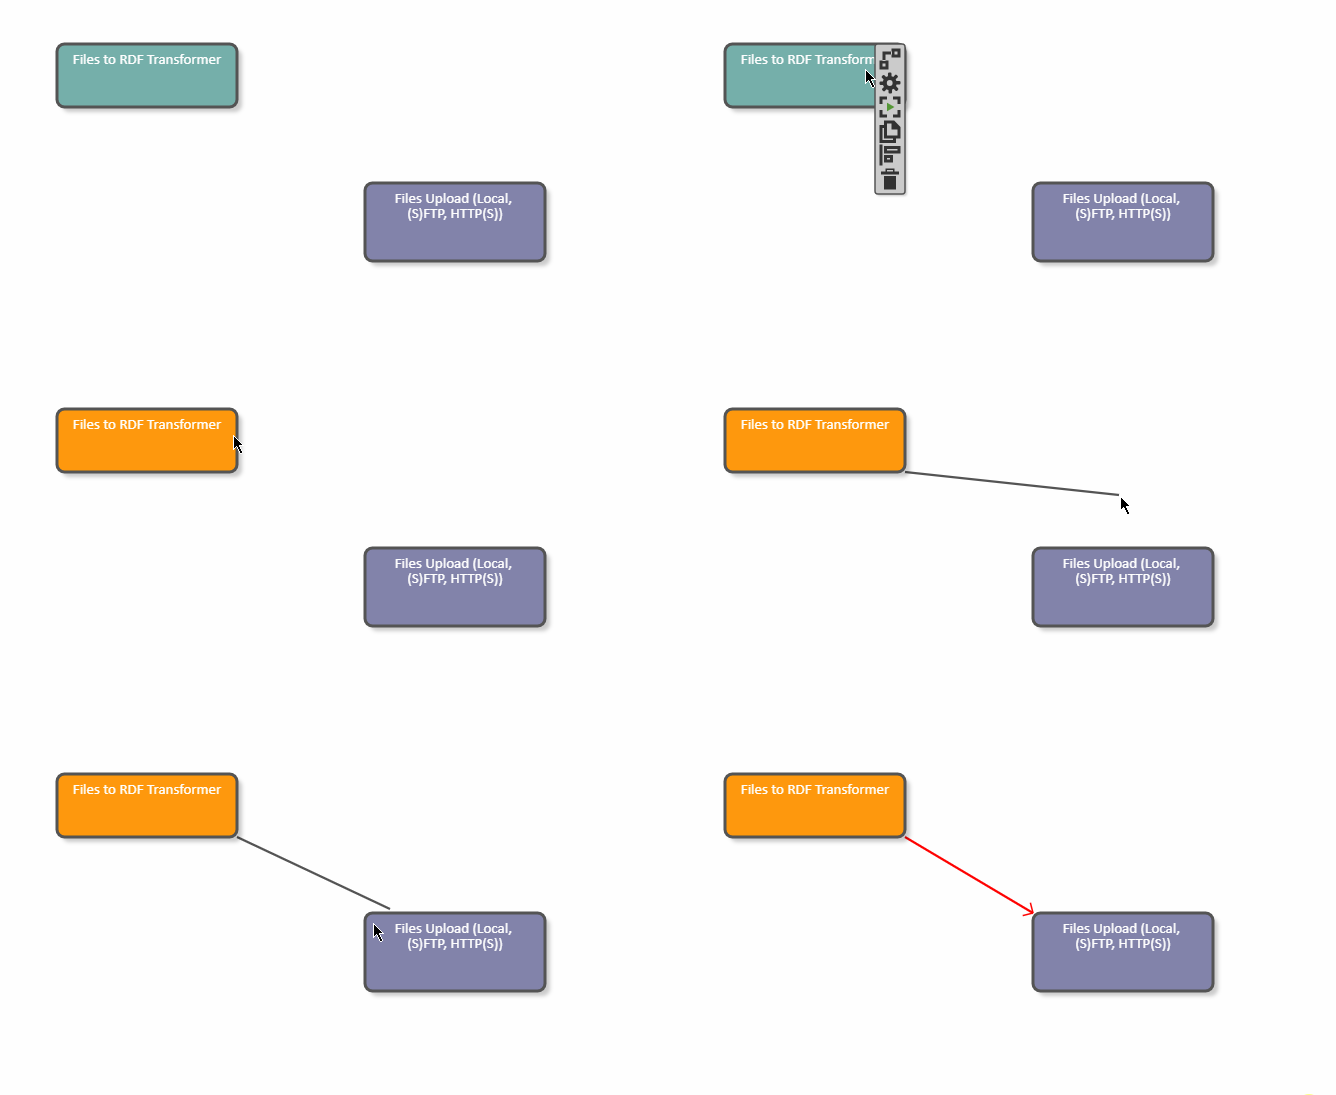
You can create edges this way:
Create data flow edges by clicking on the Create new edge icon on the DPU instance tool bar.
Drag your mouse to the DPU you want the edge to connect to and click inside that DPU's instance.
Note
After every modification of the graph edge, the application needs to verify if there is no cycle in the graph, and to deny the modification if there is one.
Find details on how to edit DPU edges in this topic: Edit DPU Edges
Edit DPU Edges
Edit DPU Edges
This section contains a short guide on how to edit existing DPU edges and creating mappings between output and input data units.
Every edge has a tool bar that appears after clicking on the edge.
Click the Edit edge mapping icon to open the Edge Detail dialogue.
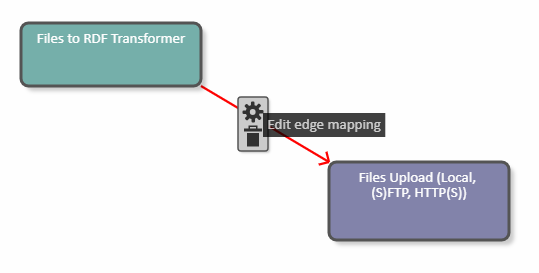
The Edge Detail (1) dialogue allows you to map output data units to input data units.
The dialogue contains a list of Output data units of the source DPU (2), which is a source of the edge and a list of Input data units of the target DPU (target of the edge, 3).
The application will find out the provided output/input data units via annotations.
To map Output data units of the source DPU to Input data units of the target DPU use the Edge Detail dialogue.
Select one or more output data units.
Select one input data unit.
Click Map.
The dialogue must check that at least one output data unit and exactly one input data unit have been selected.
As a result, a new mapping appears in the Available mappings area, one row represents one mapping.
You can delete a created mapping and also clear the selection of the data units to be mapped.
Click Save to confirm your changes or Cancel to abort.
For example, the Edge Detail dialogue contains the following parameters:
Output data units of the source DPU:
rdfOutput
Input data units of the target DPU:
config
input
On the left, select rdfOutput, on the right select config. Click Map to create the mapping.
Click the Save button and on the pipeline canvas the mapping will be visible on the edge:
Saving the Details of a UnifiedViews Pipeline
Saving the Details of a UnifiedViews Pipeline
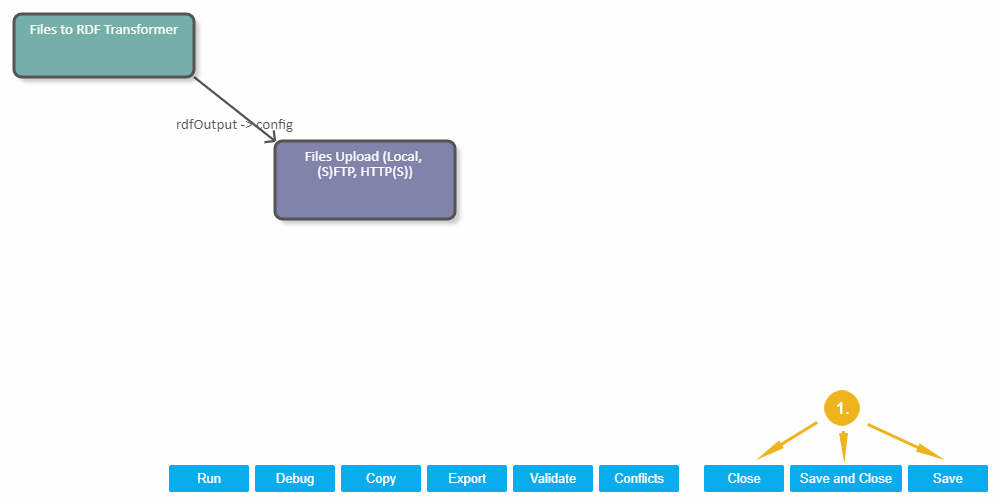
This section is about how to save the details of a DPU pipeline you have created. You have several options to save a pipeline (1). Click either:
Save: this only saves the pipeline.
Save & Close: leaves also the Pipeline detail section after saving.
Close: leave the Pipeline detail section without saving changes
Additonal Options on the UnifiedViews Pipeline Canvas
Additonal Options on the UnifiedViews Pipeline Canvas
This section contains a short guide on the options on the canvas, deleting DPU instances and edges, debugging, copying of DPUs and pipelines, layout formatting, alignment and validation.
The following topics in this section provide details on additional options on a pipeline canvas:
Alignment and Distribution Options — This section contains a short guide on alignment and distribution options for DPUs.
Debugging, Copying and Layout Formatting of DPUs — This section contains a short guide on how to debug, copy, and format the layout of DPUs.
Delete DPU Instances and Edges — This section contains a short guide on how to delete DPU instances and edges.
Copy a Pipeline — This section contains a short guide on how to copy a pipeline.
Validate DPU Connections in a Pipeline — This section contains a short guide on how to validate connections, input, outputs and mandatory check boxes of a DPU pipeline.
Defining Pipeline Conflicts — This section contains a short guide on how to set pipeline conflicts.
Alignment and Distribution Options
Alignment and Distribution Options
This section contains a short guide on alignment and distribution options for DPUs.
The pipeline canvas also provides buttons to zoom the canvas and cancel the last operation on the canvas. These buttons are placed in the top right-hand corner (1):
Note
Icons you can use to align multiple DPUs, are greyed out until you select two or more DPUs to align.
| Arrows are for aligning DPU instances. | ||
| Distribute icons are for creating the same gaps between selected DPU instances (for 3 or more DPU instances) in a given direction. | ||
| Use Zoom icons to enlarge or minimize the canvas. | ||
| The Undo icon lets you undo the last action you performed with any other icon. |
Debugging, Copying and Layout Formatting of DPUs
Debugging, Copying and Layout Formatting of DPUs
This section contains a short guide on how to debug, copy, and format the layout of DPUs.
The icons described here are also available in the icon bar of each DPU.
The following options are available:
| Debug to this DPU: run the pipeline in debug mode. | |
| Copy DPU: place a copy of this DPU instance on the pipeline canvas. | |
DPU layout formatting: only selected DPU instances are formatted. |
Select the first DPU instance by clicking on it.
To select more DPU instances, click the DPU layout formatting icon on the toolbar.
Click on other DPU instances, or hold the CTRL key and click on additional DPU instances.
The formatting action bar appears in the top right-hand corner.
Delete DPU Instances and Edges
Delete DPU Instances and Edges
This section contains a short guide on how to delete DPU instances and edges.
You can delete a DPU instance from a pipeline canvas, if it was placed incorrectly.
To do this, click on the DPU instance you would like to remove and select the Remove DPU icon (1).
You can delete an edge if it was not correctly set. To do this click on the edge and click the Remove the edge icon (2):

Copy a Pipeline
Copy a Pipeline
This section contains a short guide on how to copy a pipeline.
To copy the current pipeline click Copy (1).
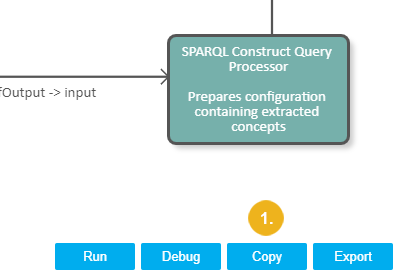
After that you will automatically work with details of a pipeline copy (2):
 |
Validate DPU Connections in a Pipeline
Validate DPU Connections in a Pipeline
This section contains a short guide on how to validate connections, input, outputs and mandatory check boxes of a DPU pipeline.
Follow these steps to validate DPU connections in the pipeline, control all mandatory inputs/outputs and mandatory check boxes in the DPU configurations:
Click Validate at the bottom of the pipeline canvas.
A validation message will be shown.
In addition, the respective DPU will display a Warning icon to depict the place of issue.
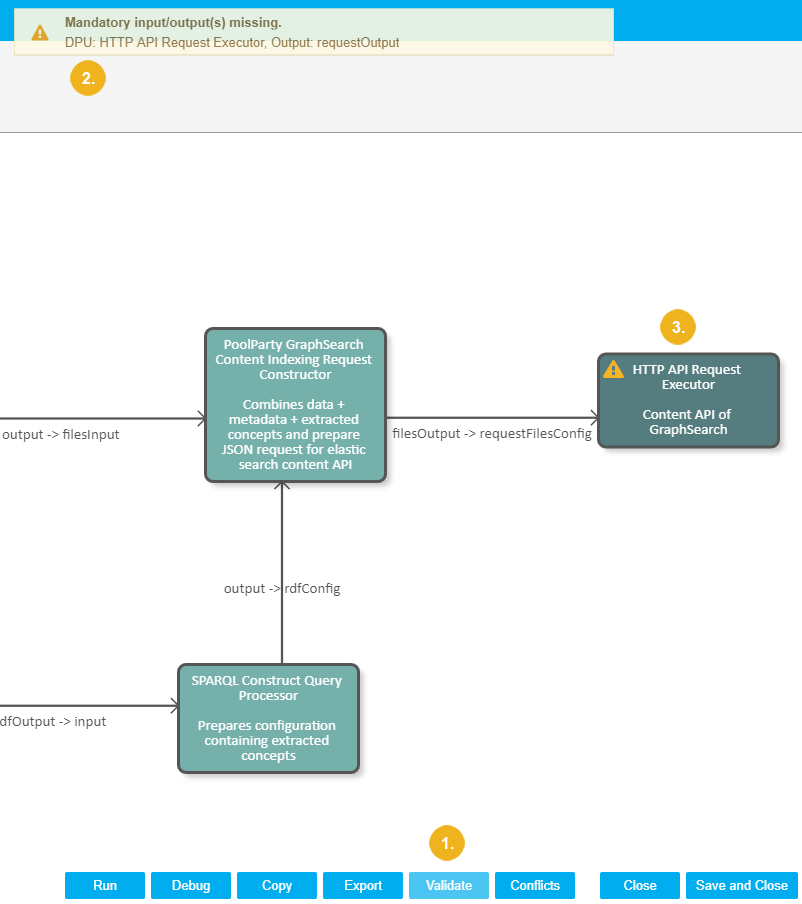 |
Defining Pipeline Conflicts
Defining Pipeline Conflicts
This section contains a short guide on how to set pipeline conflicts.
This function is useful to include or exclude concurrent editing or executing pipelines by multiple users that are active in the system.
For each pipeline you can specify a list of conflicting pipelines, including the current pipeline itself.
A user is editing pipeline A and defines pipelines B and C in the conflict list.
In that case if the user wants to start pipeline A, it will wait (in running state) till the end of the executions of the pipelines B and C. Only then it will be executed.
If a user sets pipeline A to conflict with pipeline A it means that only one instance of the pipeline A is able to run at one given moment.
In case of several instances being launched at the same time, they will be executed one after another.
Click Conflicts at the bottom of the canvas.
The Pipeline Conflicts dialogue opens.
In the column All Pipelines select one or more pipelines you want to define conflicts with the current one for. Multi-select is possible.
Use the arrows to add or remove the selected pipelines to or from the column on the right: Pipelines conflicting with the current pipeline
In the column on the right the pipelines you selected, will be listed.
Click OK to confirm your changes.
Click Cancel to abort.
Click Clear Conflicts to remove all pipelines from the column on the right.
Pipeline Actions
Pipeline Actions
This section contains the following topics:
Run a UnifiedViews Pipeline — This section contains a short guide on how to start a pipeline so it is executed in UnifiedViews.
Debug a UnifiedViews Pipeline — This section contains a short guide on how to debug a UnifiedViews pipeline.
Copy a UnifiedViews Pipeline — This section contains a short guide on how to copy a UnifiedViews pipeline.
Edit a UnifiedViews Pipeline — This section contains a short guide on how to
Delete a UnifiedViews Pipeline — This section contains a short guide on how to delete a UnifiedViews pipeline.
All actions with pipelines are available from the PIPELINES section of the main menu bar.
Run a UnifiedViews Pipeline
This section contains a short guide on how to start a pipeline so it is executed in UnifiedViews.
Click PIPELINES in the main menu.
Click Run in the corresponding row in the pipelines table.
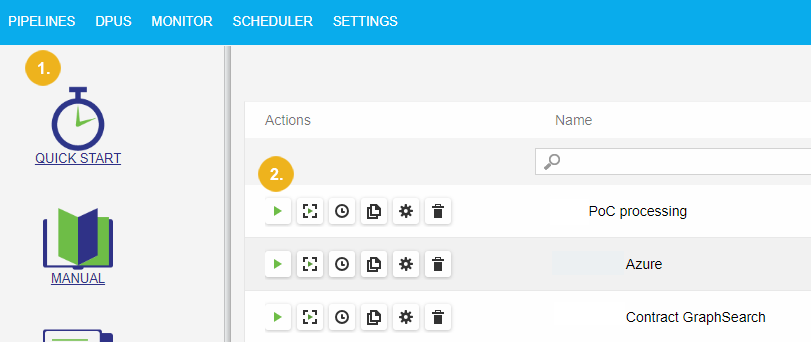
Note
In order to be able to run the pipeline, the backend must be online.
You can determine the status of the backend using the icon in the top right-hand corner of the window.
If backend is offline you see the red Disconnected icon (3):

If you try to run a pipeline, when the backend is offline, the dialogue Pipeline Execution will appear.
You can click Schedule (4) in order to run the pipeline on a schedule, after the backend is online again.
Click Cancel to cancel the execution.
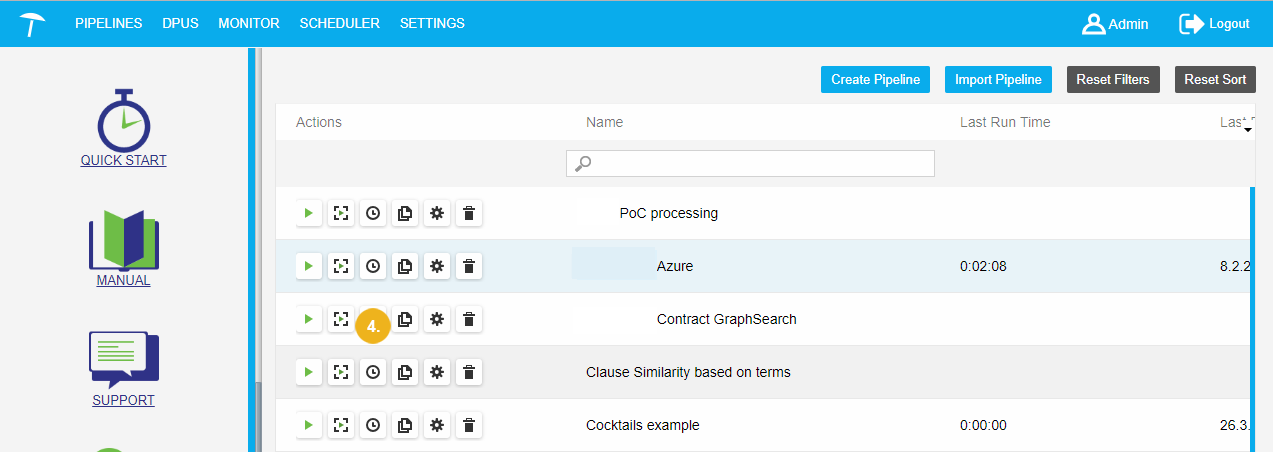
If you try to run the pipeline when the backend is online and the pipeline execution has been started successfully, the system will show a message 'Pipeline execution started..' (5):
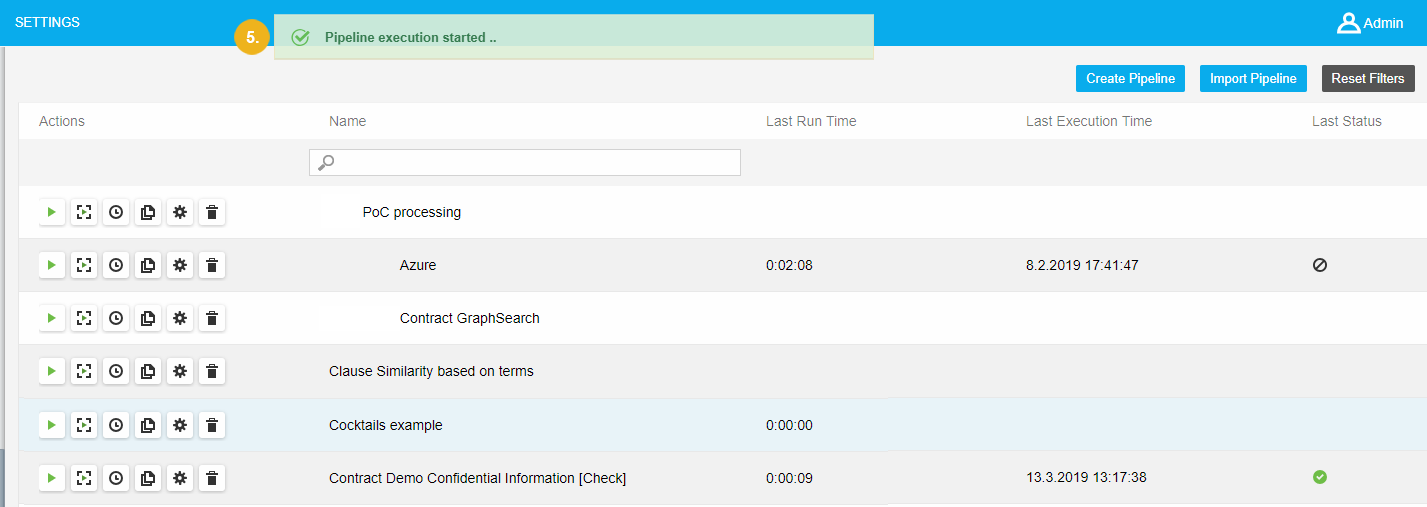
After the pipeline execution finishes the information about run time, execution time and execution status will be shown in the pipelines table (6):

More detailed information about the pipeline execution is available in the Execution Monitor section of the main menu bar.
Read more information about how to work with Execution Monitor section here.
Debug a UnifiedViews Pipeline
Debug a UnifiedViews Pipeline
This section contains a short guide on how to debug a UnifiedViews pipeline.
Debugging of the pipeline means that the pipeline is executed, but you can see the data which flows through the pipeline, you can view that in the browser.
Two ways exist to debug a pipeline.
Click PIPELINES.
To run the pipeline in debug mode, click the Debug icon in the corresponding row in the pipelines table.
Note
Debugging of the pipeline as well as running is available only, if the backend is online.
After starting the pipeline execution in debug mode, the system redirects you to the Execution Monitor section where details of the pipeline execution will be shown:
Read more information how to work with the Execution Monitor section Execution Monitor Section.
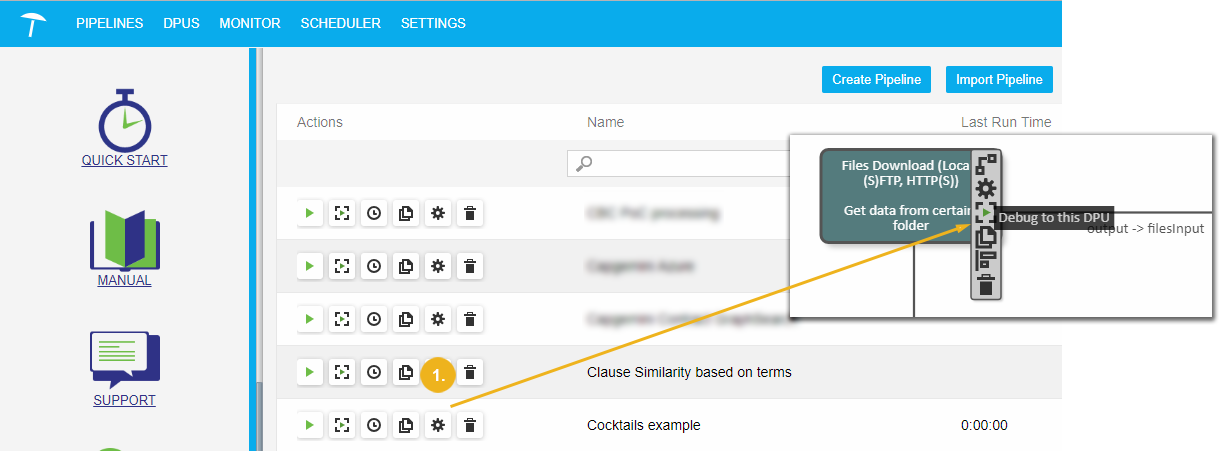
It is also possible to debug the pipeline from the pipeline canvas.
Click Edit in the pipelines table, then click Debug to this DPU icon on the DPU instance tool bar.
 |
After that the Debug Window with the debug information will appear.
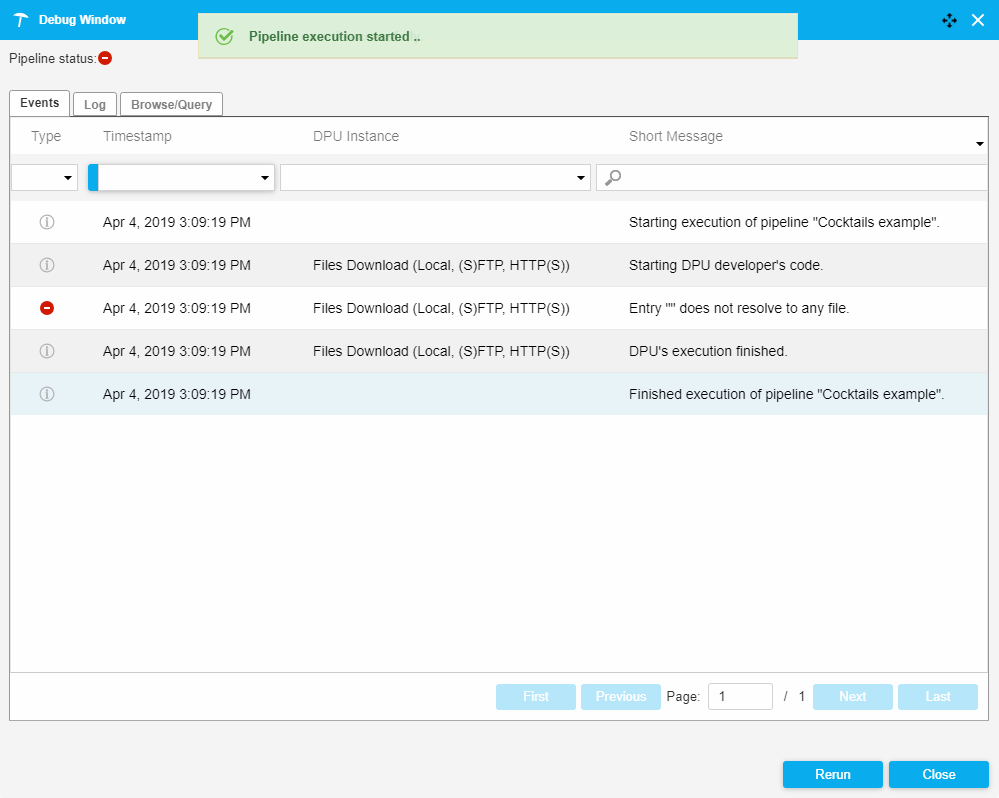 |
For detailed information about the Debug Window see Execution Monitor Section .
Copy a UnifiedViews Pipeline
Copy a UnifiedViews Pipeline
This section contains a short guide on how to copy a UnifiedViews pipeline.
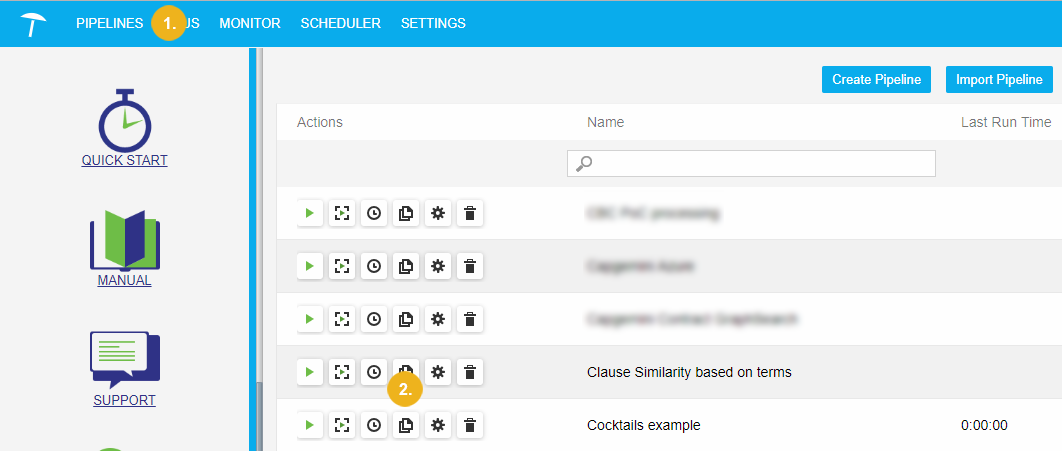
Click PIPELINES in the main menu.
To copy the pipeline press the Copy button in the corresponding row in the pipelines table:
 |
After that, the copy of an original pipeline will be created and placed in the pipelines table. The name of the copied pipeline is derived from the name of the original pipeline.
Note
The new pipeline created by Copy will contain all DPUs that the original pipeline contains, with the same settings and data flow edges.
Edit a UnifiedViews Pipeline
Edit a UnifiedViews Pipeline
This section contains a short guide on how to
Click PIPELINES in the main menu.
To edit the pipeline click the Edit icon in the corresponding row in the pipelines table.
The pipeline detail will be opened. The dialogue is the same as in Create a UnifiedViews Pipeline.
You can modify the pipeline only in the following cases, regarding permissions:
you are the owner of the pipeline,
you have the Administrator user role,
the pipeline is in public,read/write mode.
Otherwise you can only view the pipeline.
Note
If you have permissions to edit the pipeline, the pipeline detail will be opened in a Develop mode.
Without permissions to modify the pipeline it will open in a Standard mode. Also a notification about read-only mode will be shown.
With permissions to modify the pipeline you can:
change name and description of the pipeline,
add/delete DPU instances on pipeline canvas,
change DPU instance configurations,
change the data flow edges.
Several users can edit the same pipeline at the same time. In this case the warning that another user is editing the same pipeline will be shown. In that case, you can create a copy of a pipeline and continue with modification in that copy. Additionally you can continue a pipeline modification in parallel with another user.
Read more information how to work with the pipeline detail here.
Delete a UnifiedViews Pipeline
Delete a UnifiedViews Pipeline
This section contains a short guide on how to delete a UnifiedViews pipeline.
To delete the pipeline, click Delete in the corresponding row in the pipelines table.
 |
After that, a confirmation dialogue will be shown. Click Confirm to delete the pipeline from the system.


