Setting Up and Removing Graph Editors
Setting Up and Removing Graph Editors
This section provides details on prerequisites and on how to set up graph editors in PoolParty.
The GraphEditor feature provides a setup wizard that will guide you through all the necessary steps.
Note
The GraphEditor in PoolParty is an additional component, available with PoolParty Enterprise Server and included with PoolParty Semantic Integrator.
Graph editors are project dependent. Therefore you need at least one project ready to use in your PoolParty instance.
Prerequisites
In order to be able to use the GraphEditor feature, you will have to prepare and set up the following:
A PoolParty project, the thesaurus, set up ready for use.
Configure a remote database in the Semantic Middleware Configurator (SMC). This remote database will hold the graphs you will work on.
Connect your PoolParty project to at least one custom scheme.
The following topics are available here:
How to Access the GraphEditors Node
How to Access the GraphEditors Node
This section provides a guide on how to access the GraphEditors node and functionality in PoolParty.
Note
The GraphEditor in PoolParty is an additional component, available with PoolParty Enterprise Server and included with PoolParty Semantic Integrator.
You need project editing permissions in order to be able to use the GraphEditor function, which corresponds to the PoolPartyUser role.
Open an existing PoolParty project.
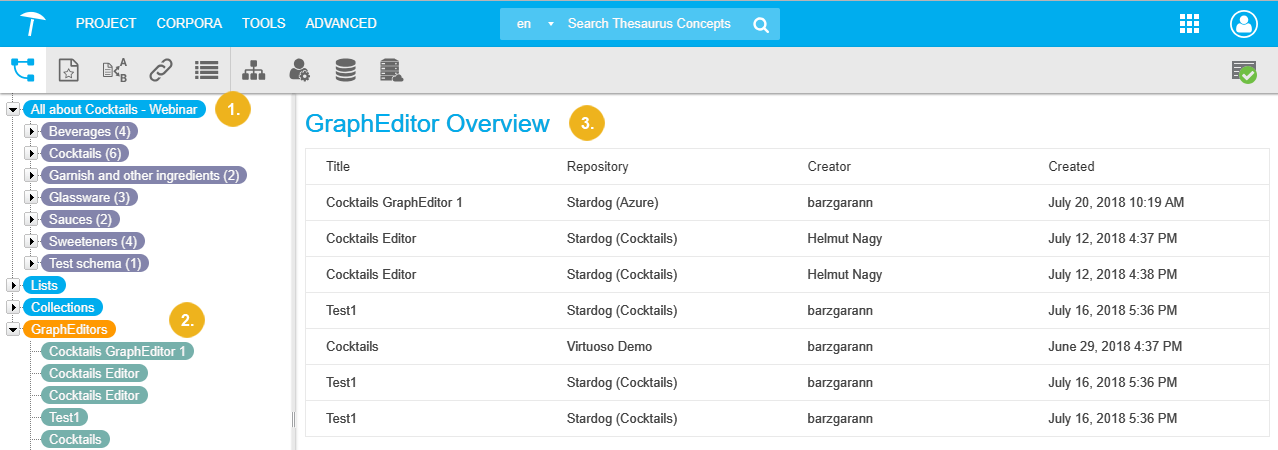
Find the GraphEditors node at the bottom of the available nodes in the Hierarchy Tree.
Expand it and find the list of available editors in the Details View on the right.
 |
In order to create a graph editor, refer to this topic: How to Create a Graph Editor - Overview
How to Create a Graph Editor - Overview
How to Create a Graph Editor - Overview
In this section find the guide on how to create a graph editor.
In order to create a graph editor in PoolParty, you will use the assistant PoolParty provides and also should prepare a few things before you start.
Create a PoolParty thesaurus project.
Create one or more custom schemes on that PoolParty instance.
Check or create a configuration for a external graph database in the Semantic Middleware Configurator (SMC).
Plan for a URI pattern for the new graph editor, which will be used for new resources, if you create them there. The GraphEditor Assistant will suggest a pattern you can use as part of the creation process.
Details on how to start the assistant find in this page: How to Start the PoolParty GraphEditor Assistant
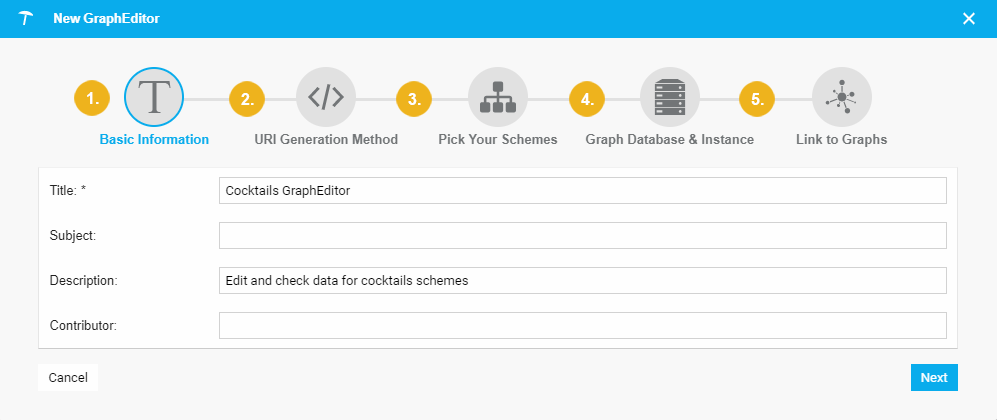
After you have opened a PoolParty project, you will use the GraphEditor Assistant, the New GraphEditor dialogue, which consists of the basic steps and necessary settings to set up a graph editor. The following steps will be covered, one after another. You find details about each, the fields and settings you can change or information you need to provide in the topics of this section.
Basic Information: the assistant starts out with fields to fill all the information you might need for it, a mandatory Title, optional creator's and contributor's information, or an optional description.
URI Generation Method: here you will define the URI pattern used for the resources you create in the graph editor. Additionally, the separator, creation method and possible incrementation start.
Pick Your Schemes: choose from the available custom schemes, which ones you want to be included in your editor.
Graph Database & Instance: depending on the configuration in the SMC for external graph databases, select here which one you want to connect to. Only supported and available ones will be listed and can be selected from.
Link to Graphs: the last step lets you choose from the list of available graphs and after that determine, if they are to be Look-up Graphs and which of them to make Editable Graphs.
 |
Each step is covered in an individual topic, find them here:
How to Start the PoolParty GraphEditor Assistant — This section provides a short guide on how to start the GraphEditor assistant in PoolParty.
How to Create a Graph Editor - Basic Information — This section contains a short introduction on what the first step of the GraphEditor assistant lets you do.
How to Create a Graph Editor - URI Generation Method — In this section find out about the URI generation method you can choose for PoolParty graph editors.
How to Create a Graph Editor - Pick Your Schemes — In this section you find a short guide on how to define the custom schemes for a PoolParty graph editor.
How to Create a Graph Editor - Graph Database & Instance — The following section contains an overview of how to set the extremal graph database for a PoolParty graph editor.
How to Create a Graph Editor - Link to Graphs — This section will provide a short guide on how to define the graphs for a PoolParty graph editor.
How to Start the PoolParty GraphEditor Assistant
How to Start the PoolParty GraphEditor Assistant
This section provides a short guide on how to start the GraphEditor assistant in PoolParty.
After you have accessed the GraphEditors node, follow these steps:
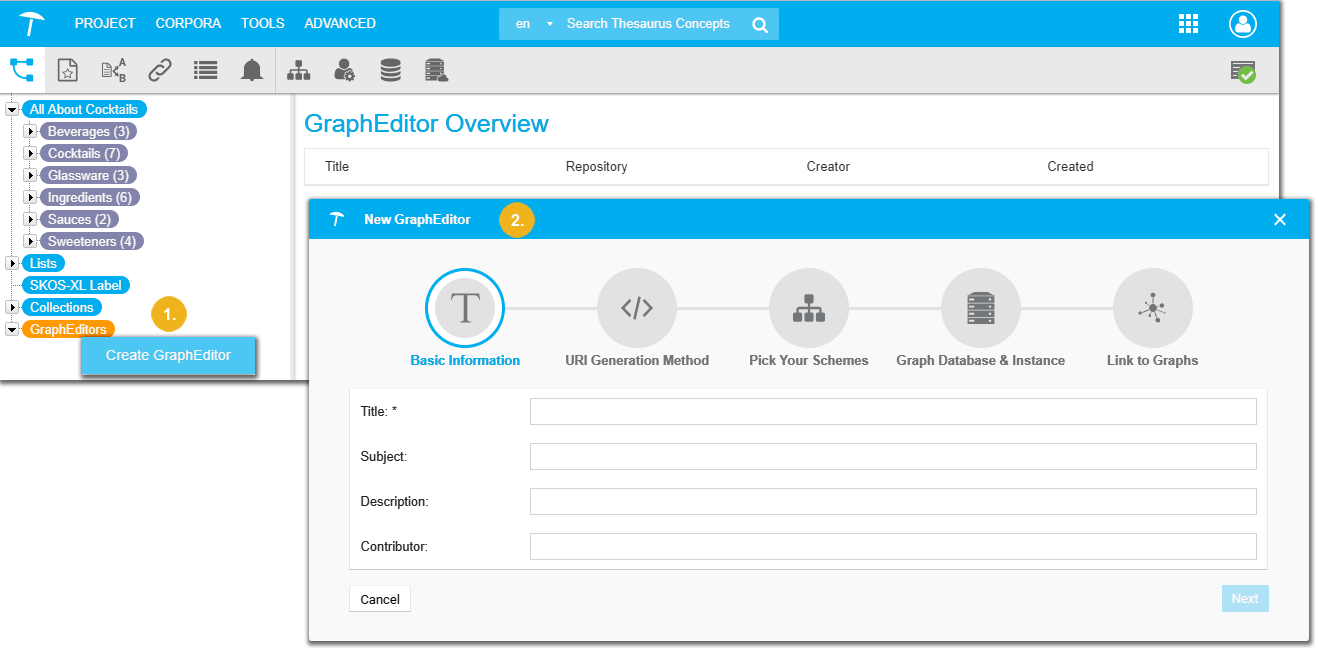
Double-click the GraphEditors node or right-click it to open the context menu, select Create GraphEditor.
The New GraphEditor dialogue opens, the first step visible, the Basic Information. Continue with this topic: How to Create a Graph Editor - Basic Information
 |
How to Create a Graph Editor - Basic Information
How to Create a Graph Editor - Basic Information
This section contains a short introduction on what the first step of the GraphEditor assistant lets you do.
After you have started the assistant, the New GraphEditor dialogue displays this initial step for the metadata information.
Enter the information into the available fields, here the Title field is mandatory.
Click Next to continue. Click Cancel to abort the process.
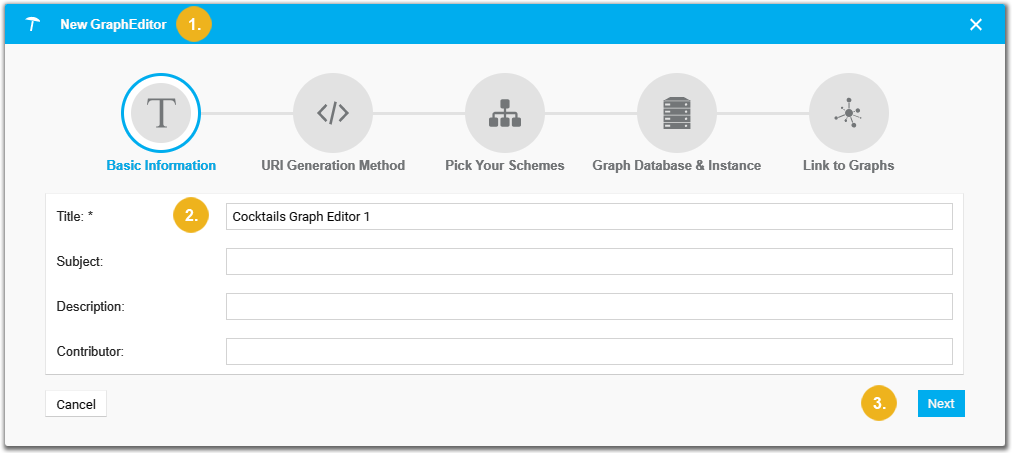 |
Fields with an asterisk beside their name are mandatory. The fields will be part of the RDF data and as such can also be looked up.
Title*(mandatory)
Title or name of the graph editor, use a name of your choice.
Subject
Provide a subject or theme the graph editor is dedicated to.
Description
Enter a description of what the graph editor should do or what information it provides.
ContributorEnter a name or names of users contributing.
How to Create a Graph Editor - URI Generation Method
How to Create a Graph Editor - URI Generation Method
In this section find out about the URI generation method you can choose for PoolParty graph editors.
In the second step, you define settings for the URI pattern.
Fill out the Base URI field, using a pattern of your choice or using the suggestion from the Sample.
The Increment At field will only be visible if you select INCREMENT as Method. Details about available fields find in the following paragraph.
Click Next to continue or Previous to go back a step. Click Cancel on the left to abort the process.
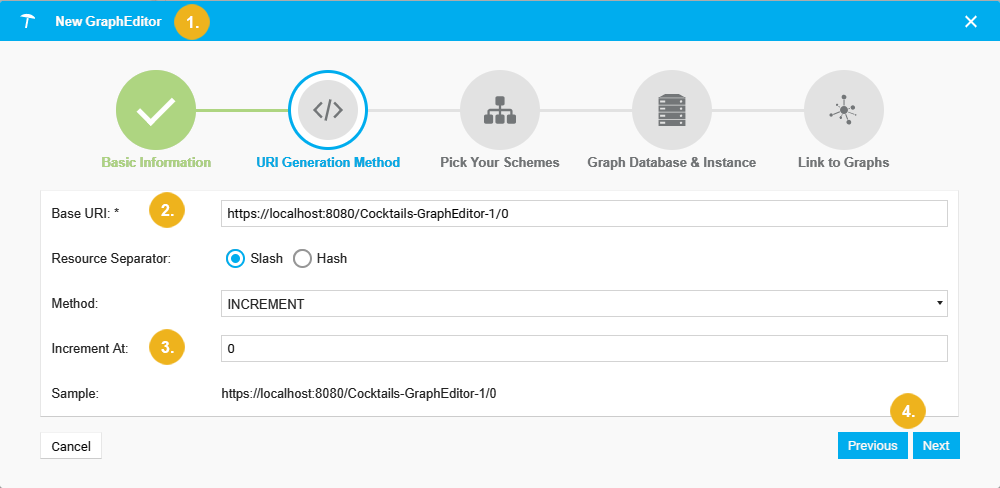 |
Base URI* (mandatory)
Enter the URI pattern that should be used for resources you create later using the editor itself.
Note
The BaseURI you enter here, will be the name of the graph PoolParty will then create on the external graph database for all data you create using the graph editor. Therefore the name should be unique.
Resource SeparatorThe URI's elements can be separated either by a slash or a hash. Slash is recommended, so far the hashes inside URIs have been known to cause problems with some parsers yet.
Method The method used to create URIs. The following are available:
INCREMENT: the base URI you configured will automatically be incremented for resources starting at the place defined in the Increment At field.
UUID: resources will be identified by a 'Universal Unique Identifier' (UUID).
MANUAL: this means that you would set each URI manually
Increment At (Only visible if you selected INCREMENT as method.)
Enter a number used as starting point for the incrementation of URIs.
Sample
Once you have entered a URI into theBase URIfield, a sample will be displayed here.
How to Create a Graph Editor - Pick Your Schemes
How to Create a Graph Editor - Pick Your Schemes
In this section you find a short guide on how to define the custom schemes for a PoolParty graph editor.
In this step, choose from the available custom schemes, which ones should be used for your graph editor, multi-select is possible.
You can use the Filter field at the top of the dialogue to filter the available custom schemes via autocomplete. Activate the check box of any custom scheme you want to use.
Click Next to continue or Previous to go back a step. Click Cancel to abort the process.
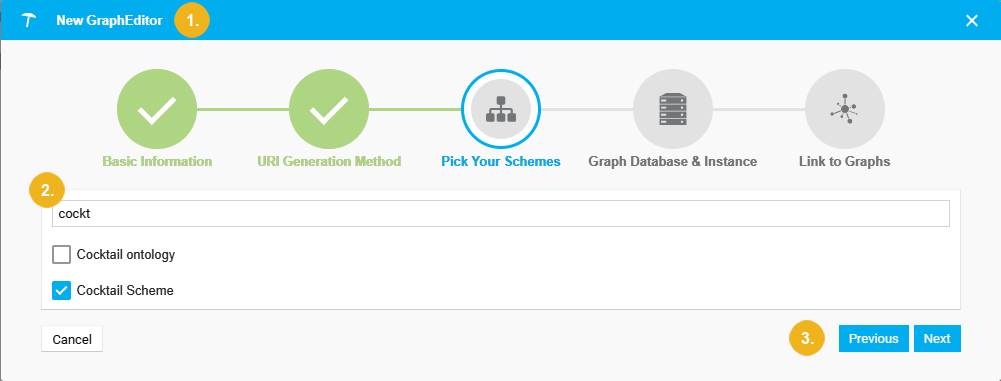 |
Filter
Field at the top for filtering custom schemes. Start typing to use the autocomplete function.
How to Create a Graph Editor - Graph Database & Instance
How to Create a Graph Editor - Graph Database & Instance
The following section contains an overview of how to set the extremal graph database for a PoolParty graph editor.
The graphs you will edit as well as new resources you create, will be read from and written to existing graph databases. You select from these available graph databases in this step.
You will have to check or create a external graph database configuration in the Semantic Middleware Configurator (SMC), before you can use any external graph databases here.
The graph databases available here will be the ones supported by PoolParty and connected successfully by configuring them in the SMC.
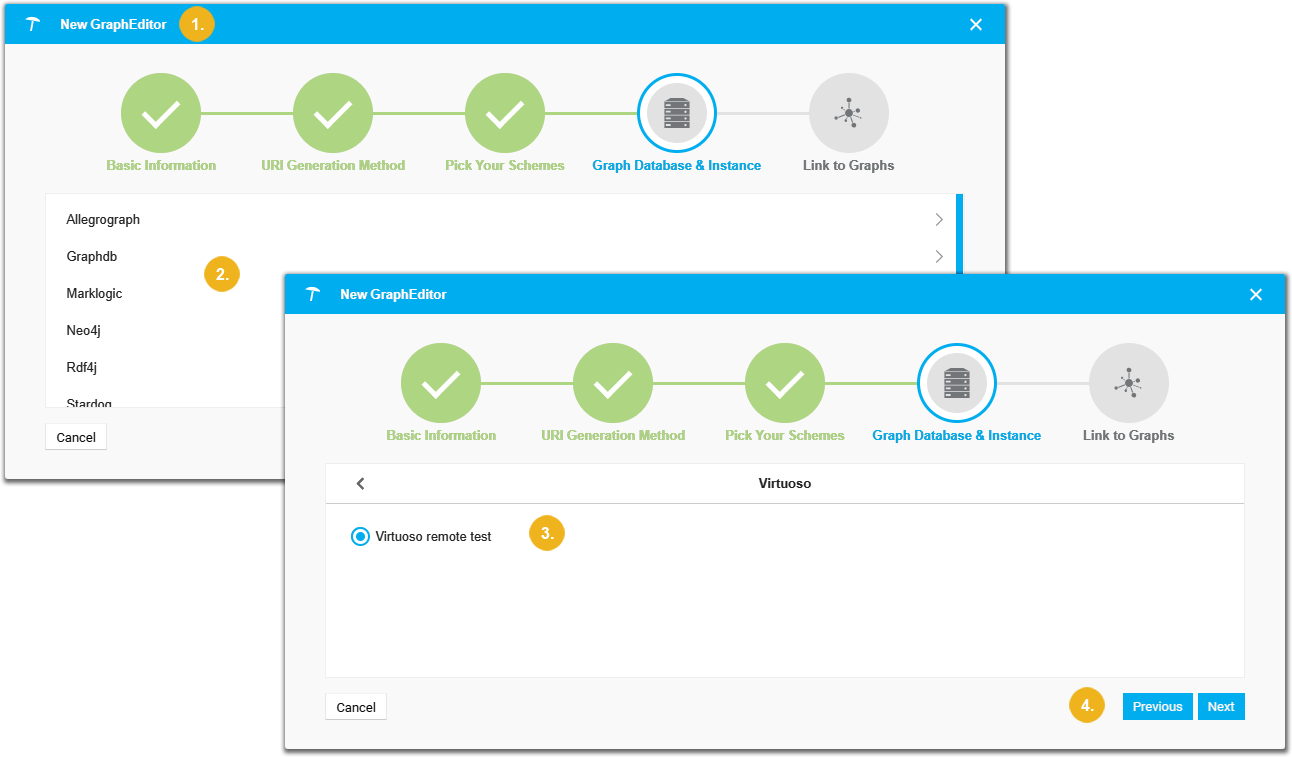
The Graph Database & Instance dialogue lets you choose from the available graph databases, depending on the SMC configuration.
Click an entry in the list.
The sub-entries will be displayed, depending on the SMCs setup, one or more entries will be visible. Click the radio button to select one.
Click Next to continue or Previous to go back a step. Click Cancel to abort the process.
 |
How to Create a Graph Editor - Link to Graphs
How to Create a Graph Editor - Link to Graphs
This section will provide a short guide on how to define the graphs for a PoolParty graph editor.
The final step of the GraphEditor Assistant provides two panes, the Available Graphs pane and the Selected Graphs pane.
Note
Available Graphs are all the graphs available, which are treated read-only. Selected Graphs are all graphs visible in the graph editor you just created and will be readable as well as writable.
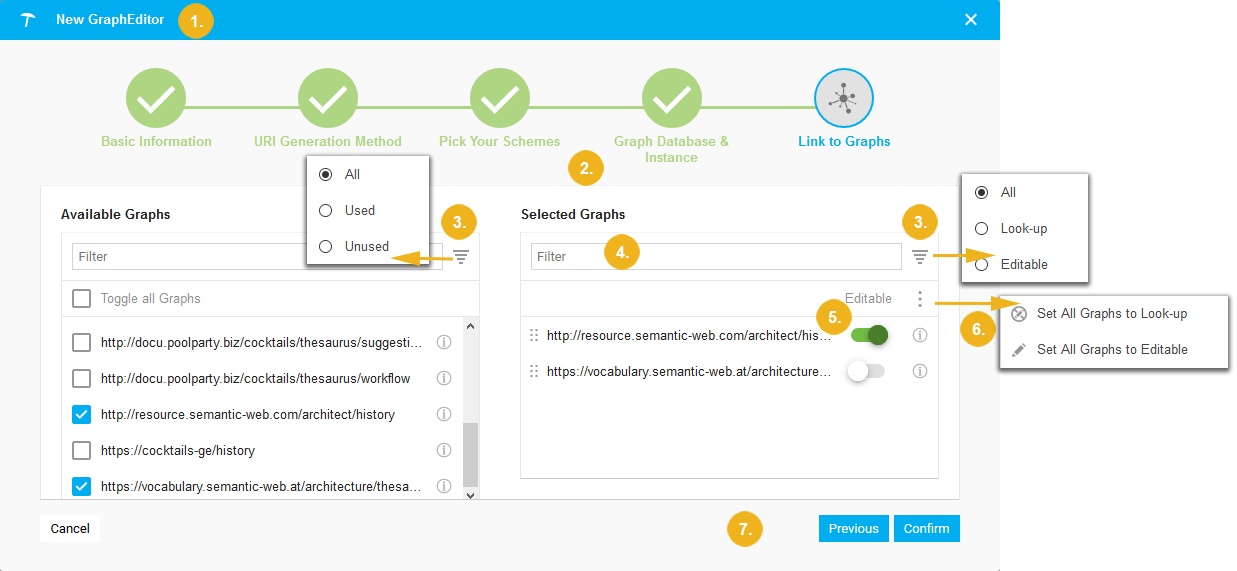
In the final step of the GraphEditor Assistant you will find a list of Available Graphs on the left and a list of Selected Graphs on the right.
In the final step you will be able to choose from the graphs of the database you just selected.
The Link to Graphs dialogue consists of two parts: the Available Graphs section and the Selected Graphs.
In the Available Graphs pane you can filter by typing and using autocomplete.
Use the check boxes to select certain graphs. Use the Graph check box to select all available ones.
Selected graphs will turn up in the Selected Graphs section right away.
The Filter icon on the right of each Filter field will let you filter for respective graphs:
Available Graphs can be filtered for Used, Unused and All.
Selected Graphs can be filtered for Look-up, Editable and All.
In the Selected Graphs pane you can filter as well by graphs' names, by typing and using autocomplete.
You can also reorder graphs here, using the 6-dots handle at the beginning of each row.
The sliders beside each graph's entry let you individually set them to Editable, which will change the slider to green.
The 3-dots menu in the Selected Graphs section lets you do one of the following:
Set All Graphs to Look-up: all graphs in this section can only be looked up, not edited.
Set All Graphs to Editable: all graphs in this section can be edited or looked up.
At the bottom, you have these three options:
Click Confirm to create your graph editor.
Click Previous to go back a step in the assistant.
Click Cancel to abort the graph editor creation.
 |
Delete a Graph Editor
Delete a Graph Editor
This section contains a short guide on how to delete a graph editor in PoolParty.
Note
When you delete a graph editor, it means that the configuration for it will be deleted. The actual graphs on the external graph database will be retained.
Note
PoolParty will not ask you to confirm the deletion of a graph editor. Make sure you really want to delete, before following the procedure below.
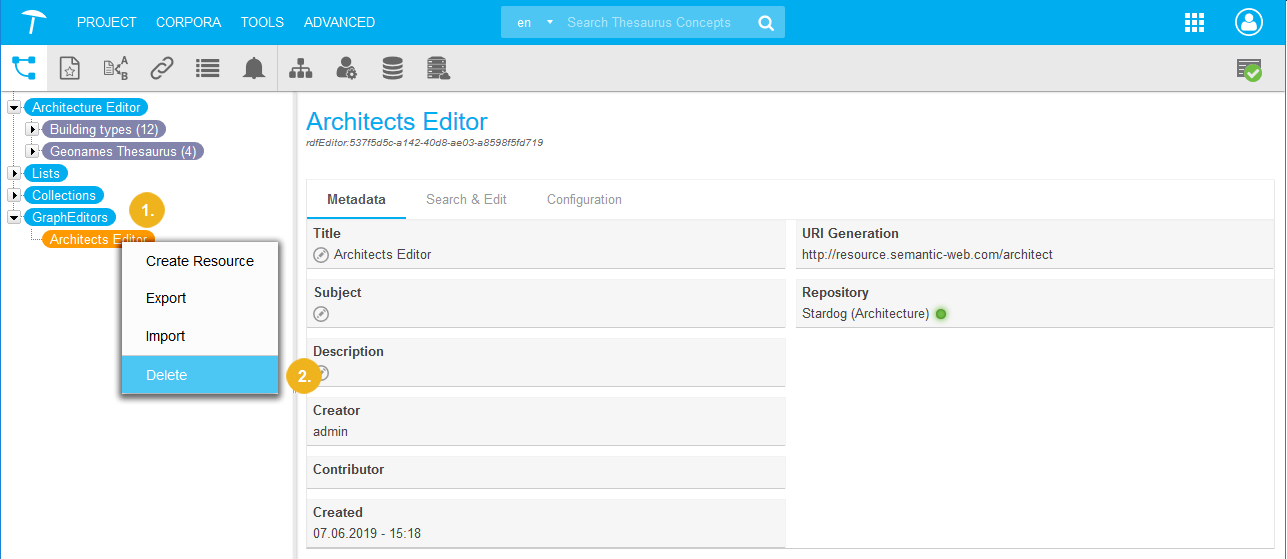
In your opened graph editor, follow these steps to delete:
In the Hierarchy Tree, below the GraphEditors node, find the graph editor, you want to delete.
Activate it and right-click its node. From the context menu, select Delete.
The graph editor will be deleted right away.
 |