Importing an Existing DPU
Importing an Existing DPU
This section contains a short guide on how to import an existing DPU.
After preparing the DPU, you can build the DPU by simply running mvn clean install in the root folder of the DPU. From inside an IDE (such as Netbeans), you may simply use a command like 'clean & build the project'.
As a result, you should get the following success message:
 |
As you can see, it prepared a JAR file in the target folder.
Importing a DPU into the UnifiedViews User Interface
Open UnifiedViews frontend
Go to the
DPU Templatesmenu item.Click Create DPU template button.
Click Choose file, select he JAR file you prepared.
Click Save.
If your DPU was successfully uploaded, you should see no error message and your new DPU should appear in the DPU tree.
If you encounter issues, typically, a certain dependency, which is required by the DPU, is not satisfied. In that case, please follow this guide: Troubleshooting OSGi Dependency Issues on DPU Import
Troubleshooting OSGi Dependency Issues on DPU Import
Troubleshooting OSGi Dependency Issues on DPU Import
This section contains a short guide on how to troubleshoot an OSGi dependency issue on DPU import.
Note
This guide is relevant for you, if you created a custom DPU, tried to import it to UnifiedViews, but the following error occurs: 'Bundle XX cannot be resolved'.
DPUs are packed in the form of OSGi bundles. The OSGi bundle is a JAR archive with special metadata in the manifest file MANIFEST.MF. A sample MANIFEST.MF of a UnifiedViews DPU:
Manifest-Version: 1.0
Bnd-LastModified: 1552311587510
Build-Jdk: 1.8.0_144
Build-Time: 2019-03-11 13:39
Built-By: knapt
Bundle-ClassPath: ...
Bundle-Description: Downloads list of files. Replaces E-FilesFromLocal a
 nd E-HttpDownload. (build timestamp: 2019-03-11 13:39)
Bundle-License: https://www.gnu.org/licenses/lgpl-3.0.txt
Bundle-ManifestVersion: 2
Bundle-Name: uv-e-filesDownload
Bundle-SymbolicName: eu.unifiedviews.plugins.uv-e-filesDownload
Bundle-Version: 4.0.1.SNAPSHOT
Created-By: Apache Maven Bundle Plugin
DPU-MainClass: FilesDownload
DPU-Package: eu.unifiedviews.plugins.extractor.filesdownload
Embedded-Artifacts: ...
Export-Package: cz.cuni.mff.xrg.uv.extractor.filesfromlocal;uses:="eu.un
 ifiedviews.dpu.config,eu.unifiedviews.plugins.extractor.filesdownload";
 version="4.0.1.SNAPSHOT",...
Import-Package: com.jcraft.jsch,com.thoughtworks.xstream;version="[1.4,2
 )",com.thoughtworks.xstream.io;version="[1.4,2)",com.thoughtworks.xstre
 am.io.xml;version="[1.4,2)",com.thoughtworks.xstream.mapper;version="[1
 .4,2)",com.vaadin.annotations;version="[7.3,8)",com.vaadin.data;version
 ="[7.3,8)",com.vaadin.data.util;version="[7.3,8)",com.vaadin.shared;ver
 sion="[7.3,8)",com.vaadin.shared.communication;version="[7.3,8)",com.va
 adin.shared.ui;version="[7.3,8)",...
Require-Capability: osgi.ee;filter:="(&(osgi.ee=JavaSE)(version=1.8))"
Tool: Bnd-3.5.0.201709291849
Export-Package section above includes the dependencies, which are provided by this DPU to the outside world (the core functionality of the DPU). Import-Package, the most important section here, contains the dependencies, which must be provided from outside - either from the UnifiedViews Core environment, or from shared libraries for DPUs. If the dependency is not provided, an error occurs when the DPU is tried to be imported to UnifiedViews.
When building the DPU, the OSGi metadata and the dependencies specified in the pom.xml with the 'compile' scope are automatically added to the created bundle JAR file.
However the transitive dependencies are not embedded, used packages from those transitive dependencies are listed in the Import-Package list and must be provided by the external environment (UnifiedViews Core).
If the external environment (UnifiedViews Core) cannot provide such dependencies as it is, the error 'Bundle XX cannot be resolved' is displayed, where XX shows you the particular missing dependency.
As a result, there are three alternative ways to continue with:
Check if the problematic dependency needs to be included into the JAR of the DPU. Sometimes, such dependency is already provided by the UnifiedViews Core environment or is available among shared libraries for DPUs. So first try is to mark the problematic dependency as provided:
<dependency>
    <groupId>org.apache.commons</groupId>
    <artifactId>commons-lang3</artifactId>
    <scope>provided</scope>
</dependency>
Instead of adding dependencies to pom.xml, you try to download the OSGi bundle of the problematic library that is required by your DPU and has further requirements on other external dependencies.
Such OSGi bundle already covers all the transitive dependencies of that dependency (or most of them_, so you do not need to define them manually in the dependency section. Usually for commonly used libraries, there are available OSGi bundles.
Afterwards, put the obtained OSGi bundle to
module.path/lib, wheremodule.pathis the configuration option inconfig.properties. Such bundle will provide the required packages.You then have to put such dependency also into
pom.xml(with the scope set to 'provided' as in the example above) as long as you need to use it in the code. Using the scope 'provided', such dependency is not copied to the resulting JAR file. In that case, you should not experience any issues when importing the DPU, because the OSGi bundle(s) in module.path/lib provide(s) all needed dependencies.If you still cannot import your custom DPU, please check
frontend.log, which may display some errors during initialization, when the OSGi modules - shared libraries - were loaded. The reason for that is that the OSGi module itself may have also some other required dependencies - so in this case, you have to satisfy those requirements as well.Also take into account that the folder with the shared libraries is not read on the fly, so when adding new OSGi bundles to the shared library, you have to reload the application (frontend).
You try to manually add all the missing dependencies into
pom.xmlof the DPU project as a new<dependency>element.As a result, the new introduced dependencies will be incorporated to the generated bundle (JAR file) as direct dependencies and these dependencies will not occur as dependencies 'to be resolved, imported from the environment'. The scope of such dependencies should be set to 'compile' (default scope).
After adding the dependency to
pom.xml, please try to re-build and re-import the DPU. If there is still some missing dependency, repeat this process. If you added 4-5 dependencies and there are still missing dependencies, you may try alternative 2 below.Take into account that you have to also define transitive dependencies
Note
Usually the best is to try option 1, then option 2, and at the end, if not successful, also option 3, which you can iterate couple of times (3-4times). Add dependency, re-import, add the next missing, etc.
Note
Do not create a JAR file without Maven. This could result in a JAR archive that may not work properly because it is not a valid OSGi bundle. Therefore, if you already have an existing Java application which uses, e.g., a folder to store all libs, you have to introduce maven dependency properly, which references the local repository represented by that lib folder.
Note
Please go for this option if all ways described above failed. This solution can be really time consuming. You have to build the OSGi bundle for a certain library yourself. Basically this approach is very similar to option 2, but you have to create the OSGi bundle for the problematic dependency yourself.
Here we describe how the OSGI bundle can be created from existing JAR files. It is described here for the Eclipse environment:
Select File, New, Other.
Then in New project dialogue, select Plugin from Existing JAR files and click on Next
Now you can select existing jar files. These jar files will be used to create the OSGi bundle.
You can also select jar files that are used as libraries in existing projects. When you select all jar files click on Next to continue.
Now you have to specify Plug-inName, Id and activate check boxes as follows:
analyze library content and add dependencies - checked
target platform : an OSGI framework, Equinox
unzip the JAR archives into the project - unchecked
update references to the JAR file - checked
Click Finish to create the project.
Now you can inspect project settings. On the right side of dependency tab you can see list of Import packages. This list specifies packages which the OSGi bundle requires to import. These packages must be provided by other bundles or host applications. Otherwise your new bundle cannot be resolved and used.
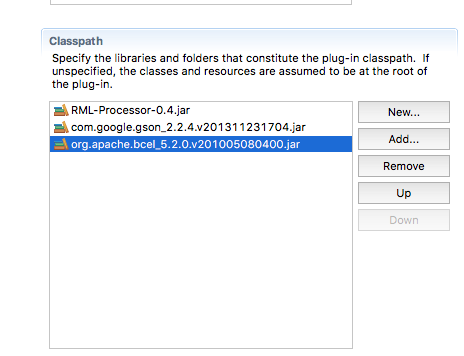
If you would like to include certain JAR files to the bundle, you have to specify them at:

When you have certain libraries inside the bundle, remove such packages from the import section. Import packages should contain packages which need to be imported from outside:
Core UV Environment (which e.g. exports rdf4j libraries, javax.xml.*, etc.)
Shared libraries (/target/lib)
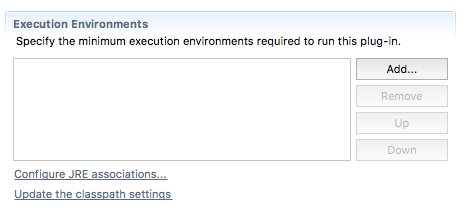
Also uncheck the Execution Environments, so as to not define any restrictions there:

The last step is to export the bundle project. To do this, select File, Export. In Export dialog, select Deployable plug-ins and fragments and click on Next.
Then select project end to finish the export.
As a result, you have a new OSGi bundle ready to be placed among the shared libraries.
Frontend/backend: -Dorg.osgi.framework.system.capabilities="osgi.ee; osgi.ee=\"JavaSE\";version:List=\"1.0,1.1,1.2,1.3,1.4,1.5,1.6,1.7,1.8\""
Some of the required packages may be system-packages. Delete them from the list of required packages.
See the class cz.cuni.mff.xrg.odcs.commons.app.module.osgi.OSGISystemPackages, if the package is there, it is a system package. Another approach is to use an IDE.
For example, Netbeans shows dependencies for each project as 'Dependencies', 'Test Dependencies' and 'Java Dependencies'. Finding your package in the last category makee it a good candidate to be a system package.
Simply delete it from MANIFEST.MF
Note
In some cases the result of 'mvn dependency:copy-dependencies' may not be ideal. This is due to the fact that the Maven bundle plugin lists all used packages, finds the dependencies, again lists the packages (which are transitively included) and from those create the list of Import-package.
On Windows, you can use a PowerShell plugin for gathering dependencies of the DPU and automatically creating OSGi bundles from these dependencies.
Finding all the DPU's dependencies and converting them to OSGi bundles may be time consuming. You can use the PowerShell plugin (Windows), which will use dependency:copy-dependencies maven plugin to obtain the dependencies and creates bundles from them for you.
Just copy the plugin into the same directory as your DPU's pom.xml file. Run the plugin. After the plugins ends you will find the bundled dependencies in './libs' the output. Such dependencies may be copied to module.path/lib and the system needs to be restarted. Then you should try to load the DPU to UnifiedViews. If there is still problem with some dependencies, add them manually.
When defining dependencies of a DPU, you may also try to change the settings of the Maven Felix plugin being responsible for preparing the OSGi bundle, so that transitive dependencies are automatically included. In that case you do not need to list them in your pom.xml. But this may result in lots of unneeded dependencies and still may not solve the issue you have, the unsatisfied import package.