Edit a Search Application Configuration
You can edit all the settings of an existing configuration, change its name and connect another GraphSearch search space.
On the configuration interface, select the pencil icon next to the configuration you want to edit.
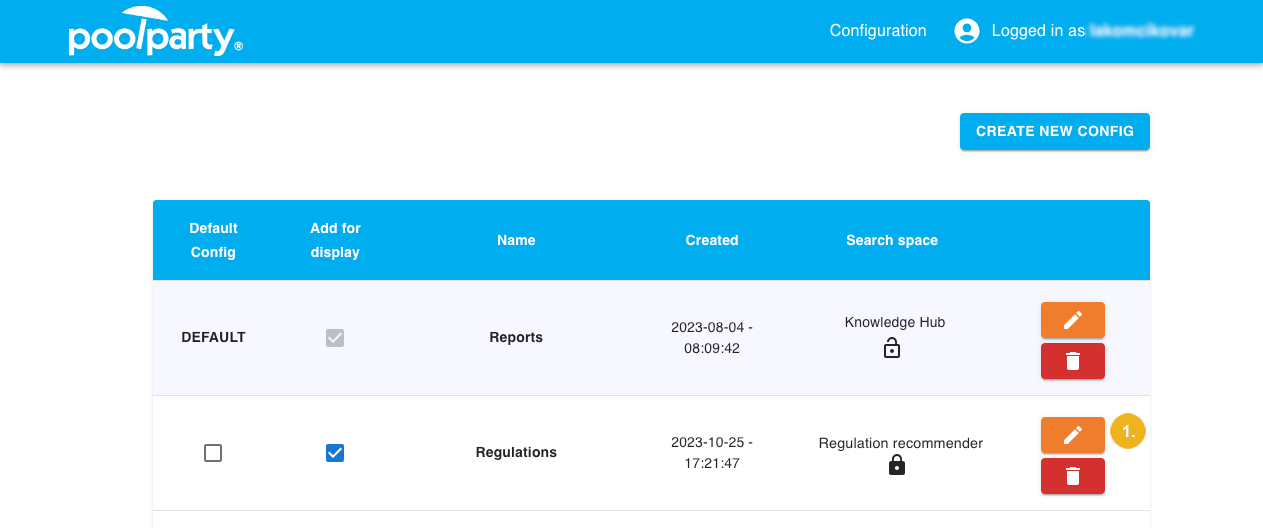
The Edit configuration section appears underneath.
Edit the name of the configuration as appropriate.
Select the search space in GraphSearch that you want to use for this configuration. For more information on how to set up a search space, refer to the PoolParty documentation.
Take note of the lock icon next to the search space. Configurations in the ADF Search Application are public or private depending on the settings of the GraphSearch search space (public vs. private). Private configurations on the main user interface are only accessible to logged-in users. Public configurations on the main user interface are available to all users unless authentication has been enforced in the
ADF.propertiesfile. For more information, refer to Manage Configurations on the Main User Interface of the Search Application.Edit the other settings as appropriate.
The Result settings control how search results will be displayed. You can customize various aspects such as the number of search results you want to see per page, whether to display associated tags, or give users the option to view similar documents.
Results per page – Type in the maximum number of search results you want to display per page.
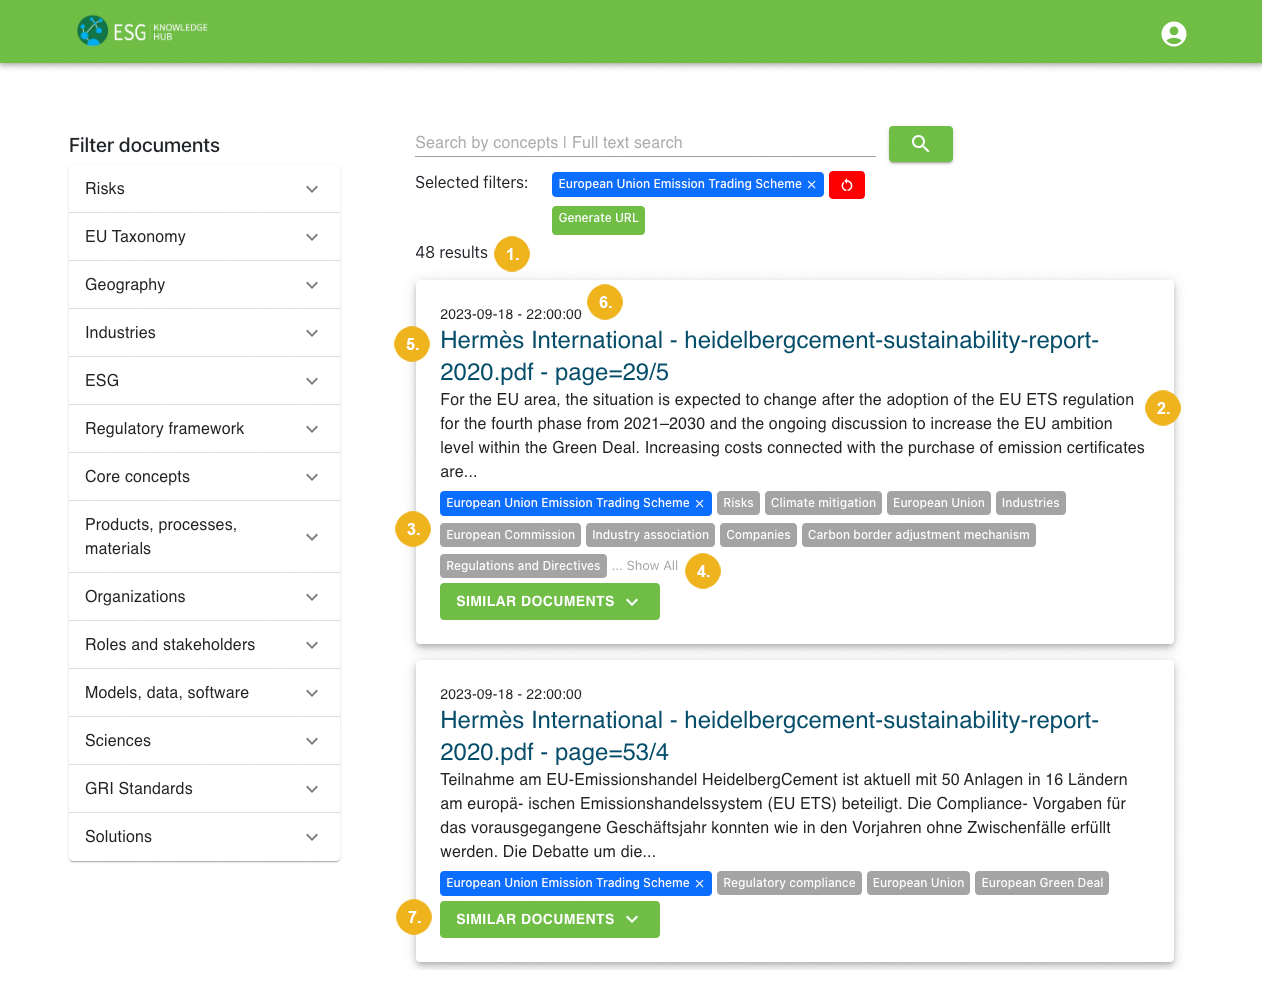
Show results count (1) – Activate this option to add a count of search results above the results list.
Length of the excerpt (2) – Type in the maximum number of characters you want to display in the excerpt for each search result.
Show tags (3) – Activate this option to display the concepts which the search results have been tagged with.
Show results as images – Activate this option to show search results as images on the Search View.
Number of tags (4) – Type in the maximum number of tags you want to display. If the number of tags exceeds this number, the user can click the Show All link to display all tags. Leave empty to display all tags per default.
Title action (5) – Select the action that will be triggered when the user clicks the title of the document on the Search View. The possible options are:
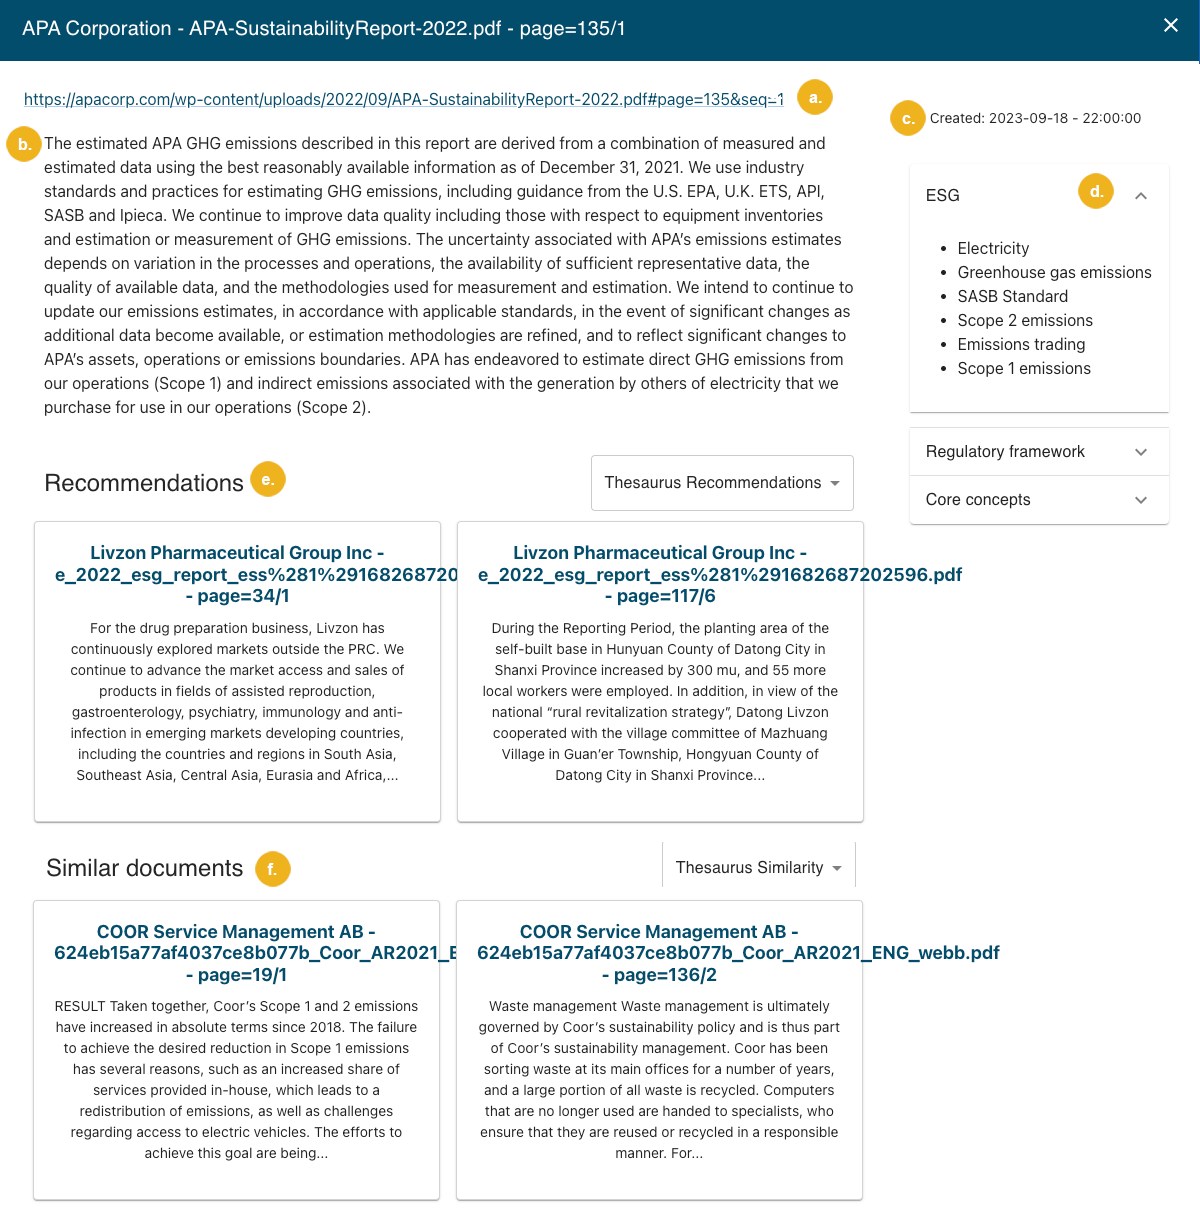
Open Details View – Opens a new dialog box with the following details:
a link to the original resource (a)
an excerpt from the document (b)
a timestamp when the document was created (c)
a list of concepts the document has been tagged with (d)
(if enabled) a list of recommended documents as text or images (e)
(if enabled) a list of similar documents as text or images (f)
Link to the original resource – Opens a new browser tab with the document.
Date format (6) – Select the format to display the timestamp when the document was created. The possible options are:
Short (
YYYY-MM-DD) – year-month-dayMedium (
YYYY-MM-DDThh:mm:ss) – year-month-day hour-minute-secondLong (
YYYY-MM-DDThh:mm:ssZ) – year-month-day hour-minute-second timezone
Show similar documents (7) – Select this option to display the Similar documents button in the Search View.
Number of similar documents – Type in the maximum number of similar documents you want to display when the user clicks the Similar Documents button.
Example configuration of the main user interface
The Filter settings control the display of search facets coming from the taxonomies connected in GraphSearch.
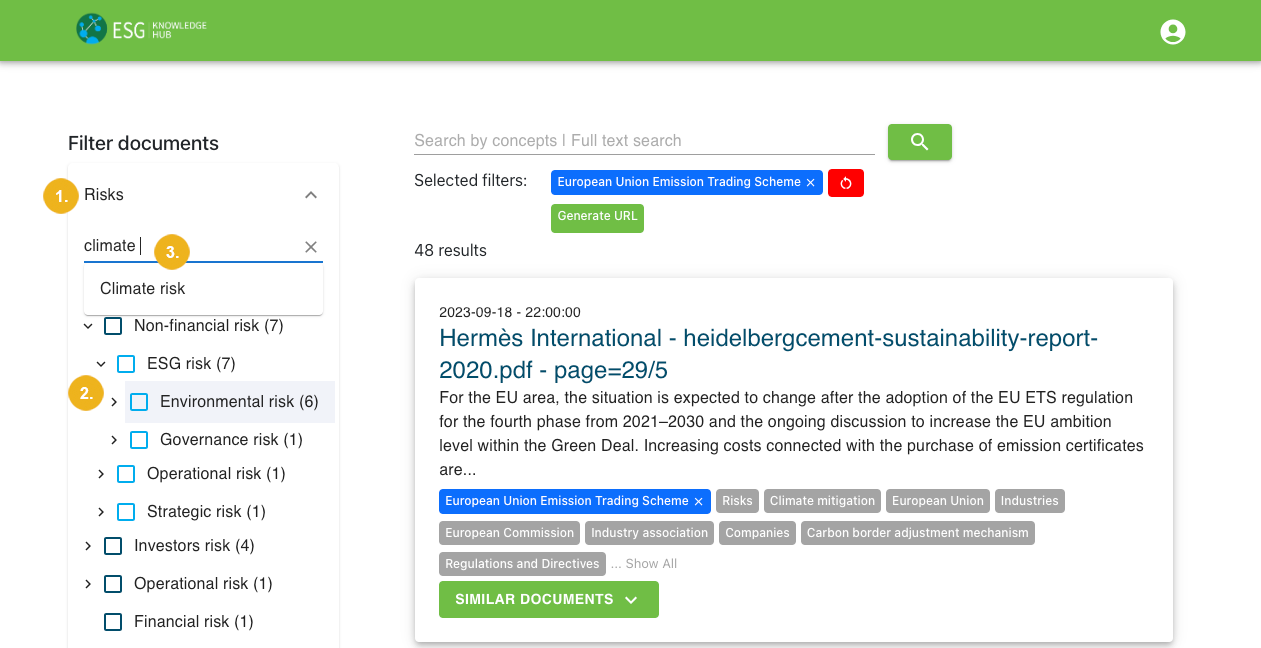
Name (1) – Type in the name of the facet that will appear on the Search View. The fields are pre-filled with concept schemes from the connected taxonomies.
Caution
The name must be unique.
Tip
If you rename the facet, you can still find the name of the concept scheme on the border of the text field where you are typing.
Show – Select this option to display the facet on the Search View.
Facet mode (2) – Select how the concepts of the facet will be displayed. The possible options are:
Flat list – Displays concepts without any hierarchical order.
Top concepts – Only displays top concepts.
Tree view – Displays concepts as they are hierarchically ordered in the taxonomy.
Hierarchical depth of tree – Only available for tree view. Type in the maximum number of child concepts to display.
Sort by – Select how concepts of the facet will be ordered. The possible options are:
Result count – From the concept with the highest number of search results to the concept with the lowest number of search results or reversed.
Alphabetically – From the concept with a label starting with the first letter of the alphabet to the concept with a label starting with the last letter of the alphabet or reversed.
Numerically – From the concept with a label starting with the lowest number to the concept with a label starting with the highest number or reversed.
Sort order – Select if concepts of the facet should be ordered in ascending or descending order.
Number of terms – Type in the maximum number of concepts to display for the facet.
Searchable (3) – Activate this option to display a search box inside the facet.
Hide empty facets – Activate this option to hide facets without any documents. If not hidden they will be shown grayed out.
Tip
To reorder the facets, drag them by the square icon.
Example configuration of the main user interface
The Layout settings allow you to customize the logo and the color scheme of the application.
Main highlight color (1) – Select the color for table headers, document titles, selected concepts and URLs in all views.
Action button color (2) – Select the color for the following action buttons: Search, Generate URL, Similar Documents.
Critical action button color (3) – Select the color for the critical action buttons Delete and Reset.
Top navigation (4) – Select the color for the application header.
Facets color (5) – Select the color for the facets box on the left side of the Search View as well as in the Details View.
Documents in Search View (6) – Select the color for the documents box on the Search View.
URL to your logo (7) – Paste in a URL to display a custom logo in the top left corner of the application or leave this box empty to use the default PoolParty logo.
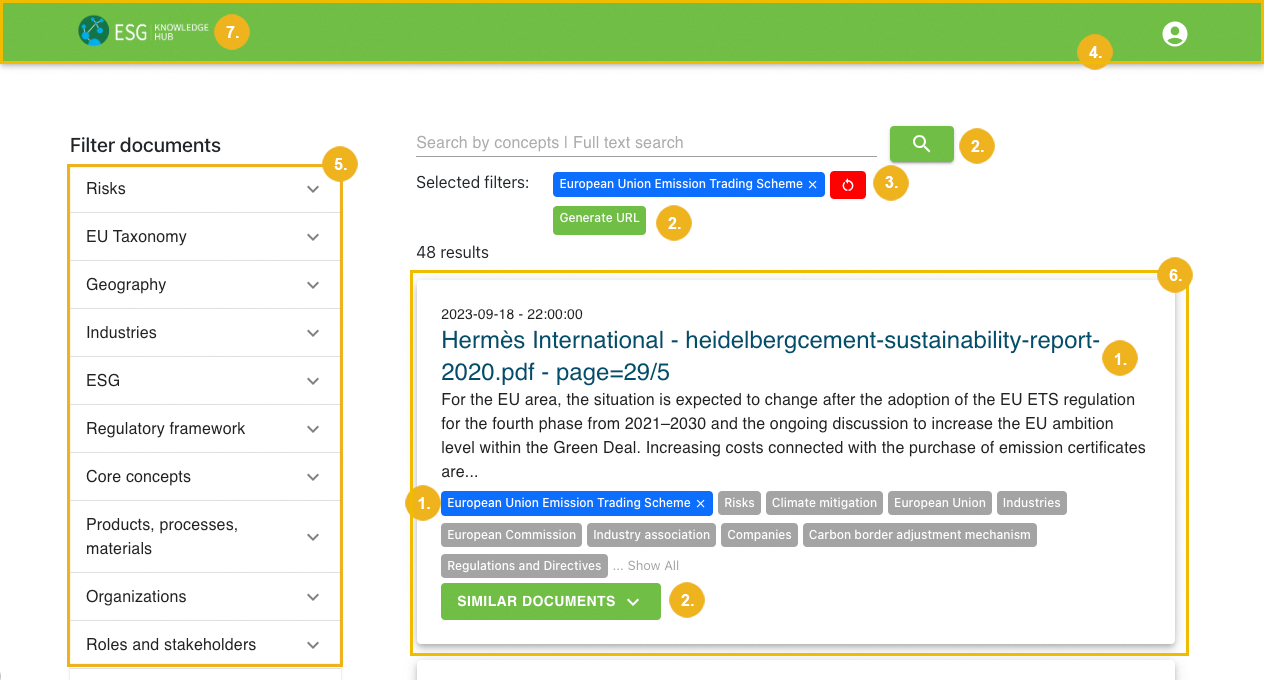
Example configuration of the main user interface
The Details View settings determine how facets, recommended and similar documents are displayed on the Details View of a search result. If enabled (Result settings > Title action), the Details View opens when the user clicks the title of a document returned by search.
Title (1) – If the search result has been tagged with concepts from this concept scheme, type in the name under which the tags should be listed on its Details View.
Show – Select this option to display tags from this concept scheme on the Details View of a search result.
Show document recommendations (2) – Activate this option to show a list of recommended documents on the Details View of a search result. Depending on the settings, the recommended documents can be displayed as text or images.
Number of recommendations – Type in the maximum number of recommended documents you want to display on the Details View of a search result.
Show recommended documents as images – Activate this option to show recommended documents as images instead of text on the Details View.
Show similar documents (3) – Activate this option to display a list of similar documents in the Details View of a search result. Depending on the settings, the similar documents can be displayed as text or images.
Number of similar documents – Type in the maximum number of similar documents you want to display on the Details View of a search result.
Show similar documents as images – Activate this option to show similar documents as images on the Details View.
Show concept highlighting (4) – Activate this option to highlight concepts found in the document excerpt. After the user selects a highlighted concept, a new dialog opens and they can see the concept's definition, alternative labels and broader concepts. This feature is only available to logged in users.
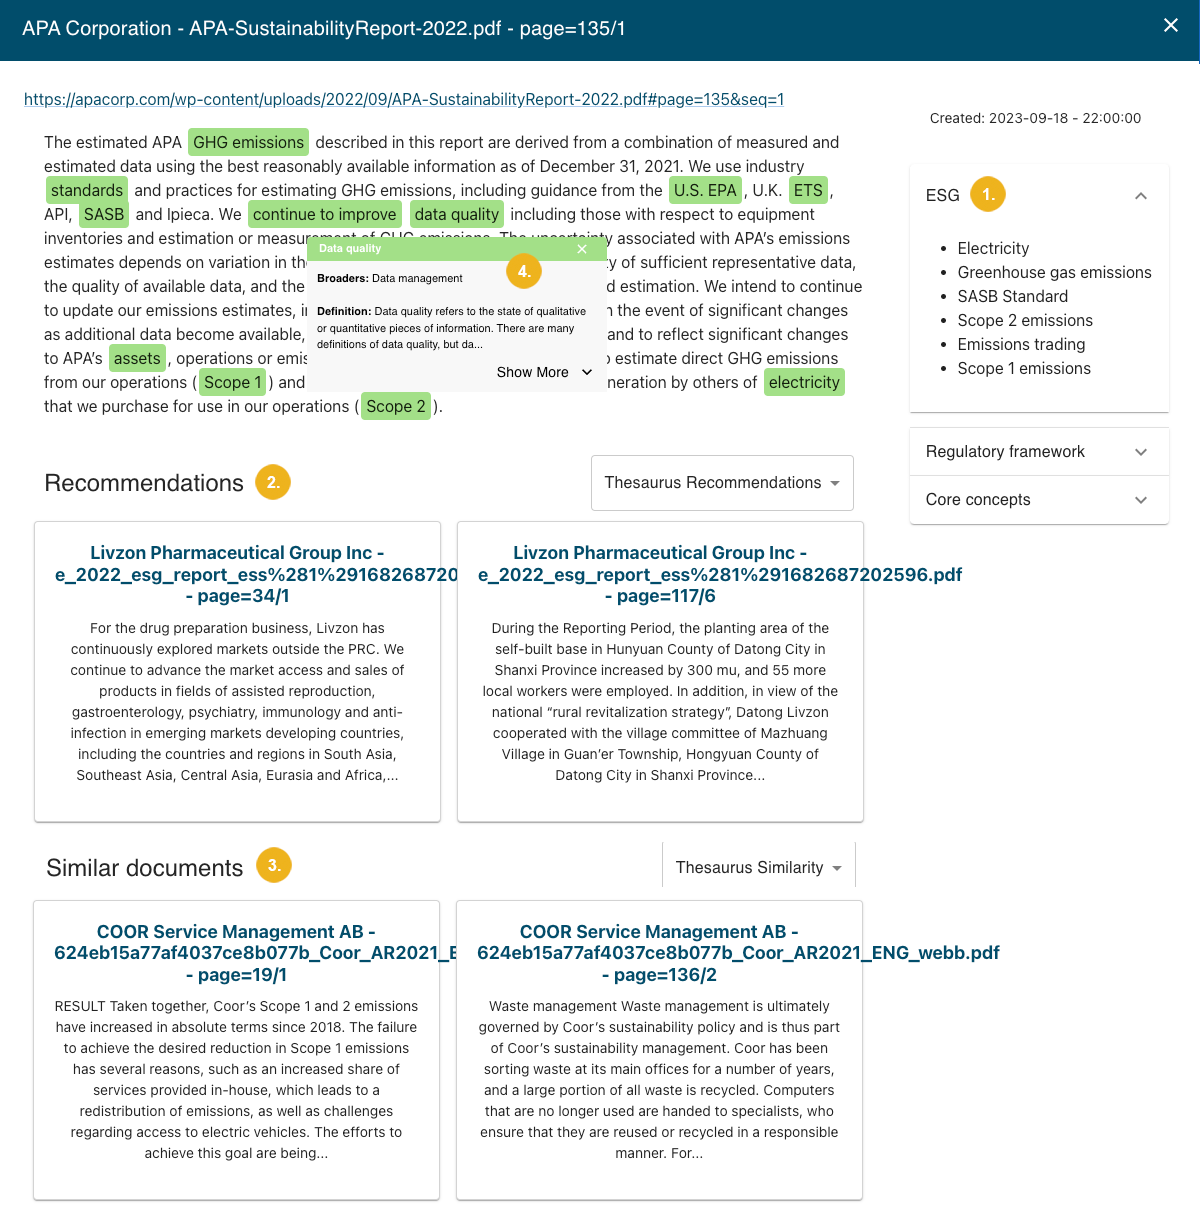
Example configuration of the main user interface
Confirm with Save.