Installation Guide (Linux)
Introduction
Make sure that you have followed the prerequisites defined in the PoolParty System Requirements.
Keycloak
PoolParty comes with Keycloak as an authentication and authorization service. A relational database is recommended to run Keycloak. Keycloak comes with H2 as an embedded database.
Important
In accordance with the Keycloak documentation, we recommend using a proper database service instead of the default database Keycloak comes with. For more information on how to migrate to a proper database service, refer to Migrate a Keycloak Embedded Database to a Database Service (Linux).
Prerequisites
To install PoolParty on Linux you need to:
Have a valid PoolParty licence.
Install OpenJDK.
Run a 64-bit Linux server.
Download the PoolParty installer (
PoolParty.run) from our download area and turn it into an executable (chmod) file.Properly set up JAVA_HOME.
Define a user (for example 'poolparty') on the server assigned to a respective group (for example 'poolparty') that should be used to run the Tomcat server.
Note
PoolParty Tomcat will be running as localhost using port 8081.
PoolParty Keycloak will be running as localhost using port 8181.
PoolParty's built in Apache Solr server will be running as localhost using port 8983.
Note
We recommend running the installation for users who have root privileges.
Installation Procedure
STEP 1: Run the Installer PoolParty.run from a Terminal Window
Here is a screenshot of the full installation routine:
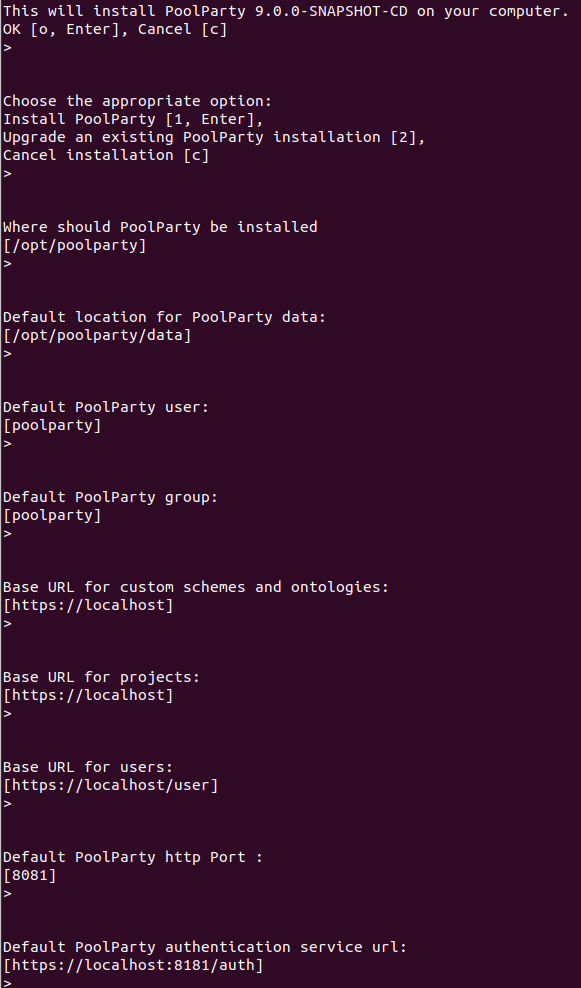
STEP 2: Start Installation Mode
In the next step start a new installation by pressing Enter.
STEP 3: Check and Adjust the PoolParty Application Directory (PPAppDir) and the Location for the PoolParty Data Directory (PPDataDir)
In this step you can define the path for your PoolParty Directory Structure Linux. It is by default /opt/poolparty.
Enter the path you want to use or press Enter to use the default path.
In addition, you can define the path for your PoolParty data directory. It is by default /opt/poolparty/data.
Enter the path you want to use or press Enter to use the default path.
STEP 4: Define User and Group
In this step define the user that owns the installation directory. It is by default poolparty.
Enter the user you want to use or press Enter to use the default user.
In addition, you can define the group that will be used running the PoolParty application. It is by default: poolparty .
Enter the name of the user group you want to use or press Enter to use the default group. The group you enter will be created if it doesn't exist.
STEP 5: Adapt Base URIs
In this step you can define the base URIs used in PoolParty per default to create projects, ontologies and custom schemes or users.
Note
We recommend adapting the <baseURI> to meaningful values according to the URI Pattern Strategy Planning when you want to use it for creating data in PoolParty. Changing them later might imply changes in the already created data.
Firstly, you have to define the <baseURI> for custom schemes and ontologies. It is by default http://localhost.
Enter the <baseURI> you want to use or press Enter to use the default <baseURI>.
Secondly, you have to define the <baseURI> for projects. The default http://localhost.
Enter the <baseURI> you want to use or press Enter to use the default baseURI.
Finally, you have to define the <baseURI> for the users. The default is http://localhost/user.
Enter the <baseURI> you want to use or press Enter to use the default <baseURI>.
Enter the Servlet PoolParty http port. The default is 8081.
Enter PoolParty authentication service URI. The default is https://localhost:8181/auth.
Tip
The respective variables are set in the The poolparty.properties File and you can change them at a later time if needed.
STEP 6: Finalize the Installation
You get an overview of the settings you have made. Press Enter to finish the installation.
You will be presented with the credentials for the The Tomcat Web Application Manager and additional information regarding the installation process.
STEP 7: Move Your License Keys to the License Directory
Add your license keys to the license directory <PPAppDir>/config/licenses .
The default is /opt/poolparty/config/licenses.
STEP 8: Start PoolParty
Open a console and change to the root directory using the following command.
sudo -i
Make PoolParty's infrastructure scripts and binaries executable using the following command.
chmod a+x /opt/poolparty/bin/*
<PPAppDir>/bin/poolparty start
Note
The PoolParty start script will also start and stop the packaged Solr server.
It may be possible that you need to specifically declare your JAVA_HOME, this can be configured in the\ poolparty.conf file. Similar to what you find in The poolparty.conf File (Linux)
If you are explicitly declaring your JAVA_HOME path as above, then you are able to do this for Solr as well. This can be set in <PPAppDir>/data/solr/solrcore.properties. Simply add the same JAVA_HOME line as you have done in poolparty.conf.
Post Installation Tasks
Open a browser and access your PoolParty installation under http://localhost:8081/PoolParty.
The following chapters in the Administrator Guide are relevant too: